分類
發燒車訊

北汽新能源獲得首張純電動車生產資質牌照

經過了一系列審核後,國家發改委於3月23日發佈了關於“北京新能源汽車股份有限公司純電動乘用車建設項目核准的批復”。

這是《新建純電動乘用車企業管理規定》自2015年7月1日開始實施後,國家發改委批復的第一個純電動乘用車生產資質。

根據《規定》要求,發改委審批之後,獲批企業還要通過工信部《乘用車生產企業及產品准入管理規則》和《新能源汽車生產企業及產品准入管理規則》的考核,列入《車輛生產企業及產品公告》。完成這一步即是正式獲得了純電動汽車的生產資質。

在發改委對北汽新能源批復內容中顯示,此次批復專案為兩部分:一是位於北京采育的2萬輛產能基地,一是位於青島萊西的5萬輛產能基地。投資金額共計11.49億元,目前這兩個建設專案均已建設完成並投入運營。

按照《新建純電動乘用車企業管理規定》要求,申請對象為純電動乘用車生產企業,不能生產任何以內燃機為驅動動力的汽車產品。這意味著北汽新能源將徹底放棄插電式混合動力路線。但規定中稱,純電動乘用車包含增程式(具備外接充電功能的串聯式混合動力)乘用車。

目前,北汽新能源正在謀求獨立上市。在拿到了第一張純電動乘用車生產牌照後,將對其上市進程起到推動作用。

本站聲明:網站內容來源於EnergyTrend https://www.energytrend.com.tw/ev/,如有侵權,請聯繫我們,我們將及時處理

【其他文章推薦】

網頁設計公司推薦更多不同的設計風格,搶佔消費者視覺第一線

※廣告預算用在刀口上,網站設計公司幫您達到更多曝光效益

※自行創業 缺乏曝光? 下一步"網站設計"幫您第一時間規劃公司的門面形象

台灣寄大陸海運貨物規則及重量限制?

大陸寄台灣海運費用試算一覽表

台中搬家,彰化搬家,南投搬家前需注意的眉眉角角,別等搬了再說!

分類
發燒車訊

千萬數據量數據表分表實踐

需求

  • 對平均 1200w 數據量的數據表進行優化
  • 數據表中有 2016年,2017 年,2018 年,2019 年數據
  • 只查詢最近半年的數據
  • 後台增加歷史數據查詢功能
  • 盡量減少代碼改動

數據表

  • 積分日誌表 tb_user_points_log
  • 虛擬充值表 tb_order_recharge
  • 虛擬充值執行表 tb_order_recharge_do

注意

先備份數據,在備份的數據表的基礎上進行分表,不直接操作原始表!

步驟

將源數據表備份一份,依次將對應年份的數據歸檔,每成功歸檔一次,就將備份數據表中對應數據刪除(目的減少查詢數據量),最後根據備份表最小 ID,刪除源數據表 小於 ID 的所有數據。

該步驟可以直接通過 SQL 執行,也可通過腳本執行。

腳本執行

刪除源數據表數據操作,建議通過手動執行 SQL完成,其他操作通過腳本執行

以積分日誌表 tb_user_points_log 為例

方式一、手動執行SQL

  1. 備份 tb_user_points_log 得到 tb_user_points_copy

    2016年數據歸檔

  2. 將數據表 tb_user_points_copy 2016 年的數據歸檔存入 2016 年數據表 tb_user_points_log_2016

    CREATE TABLE tb_user_points_log_2016 LIKE tb_user_points_log_copy;
    INSERT INTO tb_user_points_log_2016 SELECT * FROM tb_user_points_log_copy WHERE add_time < 1483200000;
    
  3. 對比數量

    SELECT COUNT(id) FROM tb_user_points_log_2016;
    SELECT COUNT(id) FROM tb_user_points_log_copy WHERE add_time < 1483200000;
    
  4. 一致則刪除 tb_user_points_copy 的 2016 年數據

    DELETE FROM tb_user_points_log_copy WHERE add_time < 1483200000;
    

    2017年數據歸檔

  5. 將數據表 tb_user_points_copy 2017 年的數據歸檔存入 2017 年數據表 tb_user_points_log_2017

    CREATE TABLE tb_user_points_log_2017 LIKE tb_user_points_log_copy;
    INSERT INTO tb_user_points_log_2017 SELECT * FROM tb_user_points_log_copy WHERE add_time < 1514736000;
    
  6. 對比數量

    SELECT COUNT(id) FROM tb_user_points_log_2017;
    SELECT COUNT(id) FROM tb_user_points_log_copy WHERE add_time < 1514736000;
    
  7. 一致則刪除 tb_user_points_copy 的 2017 年數據

    DELETE FROM tb_user_points_log_copy WHERE add_time < 1514736000;
    

    2018年數據歸檔

  8. 將數據表 tb_user_points_copy 2018 年的數據歸檔存入 2018 年數據表 tb_user_points_log_2018

    CREATE TABLE tb_user_points_log_2018 LIKE tb_user_points_log_copy;
    INSERT INTO tb_user_points_log_2018 SELECT * FROM tb_user_points_log_copy WHERE add_time < 1546272000;
    
  9. 對比數量

    SELECT COUNT(id) FROM tb_user_points_log_2018;
    SELECT COUNT(id) FROM tb_user_points_log_copy WHERE add_time < 1546272000;
    
  10. 一致則刪除 tb_user_points_copy 的 2018 年數據

    DELETE FROM tb_user_points_copy WHERE add_time < 1546272000;
    

    2019年數據歸檔

  11. 現在是 11 月,將 5 月之前的數據歸檔

    CREATE TABLE tb_user_points_log_2019 LIKE tb_user_points_log_copy;
    INSERT INTO tb_user_points_log_2019 SELECT * FROM tb_user_points_log_copy WHERE add_time < 1556640000;
    
  12. 對比數量

    SELECT COUNT(id) FROM tb_user_points_log_2019;
    SELECT COUNT(id) FROM tb_user_points_log_copy WHERE add_time < 1556640000;
    
  13. 一致則刪除 tb_user_points_copy 的 2019 年 5 月之前的數據

    DELETE FROM tb_user_points_log_copy WHERE add_time < 1556640000;
    

    刪除原始數據

  14. 根據最小 tb_user_points_copy 的最小 ID,刪除原始表 小於 ID 的所有數據

    DELETE FROM tb_user_points_log WHERE id < (SELECT id FROM tb_user_points_log_copy ORDER BY id asc LIMIT 1);
    
  15. 刪除臨時表

    DELETE FROM tb_user_points_log_copy;
    
  16. 數據表分表完成!

  17. 增量歸檔

    每日凌晨,執行腳本將最近半年之前的數據歸檔

方式二、腳本執行

<?php
/**
 * Description: 將6個月前數據歸檔
 */

namespace wladmin\cmd;


use think\console\Command;
use think\console\Input;
use think\console\Output;
use think\Db;

class DataArchiving extends Command
{
    protected function configure()
    {
        $this->setName('DataArchiving')->setDescription('將6個月前數據歸檔');
    }

    /**
     * 將6個月前數據歸檔
     * php think DataArchiving
     * @param Input $input
     * @param Output $output
     *
     * @return int|void|null
     */
    protected function execute(Input $input, Output $output)
    {
        try {
            $this->archiveData('tb_user_points_log', 'id', 'add_time');
            $this->archiveData('tb_order_recharge', 'or_id', 'create_time');
            $this->archiveData('tb_order_recharge_do', 'ord_id', 'create_time');
            echo '歸檔完成';
        } catch (\Exception $e) {
            mylog($e->getMessage(),'歸檔發生錯誤:'.PHP_EOL);
        }
    }
  
         /**
     * 歸檔數據表
     * @param string $sourceTable 源數據表名
     * @param string $primaryKey 主鍵名
     * @param string $timeKey 時間鍵名
     *
     * @author Dong.cx 2019-11-18 18:05
     * @version V4.0.1
     */
    private function archiveData($sourceTable, $primaryKey, $timeKey)
    {
        try {
            date_default_timezone_set('PRC');
            // 1.複製源數據表
            $copyTable = $sourceTable . '_copy';
            $isExist = $this->tableExist($copyTable, $sourceTable);
            if (!$isExist) {
                echo "開始複製源數據表{$copyTable}" . PHP_EOL;
                $archivingTimeLine = time();
                $sql = "INSERT IGNORE INTO {$copyTable} SELECT * FROM {$sourceTable} WHERE {$timeKey} < {$archivingTimeLine}";
                Db::execute($sql);
                echo "複製源數據表{$copyTable}完成" . PHP_EOL;
            }
            echo "{$copyTable} 開始歸檔" . PHP_EOL;
            // 歸檔
            $this->archive(2016, $sourceTable, $primaryKey, $timeKey);
            $this->archive(2017, $sourceTable, $primaryKey, $timeKey);
            $this->archive(2018, $sourceTable, $primaryKey, $timeKey);
            $this->archive(2019, $sourceTable, $primaryKey, $timeKey);
            echo "{$copyTable} 歸檔完成";

        } catch (\Exception $e) {
            echo '歸檔發生錯誤:' . $e->getMessage() .PHP_EOL;
        }
    }

    /**
     * 歸檔操作
     * @param int $year 年份
     * @param string $sourceTable 源數據表名
     * @param string $primaryKey 主鍵名
     * @param string $timeKey 時間鍵名
     *
     * @return bool
     * @throws \Exception
     * @author Dong.cx 2019-11-18 18:12
     * @version V4.0.1
     */
    private function archive($year, $sourceTable, $primaryKey, $timeKey)
    {
        try {
            $copyTable = $sourceTable . '_copy';
            echo "{$copyTable} 開始歸檔{$year}年數據--->" . PHP_EOL;
            if ($year == date('Y')) {
                // 注意現在是 11月份,可以簡單這樣寫,如果是小於6月,則要相應修改
                $archivingTimeLine = strtotime('-6 month', strtotime('today'));
            } else {
                $archivingTimeLine = mktime(0,0,0,1,1,$year+1);
            }

            $sql = "SELECT COUNT({$primaryKey}) as num FROM {$copyTable} WHERE {$timeKey} < {$archivingTimeLine}";
            $res = Db::query($sql);
            if (!$res || !$res[0]['num']) {
                echo "{$copyTable} {$year}年數據歸檔完成,未查詢到需要歸檔的數據" . PHP_EOL;
                return true;
            }

            // 需歸檔數量
            $targetNum = $res[0]['num'];
            // 歸檔表名
            $tableArchivingName = $sourceTable . '_' . $year;
            $this->tableExist($tableArchivingName, $sourceTable);

            // 分批歸檔
            $this->archivingBatch($tableArchivingName, $copyTable, $primaryKey,$timeKey, $archivingTimeLine, $year, $targetNum);

            return true;
        } catch (\Exception $e) {
            throw $e;
        }
    }

    /**
     * 分批歸檔
     * @param string $tableArchivingName 歸檔表名稱
     * @param string $copyTable 複製表名
     * @param string $primaryKey 主鍵名
     * @param string $timeKey 時間鍵
     * @param int $archivingTimeLine 歸檔時間線
     * @param string $year 歸檔年
     * @param int $targetNum 需歸檔的數據量
     *
     * @throws \Exception
     * @author Dong.cx 2019-11-19 13:10
     * @version V4.0.1
     */
    private function archivingBatch($tableArchivingName, $copyTable, $primaryKey,$timeKey, $archivingTimeLine, $year, $targetNum)
    {
        // 歸檔表起始ID
        $res = Db::query("SELECT {$primaryKey} FROM {$tableArchivingName} ORDER BY {$primaryKey} DESC LIMIT 1");
        $startID = $res ? $res[0][$primaryKey] : 0;

        $totalDelNum = 0;
        $batchNum = 10000;
        $taskNum = ceil($targetNum/$batchNum);
        $minID = Db::query("SELECT {$primaryKey} FROM {$copyTable} ORDER BY {$primaryKey} ASC LIMIT 1");
        if (!$minID) throw new \Exception('$minID為空!');
        $minID = $minID[0][$primaryKey];
        $maxID = Db::query("SELECT {$primaryKey} FROM {$copyTable} WHERE {$timeKey} < {$archivingTimeLine} ORDER BY {$primaryKey} DESC LIMIT 1");
        if (!$maxID) throw new \Exception('$max 為空!');
        $maxID = $maxID ? $maxID[0][$primaryKey] : 0;

        for ($i = 1; $i <= $taskNum; $i++) {
            if ($i == $taskNum) {
                // 歸檔
                $sql = "INSERT IGNORE INTO {$tableArchivingName} SELECT * FROM {$copyTable} WHERE {$primaryKey} <= {$maxID} AND {$timeKey} < {$archivingTimeLine}";
                Db::execute($sql);
                // 刪除
                $sql = "DELETE FROM {$copyTable} WHERE {$primaryKey} <= {$maxID} AND {$timeKey} < {$archivingTimeLine}";
                $totalDelNum += Db::execute($sql);
            } else {
                $end = $minID + $i * $batchNum;
                // 歸檔
                $sql = "INSERT IGNORE INTO {$tableArchivingName} SELECT * FROM {$copyTable} WHERE {$primaryKey} <= {$end} AND {$timeKey} < {$archivingTimeLine}";
                Db::execute($sql);
                // 刪除
                $sql = "DELETE FROM {$copyTable} WHERE {$primaryKey} <= {$end} AND {$timeKey} < {$archivingTimeLine}";
                $totalDelNum += Db::execute($sql);
            }
        }
        // 成功歸檔數據量
        $num = Db::query("SELECT COUNT({$primaryKey}) as num FROM {$tableArchivingName} WHERE {$primaryKey} > {$startID}")[0]['num'];
        if ($targetNum != $num) throw new \Exception("歸檔數據不一致,過期數據量{$targetNum},歸檔量{$num},刪除量{$totalDelNum}");
        if ($num != $totalDelNum) throw new \Exception("刪除數據不一致,歸檔量{$num},刪除量{$totalDelNum}");

        echo "{$copyTable} {$year}年數據歸檔完成,過期數據量{$targetNum},歸檔量{$num},刪除量{$totalDelNum}" . PHP_EOL;
        
        // 刪除源數據表數據
        //echo "開始刪除源數據表 {$sourceTable}已歸檔數據" . PHP_EOL;    
        //$num = Db::execute("DELETE FROM {$sourceTable} WHERE {$primaryKey} < (SELECT id FROM {$copyTable} ORDER BY {$primaryKey} asc LIMIT 1)");
       //echo "源數據表 {$sourceTable}已歸檔數據刪除完成,刪除數據量{$num}" . PHP_EOL; 
      
        //echo "開始刪除臨時表 {$copyTable}" . PHP_EOL;    
        // 刪除臨時表
        //Db::execute("DELETE FROM {$copyTable}");
        //echo "臨時表{$copyTable}刪除完成" . PHP_EOL;
    }

最後由於是要刪除源數據表,屬於敏感操作,(腳本最後註釋部分) 建議再複查一次數據歸檔正確性,確認無誤后,手動執行 SQL操作。

DELETE FROM {$sourceTable} WHERE {$primaryKey} < (SELECT {$primaryKey} FROM {$copyTable} ORDER BY {$primaryKey} asc LIMIT 1;
DELETE FROM {$copyTable};

增量歸檔腳本

<?php
/**
 * Description: 將6個月前數據歸檔
 */

namespace wladmin\cmd;


use think\console\Command;
use think\console\Input;
use think\console\Output;
use think\Db;

class DataArchiving extends Command
{
    protected function configure()
    {
        $this->setName('DataArchiving')->setDescription('將6個月前數據歸檔');
    }

    /**
     * 將6個月前數據歸檔
     * php think DataArchiving
     * @param Input $input
     * @param Output $output
     *
     * @return int|void|null
     */
    protected function execute(Input $input, Output $output)
    {
        try {
            $this->archiveDataEveryDay('tb_user_points_log', 'id', 'add_time');
            $this->archiveDataEveryDay('tb_order_recharge', 'or_id', 'create_time');
            $this->archiveDataEveryDay('tb_order_recharge_do', 'ord_id', 'create_time');
            echo '歸檔完成';
        } catch (\Exception $e) {
            mylog($e->getMessage(),'歸檔發生錯誤:'.PHP_EOL);
        }
    }

    /**
     * 歸檔數據
     * @param string $sourceTable 源數據表名
     * @param string $primaryKey 源數據表主鍵名
     * @param string $timeKey 時間控制鍵名
     *
     * @return bool
     * @throws \Exception
     * @author Dong.cx 2019-11-15 18:36
     * @version V4.0.1
     */
    private function archiveDataEveryDay($sourceTable, $primaryKey, $timeKey)
    {
        try {
            //mylog("{$sourceTable} 開始歸檔".PHP_EOL);
            // 歸檔時間線
            $archivingTimeLine = strtotime('-6 month', strtotime('today'));
            // 歸檔表的年份
            $year = date('Y', $archivingTimeLine);
            // 歸檔表名
            $tableArchivingName = $sourceTable . '_' . $year;

            // 需要歸檔的數據量
            $sql = "SELECT COUNT({$primaryKey}) as num FROM {$sourceTable} WHERE {$timeKey} < {$archivingTimeLine}";
            $res = Db::query($sql);
            // 沒有需要歸檔的,直接返回
            if (!$res) {
                mylog("{$sourceTable} 歸檔完成,未查詢到需要歸檔的數據");
                return true;
            }
            $count = $res[0]['num'];

            // 檢測數據表是否存在,不存在則創建
            $this->tableExist($tableArchivingName, $sourceTable);
            $sql = "INSERT IGNORE INTO {$tableArchivingName} SELECT * FROM {$sourceTable} WHERE {$timeKey} < {$archivingTimeLine}";

            // 1.開始歸檔
            // 歸檔表起始ID
            $res = Db::query("SELECT {$primaryKey} FROM {$tableArchivingName} ORDER BY {$primaryKey} DESC LIMIT 1");
            $startID = $res ? $res[0][$primaryKey] : 0;
            Db::execute($sql);
            // 成功歸檔數據量
            $num = Db::query("SELECT COUNT({$primaryKey}) as num FROM {$tableArchivingName} WHERE {$primaryKey} > {$startID}")[0]['num'];
            if ($count != $num) throw new \Exception("歸檔數據不一致,過期數據量{$count},歸檔量{$num}");
            $lastID = Db::query("SELECT {$primaryKey} FROM {$tableArchivingName} ORDER BY {$primaryKey} DESC LIMIT 1")[0][$primaryKey];

            // 2.刪除源數據
            $sql = "DELETE FROM {$sourceTable} WHERE {$primaryKey} <= {$lastID}  AND {$timeKey} < {$archivingTimeLine}";
            $delNum = Db::execute($sql);
            if ($delNum != $count) throw new \Exception("刪除數據不一致,過期數據量{$count},刪除量{$delNum}");
            //mylog("{$sourceTable} 歸檔完成,過期數據量{$count},歸檔量{$count},刪除量{$delNum}" . PHP_EOL);
            return true;
        } catch (\Exception $e) {
            Db::rollback();
            throw $e;
        }
    }

    /**
     * 檢測數據表是否存在,不存在則創建
     * @param $table
     * @param $likeTable
     */
    private function tableExist($table, $likeTable)
    {
        $sql = "SHOW TABLES LIKE '{$table}'";
        $isExist = Db::query($sql);

        if (!$isExist) {
            Db::execute("CREATE TABLE {$table} LIKE {$likeTable}");
        }
    }
}

歷史數據查詢

在數據訪問層中根據需要查詢時間 動態修改數據表名即可

這裏使用的是 thinkphp Query 類中的 setTable()getTable()

 if (isset($params['history']) && !empty($params['history'])) {
            $this->model()->setTable($this->model()->getTable().'_'.$params['history']);
        }

遇到的問題

  • 開發中,曾嘗試使用事務控制,數據量太多會導致提交過慢,因此使用邏輯控制
  • DB 一次性執行100多w刪除操作后,發現程序不繼續向下執行,未找到原因,因此將數據分批進行處理,但是分批可能存在問題,因為主鍵可能不是連續的,如果間隔不大的話,影響不大。

本站聲明:網站內容來源於博客園,如有侵權,請聯繫我們,我們將及時處理

【其他文章推薦】

※帶您來了解什麼是 USB CONNECTOR  ?

※自行創業 缺乏曝光? 下一步”網站設計“幫您第一時間規劃公司的門面形象

※如何讓商品強力曝光呢? 網頁設計公司幫您建置最吸引人的網站,提高曝光率!!

※綠能、環保無空污,成為電動車最新代名詞,目前市場使用率逐漸普及化

※廣告預算用在刀口上,網站設計公司幫您達到更多曝光效益

※試算大陸海運運費!

分類
發燒車訊

克羅埃西亞強震 鄰國斯洛維尼亞核電廠未受影響

摘錄自2020年3月22日聯合報報導

中歐國家克羅埃西亞今天(22日)上午遭遇規模5.3地震襲擊,鄰國斯洛維尼亞隨後表示,境內唯一一座位在克斯科(Krsko)的克斯科核電廠(NEK)並未受到影響。

克斯科核電廠是斯洛維尼亞(Slovenia)和克羅埃西亞共有。斯洛維尼亞核子安全局長塞奇(Igor Sirc)在地震後表示:「這座核電廠持續以全產能運作。」但當局已展開正常預防程序,對核電廠的系統與設備進行檢查

克羅埃西亞首都薩格勒布(Zagreb)北方發生規模5.3強震,引發人們奔逃上街,並造成建築物損害、車輛遭崩塌的瓦礫掩埋,還發生多起火警。

核能
災害
能源議題
土地水文
國際新聞
克羅埃西亞
斯洛維尼亞
地震
核電廠

本站聲明:網站內容來源環境資訊中心https://e-info.org.tw/,如有侵權,請聯繫我們,我們將及時處理

【其他文章推薦】

※帶您來了解什麼是 USB CONNECTOR  ?

※自行創業 缺乏曝光? 下一步”網站設計“幫您第一時間規劃公司的門面形象

※如何讓商品強力曝光呢? 網頁設計公司幫您建置最吸引人的網站,提高曝光率!!

※綠能、環保無空污,成為電動車最新代名詞,目前市場使用率逐漸普及化

※廣告預算用在刀口上,網站設計公司幫您達到更多曝光效益

※試算大陸海運運費!

分類
發燒車訊

東奧聖火抵日 傳遞即將開跑 福島飯館村去污後輻射仍超標

文:宋瑞文(媽媽監督核電廠聯盟特約撰述)

本站聲明:網站內容來源環境資訊中心https://e-info.org.tw/,如有侵權,請聯繫我們,我們將及時處理

【其他文章推薦】

網頁設計公司推薦更多不同的設計風格,搶佔消費者視覺第一線

※廣告預算用在刀口上,網站設計公司幫您達到更多曝光效益

※自行創業 缺乏曝光? 下一步"網站設計"幫您第一時間規劃公司的門面形象

台灣寄大陸海運貨物規則及重量限制?

大陸寄台灣海運費用試算一覽表

台中搬家,彰化搬家,南投搬家前需注意的眉眉角角,別等搬了再說!

分類
發燒車訊

福特計畫推出全新新能源車型 或將命名為Model E

據海外媒體報導稱福特計畫推出一款全新新能源車型,其很有可能會命名為Model E。

福特公司把這款Model E定位於一款緊湊車型,這款車會推出混動、插電式混動以及純電動版本,主要取代的是純電動版福克斯以及混動版和插電式混動版C-MAX。

另外,福特公司將會投資16億美元的資金,在墨西哥San Luis Potosi建設全新的工廠,並且這款Model E也將會在這座工廠生產。這款車將在2018年正式亮相,在2019年投放市場。

本站聲明:網站內容來源於EnergyTrend https://www.energytrend.com.tw/ev/,如有侵權,請聯繫我們,我們將及時處理

【其他文章推薦】

※帶您來了解什麼是 USB CONNECTOR  ?

※自行創業 缺乏曝光? 下一步”網站設計“幫您第一時間規劃公司的門面形象

※如何讓商品強力曝光呢? 網頁設計公司幫您建置最吸引人的網站,提高曝光率!!

※綠能、環保無空污,成為電動車最新代名詞,目前市場使用率逐漸普及化

※廣告預算用在刀口上,網站設計公司幫您達到更多曝光效益

※試算大陸海運運費!

分類
發燒車訊

低速電動車國家標準公開徵求意見

2016年4月14日,國家標準化管理委員會在其網站上對2016年第一批擬立項國家標準專案公開徵求意見。2016年第一批擬立項標準,《四輪低速電動乘用車技術條件》在列!

低速電動車是指行駛速度低、續駛里程短,電池、電機等關鍵部件技術水準較低的電動乘用車。因具有小型化、配置簡單、價格低廉等特點,低速電動車滿足了部分群眾,特別是低收入群體的交通出行需求,在部分中小城市迅速發展,並逐步向大城市蔓延。據統計,目前全國共有低速電動車生產企業超過100家,產能超過100萬輛,產業規模近年來持續快速增長。

但低速電動車存在一些突出問題:一是生產企業多為沒有汽車生產資質的中小規模企業,缺乏汽車研發生產所必備的設施條件,大多數產品不符合國家相關標準,沒有經過必要的實驗驗證,安全性能較差。二是駕駛人員大多未取得機動車駕駛證,安全意識差,違法行為多,駕車上路後給自身和其他車輛造成嚴重安全隱患。三是使用的鉛酸電池在回收、冶煉過程中環境污染較大,容易造成鉛污染,危害人體健康。四是大部分地方對低速電動車的生產、使用缺乏管理制度和措施,有些地方已出臺的使用、報廢等管理辦法不符合相關法律法規規定。為了保障行車安全、引導企業的正規生產,加強管理,需要制定本標準。


本站聲明:網站內容來源於EnergyTrend https://www.energytrend.com.tw/ev/,如有侵權,請聯繫我們,我們將及時處理

【其他文章推薦】

網頁設計公司推薦更多不同的設計風格,搶佔消費者視覺第一線

※廣告預算用在刀口上,網站設計公司幫您達到更多曝光效益

※自行創業 缺乏曝光? 下一步"網站設計"幫您第一時間規劃公司的門面形象

台灣寄大陸海運貨物規則及重量限制?

大陸寄台灣海運費用試算一覽表

台中搬家,彰化搬家,南投搬家前需注意的眉眉角角,別等搬了再說!

分類
發燒車訊

三菱汽車承認汽車油耗測試造假

據外媒報導,日商三菱汽車(Mitsubishi Motors)日前承認在汽車油耗測試中造假,涉及日本市場62.5萬輛汽車,包括日產汽車所供應的兩款車型。三菱汽車CEO相川哲郎為此在東京召開新聞發佈會,為公司不當行為致歉,並表示「感到羞恥。」

測試的車型包括四款三菱汽車製造的微型車,包括三菱品牌eK Wagon和eK Space,以及同日產汽車合作開發的DayZ和DayZ Roox。這類微型車搭載發動機排量均不超過660cc,屬於日本市場特有的 KeiCar。其中,以三菱品牌銷售的車輛為157,000輛,日產品牌車輛為468,000輛,總計約625,000輛。

根據三菱汽車方面的解釋,在測試中,車輛在輪胎和空氣阻力等方面進行舞弊,使得燃油經濟性測試結果好於真實情況,差距達到5%至10%左右。相川哲郎承認測試資料「蓄意為之」,存在誤導性。

三菱汽車表示,目前所有四款車型已經停止生產和銷售,此外也在調查作弊行為是否涉及海外車輛。公司暫時還無法估計舞弊醜聞對業務的影響。此外,三菱還表示,自從2002年以來公司所使用的續航里程測試方法便和日本國家標準並不吻合。

三菱曾表示將與日產合作開發電動車,也曾自行開發平價電動車款 i miev 。但並未引發熱烈的市場反應。

本站聲明:網站內容來源於EnergyTrend https://www.energytrend.com.tw/ev/,如有侵權,請聯繫我們,我們將及時處理

【其他文章推薦】

網頁設計公司推薦更多不同的設計風格,搶佔消費者視覺第一線

※廣告預算用在刀口上,網站設計公司幫您達到更多曝光效益

※自行創業 缺乏曝光? 下一步"網站設計"幫您第一時間規劃公司的門面形象

台灣寄大陸海運貨物規則及重量限制?

大陸寄台灣海運費用試算一覽表

台中搬家,彰化搬家,南投搬家前需注意的眉眉角角,別等搬了再說!

分類
發燒車訊

一分鐘帶你了解下Spring Security!

一、什麼是Spring Security?

Spring Security是一個功能強大且高度可定製的身份驗證和訪問控制框架,它是用於保護基於Spring的應用程序的實際標準。

Spring Security是一個框架,致力於為Java應用程序提供身份驗證和授權。與所有Spring項目一樣,Spring Security的真正強大之處在於可以輕鬆擴展以滿足自定義要求。

更多信息可以查看官網:https://spring.io/projects/spring-security

二、Spring Security的主要功能

  • 認證:驗證用戶名和密碼是否合法(是否系統中用戶)
  • 授權:是系統用戶不代表你能使用某些功能,因為你可能沒有權限
  • 防禦會話固定,點擊劫持,跨站點請求偽造等攻擊
  • Servlet API集成
  • 與Spring Web MVC的可選集成

三、快速入門

新建一個SpringBoot的web項目spring-boot-security。

案例1:接口不添加保護

pom文件中不引入Spring Security,然後新建一個controller:

@RestController
public class AppController {

    @GetMapping("/hello")
    public String hello() {
        return "Hello,spring security!";
    }
}

然後打開瀏覽器訪問:http://localhost:8080/hello,成功后返回:

Hello,spring security!

案例2:接口添加保護

  1. pom文件添加依賴

pom文件中引入Spring Security的starter:

<dependency>
            <groupId>org.springframework.boot</groupId>
            <artifactId>spring-boot-starter-security</artifactId>
        </dependency>
  1. 訪問接口

打開瀏覽器再次訪問http://localhost:8080/hello,會被重定向到登錄頁http://localhost:8080/login,截圖如下:

要登錄系統,我們需要知道用戶名和密碼,Spring Security默認的用戶名是user,項目啟動的時候會生成默認密碼(在啟動日誌中可以看到),輸入用戶名和密碼后就可以訪問/hello接口了。

當然也可以自定義用戶名密碼,在配置文件添加如下內容即可:

spring.security.user.name=java_suisui
spring.security.user.password=123456

四、自定義認證和授權

上面說過Spring Security的功能有“認證”和“授權”,下面通過一個簡單的例子實現下自定義的認證和授權。

假設系統中有兩個角色:

  • ADMIN 可以訪問/admin下的資源
  • USER 可以訪問/user下的資源

按照下面步驟操作即可。

  1. 新建一個配置類

對於用戶名、密碼、登錄頁面、訪問權限等都可以在 WebSecurityConfigurerAdapter 的實現類中配置。

WebSecurityConfig代碼如下:

/**
 * 配置類
 * @Author java_suisui
 *
 */
@EnableWebSecurity
@Configuration
public class WebSecurityConfig extends WebSecurityConfigurerAdapter {

    @Override
    protected void configure(AuthenticationManagerBuilder auth) throws Exception {
        //配置內存中的 用戶名、密碼和角色
        auth.inMemoryAuthentication().passwordEncoder(new MyPasswordEncoder()).withUser("user").password("123456").roles("USER");
        auth.inMemoryAuthentication().passwordEncoder(new MyPasswordEncoder()).withUser("admin").password("123456").roles("ADMIN");
    }

    @Override
    protected void configure(HttpSecurity http) throws Exception {
        http.authorizeRequests()
                .antMatchers("/login").permitAll()
                .antMatchers("/user").hasRole("USER") //訪問 /user這個接口,需要有USER角色
                .antMatchers("/admin").hasRole("ADMIN")
                .anyRequest().authenticated() //剩餘的其他接口,登錄之後就能訪問
                .and()
                .formLogin().defaultSuccessUrl("/hello");
    }
}
  1. 創建PasswordEncorder的實現類

內存用戶驗證時,Spring Boot 2.0以上版本引用的security 依賴是 spring security 5.X版本,此版本需要提供一個PasswordEncorder的實例。

MyPasswordEncoder代碼如下:

public class MyPasswordEncoder implements PasswordEncoder {
    @Override
    public String encode(CharSequence rawPassword) {
        return rawPassword.toString();
    }

    @Override
    public boolean matches(CharSequence rawPassword, String encodedPassword) {
        return encodedPassword.equals(rawPassword);
    }
}
  1. 登錄驗證

瀏覽器打開http://localhost:8080/login,

  • 使用user登錄,可以訪問/user
  • 使用admin登錄,可以訪問/admin

如果使用user登錄后訪問/admin,會報403錯誤,具體錯誤信息如下:

Whitelabel Error Page
This application has no explicit mapping for /error, so you are seeing this as a fallback.

Tue Nov 19 16:26:28 CST 2019
There was an unexpected error (type=Forbidden, status=403).
Forbidden

結果和我們預期的一致,說明簡單的自定義認證和授權功能已經實現了。

完整源碼地址:

推薦閱讀

Java碎碎念,一個堅持原創的公眾號,為您提供一系列系統架構、微服務、Java、SpringBoot、SpringCloud等高質量技術文章。
如果覺得文章不錯,希望可以隨手轉發或者”在看“哦,非常感謝哈!
關注下方公眾號后回復「1024」,有驚喜哦!

本文由博客一文多發平台 發布!

本站聲明:網站內容來源於博客園,如有侵權,請聯繫我們,我們將及時處理

【其他文章推薦】

※帶您來了解什麼是 USB CONNECTOR  ?

※自行創業 缺乏曝光? 下一步”網站設計“幫您第一時間規劃公司的門面形象

※如何讓商品強力曝光呢? 網頁設計公司幫您建置最吸引人的網站,提高曝光率!!

※綠能、環保無空污,成為電動車最新代名詞,目前市場使用率逐漸普及化

※廣告預算用在刀口上,網站設計公司幫您達到更多曝光效益

※試算大陸海運運費!

分類
發燒車訊

Feign 調用丟失Header的解決方案

問題

在 Spring Cloud 中 微服務之間的調用會用到Feign,但是在默認情況下,Feign 調用遠程服務存在Header請求頭丟失問題。

解決方案

首先需要寫一個 Feign請求攔截器,通過實現RequestInterceptor接口,完成對所有的Feign請求,傳遞請求頭和請求參數。

Feign 請求攔截器

public class FeignBasicAuthRequestInterceptor implements RequestInterceptor {

    private static final Logger logger = LoggerFactory.getLogger(FeignBasicAuthRequestInterceptor.class);

    @Override
    public void apply(RequestTemplate requestTemplate) {
        ServletRequestAttributes attributes = (ServletRequestAttributes) RequestContextHolder
                .getRequestAttributes();
        HttpServletRequest request = attributes.getRequest();
        Enumeration<String> headerNames = request.getHeaderNames();
        if (headerNames != null) {
            while (headerNames.hasMoreElements()) {
                String name = headerNames.nextElement();
                String values = request.getHeader(name);
                requestTemplate.header(name, values);
            }
        }
        Enumeration<String> bodyNames = request.getParameterNames();
        StringBuffer body =new StringBuffer();
        if (bodyNames != null) {
            while (bodyNames.hasMoreElements()) {
                String name = bodyNames.nextElement();
                String values = request.getParameter(name);
                body.append(name).append("=").append(values).append("&");
            }
        }
        if(body.length()!=0) {
            body.deleteCharAt(body.length()-1);
            requestTemplate.body(body.toString());
            logger.info("feign interceptor body:{}",body.toString());
        }
    }
}

通過配置文件配置 讓 所有 FeignClient,來使用 FeignBasicAuthRequestInterceptor

feign:
  client:
    config:
      default:
        connectTimeout: 5000
        readTimeout: 5000
        loggerLevel: basic
        requestInterceptors: com.leparts.config.FeignBasicAuthRequestInterceptor

也可以配置讓 某個 FeignClient 來使用這個 FeignBasicAuthRequestInterceptor

feign:
  client:
    config:
      xxxx: # 遠程服務名
        connectTimeout: 5000
        readTimeout: 5000
        loggerLevel: basic
        requestInterceptors: com.leparts.config.FeignBasicAuthRequestInterceptor

經過測試,上面的解決方案可以正常的使用;但是出現了新的問題。

在轉發Feign的請求頭的時候, 如果開啟了Hystrix, Hystrix的默認隔離策略是Thread(線程隔離策略), 因此轉發攔截器內是無法獲取到請求的請求頭信息的。

可以修改默認隔離策略為信號量模式:

hystrix.command.default.execution.isolation.strategy=SEMAPHORE

但信號量模式不是官方推薦的隔離策略;另一個解決方法就是自定義Hystrix的隔離策略。

自定義策略

HystrixConcurrencyStrategy 是提供給開發者去自定義hystrix內部線程池及其隊列,還提供了包裝callable的方法,以及傳遞上下文變量的方法。所以可以繼承了HystrixConcurrencyStrategy,用來實現了自己的併發策略。

@Component
public class FeignHystrixConcurrencyStrategy extends HystrixConcurrencyStrategy {

    private static final Logger log = LoggerFactory.getLogger(FeignHystrixConcurrencyStrategy.class);

    private HystrixConcurrencyStrategy delegate;

    public FeignHystrixConcurrencyStrategy() {
        try {
            this.delegate = HystrixPlugins.getInstance().getConcurrencyStrategy();
            if (this.delegate instanceof FeignHystrixConcurrencyStrategy) {
                // Welcome to singleton hell...
                return;
            }

            HystrixCommandExecutionHook commandExecutionHook =
                    HystrixPlugins.getInstance().getCommandExecutionHook();

            HystrixEventNotifier eventNotifier = HystrixPlugins.getInstance().getEventNotifier();
            HystrixMetricsPublisher metricsPublisher = HystrixPlugins.getInstance().getMetricsPublisher();
            HystrixPropertiesStrategy propertiesStrategy =
                    HystrixPlugins.getInstance().getPropertiesStrategy();
            this.logCurrentStateOfHystrixPlugins(eventNotifier, metricsPublisher, propertiesStrategy);

            HystrixPlugins.reset();
            HystrixPlugins instance = HystrixPlugins.getInstance();
            instance.registerConcurrencyStrategy(this);
            instance.registerCommandExecutionHook(commandExecutionHook);
            instance.registerEventNotifier(eventNotifier);
            instance.registerMetricsPublisher(metricsPublisher);
            instance.registerPropertiesStrategy(propertiesStrategy);
        } catch (Exception e) {
            log.error("Failed to register Sleuth Hystrix Concurrency Strategy", e);
        }
    }

    private void logCurrentStateOfHystrixPlugins(HystrixEventNotifier eventNotifier,
                                                 HystrixMetricsPublisher metricsPublisher,
                                                 HystrixPropertiesStrategy propertiesStrategy) {
        if (log.isDebugEnabled()) {
            log.debug("Current Hystrix plugins configuration is [" + "concurrencyStrategy ["
                    + this.delegate + "]," + "eventNotifier [" + eventNotifier + "]," + "metricPublisher ["
                    + metricsPublisher + "]," + "propertiesStrategy [" + propertiesStrategy + "]," + "]");
            log.debug("Registering Sleuth Hystrix Concurrency Strategy.");
        }
    }

    @Override
    public <T> Callable<T> wrapCallable(Callable<T> callable) {
        RequestAttributes requestAttributes = RequestContextHolder.getRequestAttributes();
        return new WrappedCallable<>(callable, requestAttributes);
    }

    @Override
    public ThreadPoolExecutor getThreadPool(HystrixThreadPoolKey threadPoolKey,
                                            HystrixProperty<Integer> corePoolSize,
                                            HystrixProperty<Integer> maximumPoolSize,
                                            HystrixProperty<Integer> keepAliveTime,
                                            TimeUnit unit, BlockingQueue<Runnable> workQueue) {
        return this.delegate.getThreadPool(threadPoolKey, corePoolSize, maximumPoolSize, keepAliveTime,
                unit, workQueue);
    }

    @Override
    public ThreadPoolExecutor getThreadPool(HystrixThreadPoolKey threadPoolKey,
                                            HystrixThreadPoolProperties threadPoolProperties) {
        return this.delegate.getThreadPool(threadPoolKey, threadPoolProperties);
    }

    @Override
    public BlockingQueue<Runnable> getBlockingQueue(int maxQueueSize) {
        return this.delegate.getBlockingQueue(maxQueueSize);
    }

    @Override
    public <T> HystrixRequestVariable<T> getRequestVariable(HystrixRequestVariableLifecycle<T> rv) {
        return this.delegate.getRequestVariable(rv);
    }

    static class WrappedCallable<T> implements Callable<T> {
        private final Callable<T> target;
        private final RequestAttributes requestAttributes;

        WrappedCallable(Callable<T> target, RequestAttributes requestAttributes) {
            this.target = target;
            this.requestAttributes = requestAttributes;
        }

        @Override
        public T call() throws Exception {
            try {
                RequestContextHolder.setRequestAttributes(requestAttributes);
                return target.call();
            } finally {
                RequestContextHolder.resetRequestAttributes();
            }
        }
    }
}

致此,Feign調用丟失請求頭的問題就解決的了 。

參考

https://blog.csdn.net/zl1zl2zl3/article/details/79084368
https://cloud.spring.io/spring-cloud-static/spring-cloud-openfeign/2.2.0.RC2/reference/html/

歡迎掃碼或微信搜索公眾號《程序員果果》關注我,關注有驚喜~

本站聲明:網站內容來源於博客園,如有侵權,請聯繫我們,我們將及時處理

【其他文章推薦】

網頁設計公司推薦更多不同的設計風格,搶佔消費者視覺第一線

※廣告預算用在刀口上,網站設計公司幫您達到更多曝光效益

※自行創業 缺乏曝光? 下一步"網站設計"幫您第一時間規劃公司的門面形象

台灣寄大陸海運貨物規則及重量限制?

大陸寄台灣海運費用試算一覽表

台中搬家,彰化搬家,南投搬家前需注意的眉眉角角,別等搬了再說!

分類
發燒車訊

020.掌握Pod-Pod基礎使用

一 Pod定義詳解

1.1 完整Pod定義文件

  1 apiVersion: v1			#必選,版本號,例如v1,版本號必須可以用 kubectl api-versions 查詢到
  2 kind: Pod				#必選,Pod
  3 metadata:				#必選,元數據
  4   name: string			#必選,Pod名稱,需符合RFC 1035規範
  5   namespace: string			#必選,Pod所屬的命名空間,默認為"default"
  6   labels:				#自定義標籤
  7     - name: string			#自定義標籤名字
  8   annotations:			#自定義註釋列表
  9     - name: string
 10 spec:				#必選,Pod中容器的詳細定義
 11   containers:			#必選,Pod中容器列表
 12   - name: string			#必選,容器名稱,需符合RFC 1035規範
 13     image: string			#必選,容器的鏡像名稱
 14     imagePullPolicy: [ Always|Never|IfNotPresent ]	#獲取鏡像的策略,Alawys表示每次都嘗試下載鏡像,IfnotPresent表示優先使用本地鏡像,否則下載鏡像,Nerver表示僅使用本地鏡像
 15     command: [string]		#容器的啟動命令列表,如不指定,使用打包時使用的啟動命令
 16     args: [string]			#容器的啟動命令參數列表
 17     workingDir: string		#容器的工作目錄
 18     volumeMounts:			#掛載到容器內部的存儲卷配置
 19     - name: string			#引用pod定義的共享存儲卷的名稱,需用volumes[]部分定義的的卷名
 20       mountPath: string		#存儲卷在容器內mount的絕對路徑,應少於512字符
 21       readOnly: boolean		#是否為只讀模式,默認為讀寫模式
 22     ports:				#需要暴露的端口庫號列表
 23     - name: string			#端口的名稱
 24       containerPort: int		#容器需要監聽的端口號
 25       hostPort: int		        #容器所在主機需要監聽的端口號,默認與Container相同
 26       protocol: string		#端口協議,支持TCP和UDP,默認TCP
 27     env:				#容器運行前需設置的環境變量列表
 28     - name: string			#環境變量名稱
 29       value: string		        #環境變量的值
 30     resources:			#資源限制和請求的設置
 31       limits:			#資源限制的設置
 32         cpu: string		        #CPU的限制,單位為core數,將用於docker run --cpu-shares參數
 33         memory: string		#內存限制,單位可以為Mib/Gib,將用於docker run --memory參數
 34       requests:			#資源請求的設置
 35         cpu: string		        #CPU請求,容器啟動的初始可用數量
 36         memory: string		#內存請求,容器啟動的初始可用數量
 37     livenessProbe:			#對Pod內各容器健康檢查的設置,當探測無響應幾次后將自動重啟該容器,檢查方法有exec、httpGet和tcpSocket,對一個容器只需設置其中一種方法即可
 38       exec:			        #對Pod容器內檢查方式設置為exec方式
 39         command: [string]		#exec方式需要制定的命令或腳本
 40       httpGet:			#對Pod內個容器健康檢查方法設置為HttpGet,需要制定Path、port
 41         path: string
 42         port: number
 43         host: string
 44         scheme: string
 45         HttpHeaders:
 46         - name: string
 47           value: string
 48       tcpSocket:			#對Pod內個容器健康檢查方式設置為tcpSocket方式
 49          port: number
 50        initialDelaySeconds: 0	#容器啟動完成后首次探測的時間,單位為秒
 51        timeoutSeconds: 0		#對容器健康檢查探測等待響應的超時時間,單位秒,默認1秒
 52        periodSeconds: 0		#對容器監控檢查的定期探測時間設置,單位秒,默認10秒一次
 53        successThreshold: 0
 54        failureThreshold: 0
 55        securityContext:
 56          privileged: false
 57     restartPolicy: [Always | Never | OnFailure]	#Pod的重啟策略,Always表示一旦不管以何種方式終止運行,kubelet都將重啟,OnFailure表示只有Pod以非0退出碼退出才重啟,Nerver表示不再重啟該Pod
 58     nodeSelector: obeject		#設置NodeSelector表示將該Pod調度到包含這個label的node上,以key:value的格式指定
 59     imagePullSecrets:		#Pull鏡像時使用的secret名稱,以key:secretkey格式指定
 60     - name: string
 61     hostNetwork: false		#是否使用主機網絡模式,默認為false,如果設置為true,表示使用宿主機網絡
 62     volumes:			#在該pod上定義共享存儲卷列表
 63     - name: string			#共享存儲卷名稱 (volumes類型有很多種)
 64       emptyDir: {}			#類型為emtyDir的存儲卷,與Pod同生命周期的一個臨時目錄。為空值
 65       hostPath: string		#類型為hostPath的存儲卷,表示掛載Pod所在宿主機的目錄
 66         path: string		#Pod所在宿主機的目錄,將被用於同期中mount的目錄
 67       secret:			#類型為secret的存儲卷,掛載集群與定義的secre對象到容器內部
 68         scretname: string
 69         items:
 70         - key: string
 71           path: string
 72       configMap:			#類型為configMap的存儲卷,掛載預定義的configMap對象到容器內部
 73         name: string
 74         items:
 75         - key: string
 76           path: string

二 Pod的基本用法

2.1 創建Pod


Pod可以由1個或多個容器組合而成,通常對於緊耦合的兩個應用,應該組合成一個整體對外提供服務,則應該將這兩個打包為一個pod。

屬於一個Pod的多個容器應用之間相互訪問只需要通過localhost即可通信,這一組容器被綁定在一個環境中。

  1 [root@k8smaster01 study]# vi frontend-localredis-pod.yaml
  2 apiVersion: v1
  3 kind: Pod
  4 metadata:
  5   name: redis-php
  6   label:
  7     name: redis-php
  8 spec:
  9   containers:
 10   - name: frontend
 11     image: kubeguide/guestbook-php-frontend:localredis
 12     ports:
 13     - containersPort: 80
 14   - name: redis-php
 15     image: kubeguide/redis-master
 16     ports:
 17     - containersPort: 6379
 18 
 19 [root@k8smaster01 study]# kubectl create -f frontend-localredis-pod.yaml
 20 


2.2 查看Pod

  1 [root@k8smaster01 study]# kubectl get pods	                #READY為2/2,表示此Pod中運行了yaml定義的兩個容器
  2 NAME        READY   STATUS    RESTARTS   AGE
  3 redis-php   2/2     Running   0          7m45s
  4 [root@k8smaster01 study]# kubectl describe pod redis-php	#查看詳細信息
  5 


三 靜態Pod

3.1 靜態Pod概述


靜態pod是由kubelet進行管理的僅存在於特定Node的Pod上,他們不能通過API Server進行管理,無法與ReplicationController、Deployment或者DaemonSet進行關聯,並且kubelet無法對他們進行健康檢查。靜態Pod總是由kubelet進行創建,並且總是在kubelet所在的Node上運行。

創建靜態Pod有兩種方式:配置文件或者HTTP方式。

3.2 配置文件方式創建

  1 [root@k8snode01 ~]# mkdir -p /etc/kubelet.d
  2 [root@k8snode01 ~]# vi /etc/kubelet.d/static-web.yaml
  3 apiVersion: v1
  4 kind: Pod
  5 metadata:
  6   name: static-web
  7   label:
  8     name: static-web
  9 spec:
 10   containers:
 11   - name: static-web
 12     image: nginx
 13     ports:
 14     - name: web
 15       containersPort: 80
 16 
 17 [root@k8snode01 ~]# vi /etc/systemd/system/kubelet.service
 18 ……
 19   --config=/etc/kubelet.d/ \·				#加入此參數
 20 ……
 21 [root@k8snode01 ~]# systemctl daemon-reload
 22 [root@k8snode01 ~]# systemctl restart kubelet.service	#重啟kubelet
 23 [root@k8snode01 ~]# docker ps				#查看創建的pod


提示:由於靜態pod不能通過API Server進行管理,因此在Master節點執行刪除操作後會變為Pending狀態,且無法刪除。刪除該pod只能在其運行的node上,將定義POD的yaml刪除。

3.3 HTTP方式


通過設置kubelet的啟動參數–mainfest-url,會定期從該URL下載Pod的定義文件,並以.yaml或.json文件的格式進行解析,從而創建Pod。

四 Pod容器共享Volume

4.1 共享Volume


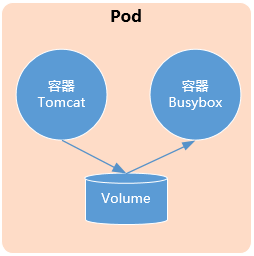
在同一個Pod中的多個容器能夠共享Pod級別的存儲就Volume。Volume可以被定義為各種類型,多個容器各自進行掛載操作,將一個Volume掛載為容器內部需要的目錄。


示例1:

Pod級別設置Volume “app-logs”,同時Pod包含兩個容器,Tomcat向該Volume寫日誌,busybox讀取日誌文件。

  1 [root@k8smaster01 study]# vi pod-volume-applogs.yaml
  2 apiVersion: v1
  3 kind: Pod
  4 metadata:
  5   name: volume-pod
  6 spec:
  7   containers:
  8   - name: tomcat
  9     image: tomcat
 10     ports:
 11     - containerPort: 8080
 12     volumeMounts:
 13     - name: app-logs
 14       mountPath: /usr/local/tomcat/logs
 15   - name: logreader
 16     image: busybox
 17     command: ["sh","-c","tail -f /logs/catalina*.log"]
 18     volumeMounts:
 19     - name: app-logs
 20       mountPath: /logs
 21   volumes:
 22   - name: app-logs
 23     emptyDir: {}

解釋:

Volume名:app-logs;

emptyDir:為Pod分配到Node的時候創建。無需指定宿主機的目錄文件,為Kubernetes自動分配的目錄。

  1 [root@k8smaster01 study]# kubectl create -f pod-volume-applogs.yaml	#創建
  2 [root@k8smaster01 study]# kubectl get pods				#查看
  3 [root@k8smaster01 study]# kubectl logs volume-pod -c busybox	#讀取log


  1 [root@k8smaster01 study]# kubectl exec -it volume-pod -c tomcat -- ls /usr/local/tomcat/logs
  2 catalina.2019-06-29.log      localhost_access_log.2019-06-29.txt
  3 host-manager.2019-06-29.log  manager.2019-06-29.log
  4 localhost.2019-06-29.log
  5 [root@k8smaster01 study]# kubectl exec -it volume-pod -c tomcat -- tail /usr/local/tomcat/logs/catalina.2019-06-29.log


提示:通過tomcat容器可查看日誌,對比busybox通過共享Volume查看的日誌是否一致。

五 Pod配置管理

5.1 Pod配置概述


應用部署的一個最佳實踐是將應用所需的配置信息與程序進行分離,使程序更加靈活。將相應的應用打包為鏡像,可以通過環境變量或者外掛volume的方式在創建容器的時候進行配置注入,從而實現更好的復用。

Kubernetes提供一種統一的應用配置管理方案:ConfigMap。

5.2 ConfigMap概述


ConfigMap供容器使用的主要場景:

  • 生成容器內部的環境變量;
  • 設置容器的啟動命令的參數(需設置為環境變量);
  • 以volume的形式掛載為容器內部的文件或者目錄。


ConfigMap以一個或多個key:value的形式定義。value可以是string也可以是一個文件內容,可以通過yaml配置文件或者通過kubectl create configmap 的方式創建configMap。

5.3 創建ConfigMap資源對象——yaml方式

  1 [root@k8smaster01 study]# vi cm-appvars.yaml
  2 apiVersion: v1
  3 kind: ConfigMap
  4 metadata:
  5   name: cm-appvars
  6 data:
  7   apploglevel: info
  8   appdatadir: /var/data
  9 
 10 [root@k8smaster01 study]# kubectl create -f cm-appvars.yaml
 11 configmap/cm-appvars created
 12 [root@k8smaster01 study]# kubectl get configmaps
 13 NAME         DATA   AGE
 14 cm-appvars   2      8s
 15 [root@k8smaster01 study]# kubectl describe configmaps cm-appvars


  1 [root@k8smaster01 study]# kubectl get configmaps cm-appvars -o yaml


5.4 創建ConfigMap資源對象——命令行方式


語法1

  1 # kubectl create configmap NAME --from-file=[key=]source --from-file=[key=]source


解釋:通過–from-file參數從文件中創建,可以指定key名稱,也可以制定多個key。

語法2

  1 # kubectl create configmap NAME --from-file=config-files-dir


解釋:通過–from-file參數從目錄中創建,該目錄下的每個配置文件名都被設置為key,文件的內容被設置為value。

語法3

  1 # kubectl create configmap NAME --from-literal=key1=value1 --from-literal=key2=value2


解釋:通過–from-literal參數從文本中創建,直接將指定的key#=value#創建為ConfigMap的內容。

5.5 Pod使用ConfigMap


容器應用使用ConfigMap有兩種方式:

  • 通過環境變量獲取ConfigMap中的內容;
  • 通過Volume掛載的方式將ConfigMap中的內容掛載為容器內容的文件或目錄。

  1 [root@k8smaster01 study]# vi cm-test-pod.yaml
  2 apiVersion: v1
  3 kind: Pod
  4 metadata:
  5   name: cm-test-pod
  6 spec:
  7   containers:
  8   - name: cm-test
  9     image: busybox
 10     command: ["/bin/sh","-c","env|grep APP"]	#容器里執行查看環境變量的命令
 11     env:
 12     - name: APPLOGLEVEL				#定義容器環境變量名稱
 13       valueFrom:
 14         configMapKeyRef:			#環境變量的值來自ConfigMap
 15           name: cm-appvars			#指定來自cm-appvars的ConfigMap
 16           key: apploglevel			#key為apploglevel
 17     - name: APPDATADIR
 18       valueFrom:
 19         configMapKeyRef:
 20           name: cm-appvars
 21           key: appdatadir
 22 
 23 [root@k8smaster01 study]# kubectl create -f cm-test-pod.yaml
 24 [root@k8smaster01 study]# kubectl get pods
 25 NAME          READY   STATUS      RESTARTS   AGE
 26 cm-test-pod   0/1     Completed   2          24s


【掛載形式-待補充】

5.6 ConfigMap限制


  • Configmap必須在pod創建之間創建;
  • ConfigMap受到namespace的限制,只有同一個命名空間下才能引用;
  • ConfigMap暫時無法配置配額;
  • 靜態的pod無法使用ConfigMap;
  • 在使用volumeMount掛載的時候,configMap基於items創建的文件會整體的將掛載數據卷的容器的目錄下的文件全部覆蓋。

六 Pod獲取自身信息

6.1 Downward API


pod擁有唯一的名字、IP地址,並且處於某個Namespace中。pod的容器內獲取pod的信息科通過Downward API實現。具體有以下兩種方式:

  • 環境變量:用於單個變量,可以將pod信息和container信息注入容器內部;
  • volume掛載:將數組類信息生成為文件,掛載至容器內部。


舉例1:通過Downward API將Pod的IP、名稱和所在的Namespace注入容器的環境變量。

  1 [root@k8smaster01 study]# vi dapi-test-pod.yaml
  2 apiVersion: v1
  3 kind: Pod
  4 metadata:
  5   name: dapi-test-pod
  6 spec:
  7   containers:
  8     - name: test-container
  9       image: busybox
 10       command: [ "/bin/sh", "-c", "env" ]
 11       env:
 12         - name: MY_POD_NAME
 13           valueFrom:
 14             fieldRef:
 15               fieldPath: metadata.name
 16         - name: MY_POD_NAMESPACE
 17           valueFrom:
 18             fieldRef:
 19               fieldPath: metadata.namespace
 20         - name: MY_POD_IP
 21           valueFrom:
 22             fieldRef:
 23               fieldPath: status.podIP
 24   restartPolicy: Never


提示:Downward API提供如下變量:

metadata.name:Pod的名稱,當Pod通過RC生成時,其名稱是RC隨機產生的唯一名稱;

status.podIP:Pod的IP地址,POd的IP屬於狀態數據,而非元數據;

metadata.namespace:Pod所在的namespace。

  1 [root@k8smaster01 study]# kubectl create -f dapi-test-pod.yaml
  2 [root@k8smaster01 study]# kubectl logs dapi-test-pod | grep MY_POD
  3 MY_POD_NAMESPACE=default
  4 MY_POD_IP=172.30.240.4
  5 MY_POD_NAME=dapi-test-pod
  6 


舉例2:通過Downward API將Container的自願請求和限制信息注入容器的環境變量。

  1 [root@k8smaster01 study]# vi dapi-test-pod-container-vars.yaml
  2 apiVersion: v1
  3 kind: Pod
  4 metadata:
  5   name: dapi-test-pod-container-vars
  6 spec:
  7   containers:
  8     - name: test-container
  9       image: busybox
 10       imagePullPolicy: Never
 11       command: [ "/bin/sh", "-c" ]
 12       args:
 13       - while true; do
 14           echo -en '\n';
 15           printenv MY_CPU_REQUEST MY_CPU_LIMIT;
 16           printenv MY_MEM_REQUEST MY_MEM_LIMIT;
 17           sleep 3600;
 18         done;
 19       resources:
 20         requests:
 21           memory: "32Mi"
 22           cpu: "125m"
 23         limits:
 24           memory: "64Mi"
 25           cpu: "250m"
 26       env:
 27         - name: MY_CPU_REQUEST
 28           valueFrom:
 29             resourceFieldRef:
 30               containerName: test-container
 31               resource: requests.cpu
 32         - name: MY_CPU_LIMIT
 33           valueFrom:
 34             resourceFieldRef:
 35               containerName: test-container
 36               resource: limits.cpu
 37         - name: MY_MEM_REQUEST
 38           valueFrom:
 39             resourceFieldRef:
 40               containerName: test-container
 41               resource: requests.memory
 42         - name: MY_MEM_LIMIT
 43           valueFrom:
 44             resourceFieldRef:
 45               containerName: test-container
 46               resource: limits.memory
 47   restartPolicy: Never


提示:Downward API提供如下變量:

requests.cpu:容器的CPU請求值;

limits.cpu:容器的CPU限制值;

requests.memory:容器的內存請求值;

limits.memory:容器的內存限制值。

  1 [root@k8smaster01 study]# kubectl create -f dapi-test-pod-container-vars.yaml
  2 [root@k8smaster01 study]# kubectl logs dapi-test-pod-container-vars
  3 1
  4 1
  5 33554432
  6 67108864


舉例3:通過Downward API將Pod的Label、Annotation列表通過Volume掛載為容器內的一個文件。

  1 [root@k8smaster01 study]# vi dapi-test-pod-volume.yaml
  2 apiVersion: v1
  3 kind: Pod
  4 metadata:
  5   name: dapi-test-pod-volume
  6   labels:
  7     zone: us-est-coast
  8     cluster: test-cluster1
  9     rack: rack-22
 10   annotations:
 11     build: two
 12     builder: john-doe
 13 spec:
 14   containers:
 15     - name: test-container
 16       image: busybox
 17       imagePullPolicy: Never
 18       command: [ "/bin/sh", "-c" ]
 19       args:
 20       - while true; do
 21           if [[ -e /etc/labels ]]; then
 22             echo -en '\n\n'; cat /etc/labels; fi;
 23           if [[ -e /etc/annotations ]]; then
 24             echo -en '\n\n'; cat /etc/annotations; fi;
 25           sleep 3600;
 26         done;
 27       volumeMounts:
 28         - name: podinfo
 29           mountPath: /etc
 30           readOnly: false
 31   volumes:
 32     - name: podinfo
 33       downwardAPI:
 34         items:
 35           - path: "labels"
 36             fieldRef:
 37               fieldPath: metadata.labels
 38           - path: "annotations"
 39             fieldRef:
 40               fieldPath: metadata.annotations


注意:Volume中的ddownwardAPI的items語法,將會以path的名稱生成文件。如上所示,會在容器內生產/etc/labels和/etc/annotations兩個文件,分別包含metadata.labels和metadata.annotations的全部Label。

  1 [root@k8smaster01 study]# kubectl create -f dapi-test-pod-volume.yaml
  2 [root@k8smaster01 study]# kubectl logs dapi-test-pod-volume
  3 


提示:DownwardAPI意義:

在某些集群中,集群中的每個節點需要將自身的標識(ID)及進程綁定的IP地址等信息事先寫入配置文件中,進程啟動時讀取此類信息,然後發布到某個類似註冊服務中心。此時可通過DowanwardAPI,將一個預啟動腳本或Init Container,通過環境變量或文件方式獲取Pod自身的信息,然後寫入主程序配置文件中,最後啟動主程序。本站聲明:網站內容來源於博客園,如有侵權,請聯繫我們,我們將及時處理

【其他文章推薦】

※帶您來了解什麼是 USB CONNECTOR  ?

※自行創業 缺乏曝光? 下一步”網站設計“幫您第一時間規劃公司的門面形象

※如何讓商品強力曝光呢? 網頁設計公司幫您建置最吸引人的網站,提高曝光率!!

※綠能、環保無空污,成為電動車最新代名詞,目前市場使用率逐漸普及化

※廣告預算用在刀口上,網站設計公司幫您達到更多曝光效益

※試算大陸海運運費!