分類
發燒車訊

程泰打入Tesla Model 3供應鏈,預計年底出貨

程泰16日參加宏遠證券所舉辦自動化產業投資論壇,對於2017年營運展望,程泰表示,目前母公司程泰集團在手訂單已回升至5億多元,且未含3月台北國際工具機展部分,同時在中國大陸訂單約有2-3億元,整體而言,目前整體訂單能見度看到第二季底。程泰集團董事長楊德華則表示,集團整體在手訂單規模約22億至23億元,至於3月台北國際工具機展接單規模約在3億至5億元。

程泰也指出,公司業務以車床為主,由於波音預期未來20年全球航太市場規模將達180兆元,預估民航機需求約3.8萬架,加上政府要推國機國造,因此未來也會聚焦在航太產業。此外,在電動車布局方面,程泰打入美國特斯拉電動車Model 3供應鏈,於台中大里工業區建立代工基地,預計今年底起,每月將出貨減速齒輪箱的齒輪傳動軸前端車銑磨6萬套。

程泰集團旗下包括程泰及亞崴兩工具機廠,亞崴表示,農曆年後,台灣航太及汽車零組件業開始投資擴廠,加上推進國機國造及航太零件國產化,預期今年台灣市場會有不錯表現,目前台灣地區在手訂單14億元,大陸吳江及嘉興廠在手訂單3-4億元,兩岸合併在手訂單約18億元,訂單能見度看到7月;在產能布局方面,嘉義大埔美一期新廠預計今年底完工,大陸吳江廠亦規劃最快於今年底興建二期廠。

(本文內容由授權使用。圖片出處:Tesla)

本站聲明:網站內容來源於EnergyTrend https://www.energytrend.com.tw/ev/,如有侵權,請聯繫我們,我們將及時處理

【其他文章推薦】

USB CONNECTOR掌控什麼技術要點? 帶您認識其相關發展及效能

台北網頁設計公司這麼多該如何選擇?

※智慧手機時代的來臨,RWD網頁設計為架站首選

※評比南投搬家公司費用收費行情懶人包大公開

※回頭車貨運收費標準

分類
發燒車訊

電動車商機大,Panasonic再收購Ficosa


Panasonic 21日發布新聞稿宣布,將追加收購西班牙汽車零件大廠Ficosa International SA 20%股權,目標在今年4月把持股提高至69%、將Ficosa收編為旗下子公司行列,以期望藉由加深與Ficosa的合作,強化車用電子鏡、先進駕駛輔助系統(ADAS)等車用事業。Panasonic於2015年6月取得Ficosa 49%股權。

Ficosa為全球第3大車用門鏡商,2015年營收為11億歐元,並計畫於2017年開賣與Panasonic攜手研發的新型車鏡。

車用相關事業被Panasonic視為成長領域事業,Panasonic計畫在2018年度將車用相關事業營收提高至2兆日圓、將較2015年度的1.3兆日圓大增5成。

路透社報導,Panasonic社長津賀一宏1月接受專訪時表示,「2兆日圓不是一個頂點,應該將目光瞄準在之後的2.5兆日圓或更高的目標上」。

根據嘉實XQ全球贏家系統報價,截至台北時間22日13點18分為止,Panasonic大跌2.85%至1,209.5日圓,創約1個月來(2月10日以來)新低水準。

日經新聞於去年12月5日報導,IT、電機大廠為了搶食自動駕駛、電動車(EV)普及所將引發的商機,正積極進行併購,其中日本Panasonic將收購歐洲車燈大廠ZKW、進軍車燈市場。據悉,Panasonic、ZKW已就收購進入最終協商階段,預估收購額最高將達1,000億日圓的規模。

(本文內容由授權使用。圖片出處:Ficosa)

本站聲明:網站內容來源於EnergyTrend https://www.energytrend.com.tw/ev/,如有侵權,請聯繫我們,我們將及時處理

【其他文章推薦】

網頁設計公司推薦不同的風格,搶佔消費者視覺第一線

※廣告預算用在刀口上,台北網頁設計公司幫您達到更多曝光效益

※自行創業缺乏曝光? 網頁設計幫您第一時間規劃公司的形象門面

南投搬家公司費用需注意的眉眉角角,別等搬了再說!

※教你寫出一流的銷售文案?

分類
發燒車訊

這一次搞懂Spring Web零xml配置原理以及父子容器關係

前言

在使用Spring和SpringMVC的老版本進行開發時,我們需要配置很多的xml文件,非常的繁瑣,總是讓用戶自行選擇配置也是非常不好的。基於約定大於配置的規定,Spring提供了很多註解幫助我們簡化了大量的xml配置;但是在使用SpringMVC時,我們還會使用到WEB-INF/web.xml,但實際上我們是完全可以使用Java類來取代xml配置的,這也是後來SpringBoott的實現原理。本篇就來看看Spring是如何實現完全的零XML配置。

正文

先來看一下原始的web.xml配置:

<!DOCTYPE web-app PUBLIC
 "-//Sun Microsystems, Inc.//DTD Web Application 2.3//EN"
 "http://java.sun.com/dtd/web-app_2_3.dtd" >

<web-app>
  <context-param>
    <param-name>contextConfigLocation</param-name>
    <param-value>
      <!--加載spring配置-->
      classpath:spring.xml
    </param-value>
  </context-param>
  <context-param>
    <param-name>webAppRootKey</param-name>
    <param-value>ServicePlatform.root</param-value>
  </context-param>

  <listener>
    <listener-class>org.springframework.web.context.ContextLoaderListener</listener-class>
    <!--<listener-class>org.springframework.web.context.request.RequestContextListener</listener-class>-->
  </listener>

  <servlet>
    <servlet-name>spring-dispatcher</servlet-name>
    <servlet-class>org.springframework.web.servlet.DispatcherServlet</servlet-class>
    <init-param>
      <!--springmvc的配置文件-->
      <param-name>contextConfigLocation</param-name>
      <param-value>classpath:spring-dispatcher.xml</param-value>
    </init-param>
    <load-on-startup>0</load-on-startup>
  </servlet>
  <servlet-mapping>
    <servlet-name>spring-dispatcher</servlet-name>
    <url-pattern>/</url-pattern>
  </servlet-mapping>
</web-app>

這裏各個配置的作用簡單說下,context-param是加載我們主的sping.xml配置,比如一些bean的配置和開啟註解掃描等;listener是配置監聽器,Tomcat啟動會觸發監聽器調用;servlet則是配置我們自定義的Servlet實現,比如DispatcherServlet。還有其它很多配置就不一一說明了,在這裏主要看到記住context-paramservlet配置,這是SpringIOC父子容器的體現。在之前的I文章中講過IOC容器是以父子關係組織的,但估計大部分人都不能理解,除了看到複雜的繼承體系,並沒有看到父容器作用的體現,稍後來分析。
了解了配置,我們就需要思考如何替換掉這些繁瑣的配置。實際上Tomcat提供了一個規範,有一個ServletContainerInitializer接口:

public interface ServletContainerInitializer {
    void onStartup(Set<Class<?>> var1, ServletContext var2) throws ServletException;
}

Tomcat啟動時會調用該接口實現類的onStartup方法,這個方法有兩個參數,第二個不用說,主要是第一個參數什麼?從哪裡來?另外我們自定義的實現類又怎麼讓Tomcat調用呢?
首先解答最後一個問題,這裏也是利用SPI來實現的,因此我們實現了該接口后,還需要在META-INF.services下配置。其次,這裏傳入的第一個參數也是我們自定義的擴展接口的實現類,我們可以通過我們自定義的接口實現很多需要在啟動時做的事,比如加載Servlet,但是Tomcat又是怎麼知道我們自定義的接口是哪個呢?這就需要用到@HandlesTypes註解,該註解就是標註在ServletContainerInitializer的實現類上,其值就是我們擴展的接口,這樣Tomcat就知道需要傳入哪個接口實現類到這個onStartup方法了。來看一個簡單的實現:

@HandlesTypes(LoadServlet.class)
public class MyServletContainerInitializer implements ServletContainerInitializer {
    @Override
    public void onStartup(Set<Class<?>> set, ServletContext servletContext) throws ServletException {
        Iterator var4;
        if (set != null) {
            var4 = set.iterator();
            while (var4.hasNext()) {
                Class<?> clazz = (Class<?>) var4.next();
                if (!clazz.isInterface() && !Modifier.isAbstract(clazz.getModifiers()) && LoadServlet.class.isAssignableFrom(clazz)) {
                    try {
                        ((LoadServlet) clazz.newInstance()).loadOnstarp(servletContext);
                    } catch (Exception e) {
                        e.printStackTrace();
                    }
                }
            }
        }
    }
}

public interface LoadServlet {

    void loadOnstarp(ServletContext servletContext);
}

public class LoadServletImpl implements LoadServlet {
    @Override
    public void loadOnstarp(ServletContext servletContext) {
        ServletRegistration.Dynamic initServlet = servletContext.addServlet("initServlet", "org.springframework.web.servlet.DispatcherServlet");
        initServlet.setLoadOnStartup(1);
        initServlet.addMapping("/init");
	}
}

這就是Tomcat給我們提供的規範,通過這個規範我們就能實現Spring的零xml配置啟動,直接來看Spring是如何做的。
根據上面所說我們可以在spring-web工程下找到META-INF/services/javax.servlet.ServletContainerInitializer配置:

@HandlesTypes(WebApplicationInitializer.class)
public class SpringServletContainerInitializer implements ServletContainerInitializer {
	@Override
	public void onStartup(@Nullable Set<Class<?>> webAppInitializerClasses, ServletContext servletContext)
			throws ServletException {

		List<WebApplicationInitializer> initializers = new LinkedList<>();

		if (webAppInitializerClasses != null) {
			for (Class<?> waiClass : webAppInitializerClasses) {
				// Be defensive: Some servlet containers provide us with invalid classes,
				// no matter what @HandlesTypes says...
				if (!waiClass.isInterface() && !Modifier.isAbstract(waiClass.getModifiers()) &&
						WebApplicationInitializer.class.isAssignableFrom(waiClass)) {
					try {
						initializers.add((WebApplicationInitializer)
								ReflectionUtils.accessibleConstructor(waiClass).newInstance());
					}
					catch (Throwable ex) {
						throw new ServletException("Failed to instantiate WebApplicationInitializer class", ex);
					}
				}
			}
		}

		if (initializers.isEmpty()) {
			servletContext.log("No Spring WebApplicationInitializer types detected on classpath");
			return;
		}

		servletContext.log(initializers.size() + " Spring WebApplicationInitializers detected on classpath");
		AnnotationAwareOrderComparator.sort(initializers);
		for (WebApplicationInitializer initializer : initializers) {
			initializer.onStartup(servletContext);
		}
	}

}

核心的實現就是WebApplicationInitializer,先看看其繼承體系

AbstractReactiveWebInitializer不用管,主要看另外一邊,但是都是抽象類,也就是說真的實例也是由我們自己實現,但需要我們實現什麼呢?我們一般直接繼承AbstractAnnotationConfigDispatcherServletInitializer類,有四個抽象方法需要我們實現:

    //父容器
    @Override
    protected Class<?>[] getRootConfigClasses() {
        return new Class<?>[]{SpringContainer.class};
    }

    //SpringMVC配置子容器
    @Override
    protected Class<?>[] getServletConfigClasses() {
        return new Class<?>[]{MvcContainer.class};
    }

    //獲取DispatcherServlet的映射信息
    @Override
    protected String[] getServletMappings() {
        return new String[]{"/"};
    }

	// filter配置
    @Override
    protected Filter[] getServletFilters() {
        MyFilter myFilter = new MyFilter();
        CorsFilter corsFilter = new CorsFilter();
        return new Filter[]{myFilter,corsFilter};
    }

這裏主要注意getRootConfigClassesgetServletConfigClasses方法,分別加載父、子容器:

@ComponentScan(value = "com.dark",excludeFilters = {
        @ComponentScan.Filter(type = FilterType.ANNOTATION,classes = {Controller.class})
})
public class SpringContainer {
}

@ComponentScan(value = "com.dark",includeFilters = {
        @ComponentScan.Filter(type = FilterType.ANNOTATION,classes = {Controller.class})
},useDefaultFilters = false)
public class MvcContainer {
}

看到這兩個類上的註解應該不陌生了吧,父容器掃描裝載了所有不帶@Controller註解的類,子容器則相反,但需要對象時首先從當前容器中找,如果沒有則從父容器中獲取,為什麼要這麼設計呢?直接放到一個容器中不行么?先思考下, 稍後解答。
回到onStartup方法中,直接回調用到AbstractDispatcherServletInitializer類:

	public void onStartup(ServletContext servletContext) throws ServletException {
		super.onStartup(servletContext);
		//註冊DispatcherServlet
		registerDispatcherServlet(servletContext);
	}

先是調用父類:

	public void onStartup(ServletContext servletContext) throws ServletException {
		registerContextLoaderListener(servletContext);
	}

	protected void registerContextLoaderListener(ServletContext servletContext) {

		//創建spring上下文,註冊了SpringContainer
		WebApplicationContext rootAppContext = createRootApplicationContext();
		if (rootAppContext != null) {
			//創建監聽器
			ContextLoaderListener listener = new ContextLoaderListener(rootAppContext);
			listener.setContextInitializers(getRootApplicationContextInitializers());
			servletContext.addListener(listener);
		}
	}

然後調用createRootApplicationContext創建父容器:

	protected WebApplicationContext createRootApplicationContext() {
		Class<?>[] configClasses = getRootConfigClasses();
		if (!ObjectUtils.isEmpty(configClasses)) {
			AnnotationConfigWebApplicationContext context = new AnnotationConfigWebApplicationContext();
			context.register(configClasses);
			return context;
		}
		else {
			return null;
		}
	}

可以看到就是創建了一個AnnotationConfigWebApplicationContext對象,並將我們的配置類SpringContainer註冊了進去。接着創建Tomcat啟動加載監聽器ContextLoaderListener,該監聽器有一個contextInitialized方法,會在Tomcat啟動時調用。

	public void contextInitialized(ServletContextEvent event) {
		initWebApplicationContext(event.getServletContext());
	}

	 */
	public WebApplicationContext initWebApplicationContext(ServletContext servletContext) {
		long startTime = System.currentTimeMillis();
		try {
			// Store context in local instance variable, to guarantee that
			// it is available on ServletContext shutdown.
			if (this.context == null) {
				this.context = createWebApplicationContext(servletContext);
			}
			if (this.context instanceof ConfigurableWebApplicationContext) {
				ConfigurableWebApplicationContext cwac = (ConfigurableWebApplicationContext) this.context;
				if (!cwac.isActive()) {
					// The context has not yet been refreshed -> provide services such as
					// setting the parent context, setting the application context id, etc
					if (cwac.getParent() == null) {
						// The context instance was injected without an explicit parent ->
						// determine parent for root web application context, if any.
						ApplicationContext parent = loadParentContext(servletContext);
						cwac.setParent(parent);
					}
					configureAndRefreshWebApplicationContext(cwac, servletContext);
				}
			}
			servletContext.setAttribute(WebApplicationContext.ROOT_WEB_APPLICATION_CONTEXT_ATTRIBUTE, this.context);

			ClassLoader ccl = Thread.currentThread().getContextClassLoader();
			if (ccl == ContextLoader.class.getClassLoader()) {
				currentContext = this.context;
			}
			else if (ccl != null) {
				currentContextPerThread.put(ccl, this.context);
			}

			return this.context;
		}
	}

可以看到就是去初始化容器,這個和之前分析xml解析是一樣的,主要注意這裏封裝了ServletContext對象,並將父容器設置到了該對象中。
父容器創建完成后自然就是子容器的創建,來到registerDispatcherServlet方法:

	protected void registerDispatcherServlet(ServletContext servletContext) {
		String servletName = getServletName();
		Assert.hasLength(servletName, "getServletName() must not return null or empty");

		//創建springmvc的上下文,註冊了MvcContainer類
		WebApplicationContext servletAppContext = createServletApplicationContext();
		Assert.notNull(servletAppContext, "createServletApplicationContext() must not return null");

		//創建DispatcherServlet
		FrameworkServlet dispatcherServlet = createDispatcherServlet(servletAppContext);
		Assert.notNull(dispatcherServlet, "createDispatcherServlet(WebApplicationContext) must not return null");
		dispatcherServlet.setContextInitializers(getServletApplicationContextInitializers());

		ServletRegistration.Dynamic registration = servletContext.addServlet(servletName, dispatcherServlet);
		if (registration == null) {
			throw new IllegalStateException("Failed to register servlet with name '" + servletName + "'. " +
					"Check if there is another servlet registered under the same name.");
		}

		/*
		* 如果該元素的值為負數或者沒有設置,則容器會當Servlet被請求時再加載。
			如果值為正整數或者0時,表示容器在應用啟動時就加載並初始化這個servlet,
			值越小,servlet的優先級越高,就越先被加載
		* */
		registration.setLoadOnStartup(1);
		registration.addMapping(getServletMappings());
		registration.setAsyncSupported(isAsyncSupported());

		Filter[] filters = getServletFilters();
		if (!ObjectUtils.isEmpty(filters)) {
			for (Filter filter : filters) {
				registerServletFilter(servletContext, filter);
			}
		}

		customizeRegistration(registration);
	}

	protected WebApplicationContext createServletApplicationContext() {
		AnnotationConfigWebApplicationContext context = new AnnotationConfigWebApplicationContext();
		Class<?>[] configClasses = getServletConfigClasses();
		if (!ObjectUtils.isEmpty(configClasses)) {
			context.register(configClasses);
		}
		return context;
	}

這裏也是創建了一個AnnotationConfigWebApplicationContext對象,不同的只是這裏註冊的配置類就是我們的Servlet配置了。然後創建了DispatcherServlet對象,並將上下文對象設置了進去。看到這你可能會疑惑,既然父子容器創建的都是相同類的對象,何來的父子容器之說?別急,這個在初始化該上文時就明白了。但是這裏的初始化入口在哪呢?沒有看到任何監聽器的創建和調用。實際上這裏的上下文對象初始化是在Servlet初始化時實現的,即init方法,直接來到HttpServletBeaninit方法(分析SpringMVC源碼時講過):

	public final void init() throws ServletException {
		...省略
		
		// Let subclasses do whatever initialization they like.
		initServletBean();
	}

	protected final void initServletBean() throws ServletException {
		try {
			this.webApplicationContext = initWebApplicationContext();
			initFrameworkServlet();
		}
	}

	protected WebApplicationContext initWebApplicationContext() {
		//這裡會從servletContext中獲取到父容器,就是通過監聽器加載的容器
		WebApplicationContext rootContext =
				WebApplicationContextUtils.getWebApplicationContext(getServletContext());
		WebApplicationContext wac = null;

		if (this.webApplicationContext != null) {
			// A context instance was injected at construction time -> use it
			wac = this.webApplicationContext;
			if (wac instanceof ConfigurableWebApplicationContext) {
				ConfigurableWebApplicationContext cwac = (ConfigurableWebApplicationContext) wac;
				if (!cwac.isActive()) {
					if (cwac.getParent() == null) {
						cwac.setParent(rootContext);
					}
					//容器加載
					configureAndRefreshWebApplicationContext(cwac);
				}
			}
		}
		if (wac == null) {
			wac = findWebApplicationContext();
		}
		if (wac == null) {
			wac = createWebApplicationContext(rootContext);
		}

		if (!this.refreshEventReceived) {
			synchronized (this.onRefreshMonitor) {
				onRefresh(wac);
			}
		}

		if (this.publishContext) {
			// Publish the context as a servlet context attribute.
			String attrName = getServletContextAttributeName();
			getServletContext().setAttribute(attrName, wac);
		}

		return wac;
	}

看到這裏想你也應該明白了,首先從ServletContext中拿到父容器,然後設置到當前容器的parent中,實現了父子容器的組織,而這樣設計好處我想也是很清楚的,子容器目前裝載的都是MVC的配置和Bean,簡單點說就是Controller,父容器中都是Service,Controller是依賴於Service的,如果不構建這樣的層級關係並優先實例化父容器,你怎麼實現Controller層的依賴注入成功呢?

總結

本篇結合之前的文章,分析了SpringMVC零XML配置的實現原理,也補充了之前未分析到父子容器關係,讓我們能從細節上更加全面的理解SpringIOC的實現原理,相信看完本篇對於SpringBoot的實現你也會有自己的想法。

本站聲明:網站內容來源於博客園,如有侵權,請聯繫我們,我們將及時處理

【其他文章推薦】

USB CONNECTOR掌控什麼技術要點? 帶您認識其相關發展及效能

台北網頁設計公司這麼多該如何選擇?

※智慧手機時代的來臨,RWD網頁設計為架站首選

※評比南投搬家公司費用收費行情懶人包大公開

※回頭車貨運收費標準

分類
發燒車訊

三角函數與緩入緩出動畫及C#實現(圖文講解)

日常經常能看到緩入緩出的動畫效果,如:

1,帶緩入緩出效果的滾動條:

2,帶緩入緩出效果的呼吸燈:

像上面這種效果,就是用到了三角函數相關的知識,下面將從頭開始一步步去講解如何實現這種效果。


一、基礎知識

(一)三角函數

常用的三角函數有正弦函數(sin)、餘弦函數(cos)、正切函數(tan)。在動畫效果中常用的是正弦函數和餘弦函數,由於兩者可以互相轉化,所以本文將以正弦函數來進行講解。

如下圖所示直角三角形ABC:

則:

sin(A)=a/c

即:角A的正弦值=角A的對邊/斜邊

(二)正弦曲線

將三角函數與動畫橋接起來的便是三角函數曲線。

以正弦函數為例,其正弦曲線公式為:y = A*sin(B*x + C) + D

其中y、x分別是縱坐標、橫坐標。

1,在默認狀態時,即:y=sin(x) 時,其曲線如下圖所示:

2,正弦曲線公式中的參數 “A” 控制曲線的振幅,A 值越大,振幅越大,A 值越小,振幅越小。

如:y=2*sin(x),其曲線如下圖所示(藍線為 y=sin(x)):

3,參數 “B” 控控制曲線的周期,B 值越大,那麼周期越短,B 值越小,周期越長。

如:y=sin(2x),其曲線如下圖所示(藍線為 y=sin(x)):

4,參數 “C” 控控制曲線左右移動,C 值為正數,曲線左移,C 值為負數,曲線右移;

如:y=sin(x+1),其曲線如下圖所示(藍線為 y=sin(x)):

5,參數 “D” 控控制曲線上下移動。D 值為正數,曲線上移,D 值為負數,曲線下移;

如:y=sin(x)+1,其曲線如下圖所示(藍線為 y=sin(x)):

(三)角度與弧度

因為在使用代碼去計算正弦值時,其單位一般是弧度,像C#中的”Math.Sin()“函數,而直觀的效果卻是角度,所以需要講解一下角度與弧度。

1,角度

定義:兩條射線從圓心向圓周射出,形成一個夾角和夾角正對的一段弧。當這段弧長正好等於圓周長的360分之中的一個時,兩條射線的夾角的大小為1度。

示意圖如下:

2,弧度

定義:弧度:兩條射線從圓心向圓周射出,形成一個夾角和夾角正對的一段弧。當這段弧長正好等於圓的半徑時,兩條射線的夾角大小為1弧度。

示意圖如下:

其中:AB=OA=r

3,角度與弧度的差別

最基本的差別在於角所對的弧長大小不同。度的是等於圓周長的360分之中的一個,而弧度的是等於半徑。

4,角度與弧度的轉換

因為:弧度角=弧長/半徑

所以:

a,周角(360度)=周長/半徑=2πr/r=2π

b,平角(180度)=π

由b可知:180度=π弧度

所以:

c,1度=π/180 弧度(≈0.017453弧度)
d,1弧度=180/π 度(≈57.3度)

可得轉換公式:

弧度=度*π/180
度=弧度*180/π


三、動畫實現

實現的思路簡單而言便是利用正弦曲線的”y“和”x“值的變化。對於緩入緩出動畫,就是速度的變化。

速度的定義和公式:速度在數值上等於物體運動的位移跟發生這段位移所用的時間的比值。速度的計算公式為v=Δs/Δt

控制速度,無非是”距離“與”時間“這兩個量的變化。

在實現應用中,往往不會同時變化兩個量,而是固定一個量,變化一個量。

在實際程序實現時,一般是固定“時間”,只變化“距離”。此處的”時間“可以理解為”時間間隔“。即在時間間隔不變的情況下,需要考慮每個時間間隔內運行的距離。

那麼在正弦曲線上的體現便是等x間隔下,y的取值。

(一)簡單實現

(1)實現思路:

1,通過y=sin(x)的曲線可知:y值的範圍是(-1~+1)

2,將曲線上移,上移距離為1,即:y=sin(x)+1,此時y值的範圍:(0~2)

3,為使y值範圍變為(0~1),對函數除2,即:y=(sin(x)+1)/2

如圖(藍線為 y=sin(x)):

4,將y值乘以緩入緩出動畫的擺動距離

(2)C#實現:

1,控件布局及屬性

2,核心代碼

 1 void pShowD()
 2 {
 3     //i是度數,不是弧度
 4     int i = 0;
 5     //移動距離要減去滑塊本身的寬度
 6     double dMoveDistance = panel_Board.Width - panel_Slider.Width;
 7     while (true)
 8     {
 9         i++;
10         if (i > 360)
11         {
12             //一個周期是360度
13             i = 0;
14         }
15         //固定時間間隔
16         Thread.Sleep(10);
17         //通過公式:弧度=度*π/180,將度數i轉為Math.Sin()所需要的弧度數
18         double dz = dMoveDistance * (1 + Math.Sin(i * Math.PI / 180)) / 2;
19         pSetLeft(Convert.ToInt32(dz));
20 
21     }
22 }
23 
24 void pSetLeft(int i)
25 {
26     if (panel_Slider.InvokeRequired)
27     {
28         panel_Slider.Invoke(new Action<int>(pSetLeft), new object[] { i });
29     }
30     else
31     {
32         panel_Slider.Left = i;
33     }
34 }

簡單實現

3,運行效果

(二)簡單實現優化

通過觀察上面的實現,可以發現雖然實現了緩入緩出效果,但是其”滑塊“(panel_Slider)的起始位置卻不是最左側,而是從中間開始。

根據上面的公式也可以看出來,當x=0時,y=(sin(x)+1)/2=1/2,即:整個擺動距離的二分之一。

(1)優化思路

為了讓滑塊從最左側開始,則需要將曲線向右移動,移動距離是π/2。

其曲線公式變為:y=(sin(x-π/2)+1)/2

如圖(藍線為 y=sin(x)):

(2)C#實現

1,布局同上。

2,核心代碼

 1 void pShowD2()
 2 {
 3     //i是度數,不是弧度
 4     int i = 0;
 5     //移動距離要減去滑塊本身的寬度
 6     double dMoveDistance = panel_Board.Width - panel_Slider.Width;
 7     while (true)
 8     {
 9         i++;
10         if (i > 360)
11         {
12             //一個周期是360度
13             i = 0;
14         }
15         //固定時間間隔
16         Thread.Sleep(10);
17         //通過公式:弧度=度*π/180,將度數i轉為Math.Sin()所需要的弧度數
18         //因為i是度數,所以是(i-90)
19         double dz = dMoveDistance * (1 + Math.Sin((i-90) * Math.PI / 180)) / 2;
20         pSetLeft(Convert.ToInt32(dz));
21 
22     }
23 }
24 
25 void pSetLeft(int i)
26 {
27     if (panel_Slider.InvokeRequired)
28     {
29         panel_Slider.Invoke(new Action<int>(pSetLeft), new object[] { i });
30     }
31     else
32     {
33         panel_Slider.Left = i;
34     }
35 }

簡單實現(優化)

3,運行效果

(三)擴展實現

在實際應用中,動畫往往需要在”固定時間“內完成。

以前面實現為例,使滑塊從左端滑到右端的時長固定為1秒。該怎麼實現呢?

 (1)實現思路

整體思路與之前的並沒有什麼大的區別,仍是固定”時間“,變化”距離“。

在前面的”簡單實現(優化)“的基礎上,需要增加下面的一些修改和補充:

1,假設”時間間隔“為:Interval,那麼,在指定的1秒內,共會變化(Step=1/Interval)次。

2,那麼,每次變化時度數的變化便不再是”1“,又一個周期是滑塊一個來回,所以,第次變化的度數便是:Per=2π/2*Step=180/Step。

(2)C#實現

在實現時加入了勻速的對比。

1,布局及屬性

2,核心代碼

 1 void pShowD2()
 2 {
 3     //當前滑塊的位置
 4     double d = 0;
 5     //true/false:向右滑/向左滑
 6     bool bToRight = true;
 7     //時間間隔,單位:ms
 8     int iInterval = 10;
 9     //從左到右所需要的總時間,單位:ms
10     int iAnimateTime = 1000;
11     //移動距離要減去滑塊本身的寬度
12     double dMoveDistance = panel_Board.Width - panel_Slider.Width;
13     //需要變化的次數
14     double dStep = Convert.ToDouble(iAnimateTime) / iInterval;
15     //每次變化所增加的距離
16     double dPerX = dMoveDistance / dStep;
17     while (true)
18     {
19         d = bToRight ? d + dPerX : d - dPerX;
20         if (d > dMoveDistance)
21         {
22             bToRight = false;
23         }
24         if (d < 0)
25         {
26             bToRight = true;
27         }
28 
29         Thread.Sleep(iInterval);
30         int iZ = Convert.ToInt32(d);
31         pSetLeft2(iZ);
32 
33     }
34 }
35 void pSetLeft2(int i)
36 {
37     if (panel_S2.InvokeRequired)
38     {
39         panel_S2.Invoke(new Action<int>(pSetLeft2), new object[] { i });
40     }
41     else
42     {
43         panel_S2.Left = i;
44     }
45 }

1,勻速

 1 void pShowD()
 2 {
 3     //d是度數,不是弧度
 4     double d = 0;
 5     //時間間隔,單位:ms
 6     int iInterval = 10;
 7     //從左到右所需要的總時間,單位:ms
 8     int iAnimateTime = 1000;
 9     //移動距離要減去滑塊本身的寬度
10     double dMoveDistance = panel_Board.Width - panel_Slider.Width;
11     //需要變化的次數
12     double dStep = Convert.ToDouble(iAnimateTime) / iInterval;
13     //每次變化所增加的度數
14     double dPer = 180.0 / dStep;
15     while (true)
16     {
17         d += dPer;
18         if (d > 360)
19         {
20             //一個周期是360度
21             d = 0;
22         }
23         //固定時間間隔
24         Thread.Sleep(iInterval);
25         //通過公式:弧度=度*π/180,將度數i轉為Math.Sin()所需要的弧度數
26         double dz = dMoveDistance * (1 + Math.Sin((d - 90) * Math.PI / 180)) / 2;
27         pSetLeft(Convert.ToInt32(dz));
28 
29     }
30 }
31 
32 void pSetLeft(int i)
33 {
34     if (panel_Slider.InvokeRequired)
35     {
36         panel_Slider.Invoke(new Action<int>(pSetLeft), new object[] { i });
37     }
38     else
39     {
40         panel_Slider.Left = i;
41     }
42 }

2,緩入緩出

3,運行效果


四、結束語

本篇主要講的是三角函數與緩入緩出動畫,但三角函數在動畫中的作用不僅僅如此,比如直接使用正弦曲線的形狀來繪製波浪效果——在充電、進度條等地方可以使用該效果。

而且即然知道在曲線在動畫中的作用,那麼便可以通過不同的函數曲線實現不同的動畫效果,比如另一個非常好用的”貝塞爾曲線“,可以實現更複雜、更優雅的動畫效果。


如有錯誤和不足之處歡迎大家批評指正。


本站聲明:網站內容來源於博客園,如有侵權,請聯繫我們,我們將及時處理

【其他文章推薦】

網頁設計公司推薦不同的風格,搶佔消費者視覺第一線

※廣告預算用在刀口上,台北網頁設計公司幫您達到更多曝光效益

※自行創業缺乏曝光? 網頁設計幫您第一時間規劃公司的形象門面

南投搬家公司費用需注意的眉眉角角,別等搬了再說!

※教你寫出一流的銷售文案?

分類
發燒車訊

南京金龍加碼純電動物流車 四款新品將在振威新能源汽車展亮相

近年來,在電子商務快速發展的強勢需求拉動下,中國電商物流繼續保持快速增長。在環境壓力較大的當下,物流行業推行新能源汽車也成了改善環境,治理霧霾的一個重要手段。

在新能源物流車形勢一片大好的情況下,新能源客車產品在細分市場銷量第二把交椅的南京金龍自然也不會錯過這一片藍海。據瞭解,南京金龍將於2017上海國際新能源汽車產業博覽會上推出四款新品純電動物流車。展會由振威展覽股份、中國土木工程學會城市公共交通學會、廣東省新能源汽車產業協會、廣東省充電設施協會及充電設施線上網聯合舉辦,將於2017年8月23-25日在上海新國際博覽中心舉行。

據瞭解,本次南京金龍四款純電動物流車型分別為開沃D07、開沃D09、開沃D10和開沃D11。此四款物流車涵蓋3.9-5.9米的中小型物流車,且秉承其一貫的強勁續航能力,滿載續航均在220-260公里,是名副其實的續航之王。其中開沃D07為微型純電動物流車,主要用於城市內的快遞派送。作為“最後一公里”快遞配送專家,其載貨空間達3.4立方米,載貨量可達600KG,完美滿足市網點到客戶的快遞配送。開沃D09、D10為輕型純電動物流車,載貨空間分別在6立方米和8立方米,載重分別為750kg和1000kg,主要用作城市間的物流配送“貨的”。

開沃D7純電動物流車

去年,南京金龍就推出了素有“快遞王”之稱的開沃E7,“物流王”開沃D11,早已以其380公里左右的高續航、1.55噸的高載重、12.3個立方的高容量等特點,4小時繞北京五環三圈贏得了新能源物流車界的良好口碑。D11作為城市大空間長續航的物流王更是經受市場考驗超過3年、以好品質得到客戶認可和擁護的車型,輕鬆勝任城市間的物流運輸。

3月1日,工信部官網正式公佈了《新能源汽車推廣應用推薦車型目錄(2017年第2批)》主要車型及參數。此次發佈的目錄涉及新能源乘用車、新能源客車及新能源專用車共有40家企業201款車型進入目錄。其中,南京金龍開沃牌NJL5040XXYBEV1純電動廂式運輸車入圍本次目錄。

資料顯示,2016年純電動物流車產量達5.78萬輛,且2017年剛開始,工信部就給電動物流車行業一個驚喜。首批新能源汽車推薦目錄發佈,以電動物流車為代表的專用車型共有36款,占總比19%。“新能源物流車正成為新能源商用車發展的一大亮點。”全國乘聯會秘書長崔東樹也指出,新能源物流車使用費用低,維(護)修簡單,從國家政策的扶持以及城市空氣污染的角度來看,新能源物流車急劇增長是必然的,也是長期的發展趨勢。

據不完全統計,北京、上海、廣東、天津等37省市出臺的新能源汽車政策裡都有提及純電動物流車的相關政策。隨著政策的明朗,行業逐漸趨於理性,純電動物流車市場迎來健康發展,其也將迎來真正的發展元年。業界普遍認為,2017年電動物流車行業預計將實現10萬輛左右的銷量,同比增速超過100%。

南京金龍市場負責人表示,本次展會的召開是一個很好的契機,南京金龍開沃純電動物流車憑藉靈活多變的空間及穩定的滿負荷續航里程,將極大地改變我國新能源物流車產業發展格局。未來,南京金龍憑藉產品技術優勢,不斷開拓物流、快遞行業需求,為全面實現“零排放物流”的行業大計而持續努力。

組委會聯繫方式:+86 20-83953286
連絡人:黃俊鵬
官方微信公眾號:nevechina

本站聲明:網站內容來源於EnergyTrend https://www.energytrend.com.tw/ev/,如有侵權,請聯繫我們,我們將及時處理

【其他文章推薦】

USB CONNECTOR掌控什麼技術要點? 帶您認識其相關發展及效能

台北網頁設計公司這麼多該如何選擇?

※智慧手機時代的來臨,RWD網頁設計為架站首選

※評比南投搬家公司費用收費行情懶人包大公開

※回頭車貨運收費標準

分類
發燒車訊

英威騰:高效電驅動專家 攜多款新品亮相振威新能源汽車展

中國已經成為全球新能源汽車發展最快,保有量最大的國家。但是隨著國家補貼的逐漸退坡,新能源汽車企業的壓力也越來越大。那麼隨著中國新能源汽車行業由政策導向變為市場導向,如何能快速、有效的降低生產成本,成為了新能源車企亟待解決的問題。

目前來說,動力電池方面價格在逐步的下降,除此之外電機、電控等環節也應該成為降低成本的重要方向。市場的規模效應一直都是降低成本的最好辦法,也就是說,除了動力電池之外,其餘的環節也需要這樣的規模效應。

英威騰作為電機控制器領域的龍頭企業,在新能源汽車電控產品的創新和研發上取得了重大的進展。據英威騰負責人介紹,後補貼時代的到來,英威騰將通過創新設計和規模效應來降低成本,通過提升產品品質降低費用,讓更多的客戶認可其產品品質和產品性能,從而推動大批量應用。這樣才會使企業減少對補貼的依賴,使產業更健康發展。

目前,英威騰電機控制器系列產品主要有純電動客車主電機控制器、混合動力客車主電機控制器、環衛車主電機控制器、物流車主電機控制器、輔助控制器及各種集成方案。其主電機控制器主要用於新能源汽車發電機與電動機的控制,可用來控制新能源汽車的非同步電機和永磁同步電機,實現高效、節能,控制器效率可達98%。輔助控制器主要用於新能源汽車轉向、刹車、上裝等的電機控制、蓄電池或輔助電源的供電等。

為了應對新能源汽車行業新的發展態勢,英威騰於去年8月成立了深圳市英威騰電動汽車充電技術有限公司,專門從事與電動汽車相關的電機控制器、電機、輔助控制器、 DC-DC轉換器、車載充電機、地面充電樁/充電機及電池組件產品和整體解決方案的開發及銷售。至此,英威騰基本形成了以電機電控、電池和充電設施等完善的新能源汽車配套產業解決方案產品體系。

據悉,英威騰將攜最新研發的電機控制器及其自主研發的最新充電設備產品首度亮相2017中國國際新能源汽車產業博覽會(以下簡稱振威新能源汽車展)。

本次英威騰將展出四款充電設備最新的相關產品。涵蓋了掛壁式充電樁,充電模組、充電機、DCDC。此四款產品的特點在於對電流的保護,特別是在過壓、欠壓、短路等方面表現出色。

振威新能源汽車展是由廣東省充電設施協會、廣東省新能源汽車產業協會、充電設施線上網及振威展覽股份聯合舉辦。將於2017年6月16-18日、2017年8月23-25日分別在深圳會展中心及上海新國際博覽中心舉行。超過800家新能源汽車產業相關的企業將參與本次展會,累積展示面積超過6萬平方米。

本次展會振威展覽股份醞釀了多年,從最初的鋰電展到充電設備展,經過多年的籌備,在2017年整合了新能源汽車產業的整車製造、核心三電(電池、電機、電控)、充電設備、BMS、零部件等全產業鏈環節,致力於打造中國新能源汽車產業第一展。

組委會聯繫方式:+86-20-83953286
連絡人:黃俊鵬
官方微信公眾號:nevechina

本站聲明:網站內容來源於EnergyTrend https://www.energytrend.com.tw/ev/,如有侵權,請聯繫我們,我們將及時處理

【其他文章推薦】

網頁設計公司推薦不同的風格,搶佔消費者視覺第一線

※廣告預算用在刀口上,台北網頁設計公司幫您達到更多曝光效益

※自行創業缺乏曝光? 網頁設計幫您第一時間規劃公司的形象門面

南投搬家公司費用需注意的眉眉角角,別等搬了再說!

※教你寫出一流的銷售文案?

分類
發燒車訊

K8S-磁盤配額管理-整理

1.  ephemeral-storage介紹

Kubernetes在1.8的版本中引入了一種類似於CPU,RAM的新的資源模式:ephemeral-storage屬性(直譯為臨時存儲),並且在1.10的版本kubelet默認啟用了這個特性。

ephemeral-storage實現了對Pod應用存儲資源的管理,可以有效的降低Pod應用失控消耗完 node磁盤空間的風險。官網中對該屬性的描述如下:

(https://kubernetes.io/docs/concepts/configuration/manage-resources-containers/):


從上述官網介紹,總結如下:

  1. 臨時存儲:臨時的含義是指容器內的數據未做持久化處理,生命周期和容器一致。
  2. 作用對象:容器日誌(/var/log)、EmptyDir類型的volume數據(/var/lib/kubelet)、鏡像層和容器可寫層(/var/lib/docker)。由此可見,基本覆蓋了Pod各個方面的磁盤消耗。
  3. 管理的文件系統:ephemeral-storage對kubelet的根目錄(默認是/var/lib/kubelet)所在的節點分區(文件系統)進行管理,即如果把/var/lib/docker獨立分區,ephemeral-storage將不對/var/lib/docker目錄進行管理。
  4. Pod調度流程:節點上的kubelet啟動的時候,kubelet會統計當前節點的kubelet分區的可分配的磁盤資源,或者你可以覆蓋節點上kubelet的配置來自定義可分配的資源。在創建Pod時會根據存儲需求調度到滿足存儲的節點,在Pod使用超過限制的存儲時會對其做驅逐的處理來保證不會耗盡節點上的磁盤空間。

2. ephemeral-storage功能驗證

2.1   環境準備

  • 虛擬機配置

1)    規格:16 vCpu + 80 GB RAM + 1000 GB 磁盤

2)    分區:/var/lib/docker、/var/lib/kubelet/和/var/log全在同一個系統分區上

  • 測試容器鏡像

1)  Dockerfile

FROM ubuntu:16.04
ADD start.sh /home/
RUN mkdir -p /lq/log/
ENTRYPOINT /home/start.sh

2)  Start.sh

#!/bin/bash
while true
do
dateString=`date`
echo "$dateString==================================">> /lq/log/test.log
done
  • 集群環境

1)  Kuberneters版本:1.15.6

2)  Docker版本:18.06

2.2   容器可寫層大小

  • 容器的部署文件


說明:

1)    容器的啟動腳本start.sh會持續的向容器內路徑/lq/log下寫test.log日誌

2)    該日誌並未掛載出來,故日誌文件在宿主機的容器可寫層目錄下

3)    該容器申請10Mi的磁盤空間,上限為20Mi

  • 創建該Pod

使用kubectl apply -f xxxx.yaml,觀察可寫層日誌大小情況以及Pod運行情況

很快可寫層的日誌就達到了16Mi

  • 繼續觀察Pod


Pod驅逐了(容器被殺掉,容器內數據全部丟失)

 從上述Event事件可以看到,Pod可用磁盤空間被限制住了

2.3   EmptyDir日誌

  • 部署文件


說明:

1)    容器的啟動腳本start.sh會持續的向容器內路徑/lq/log下寫test.log日誌

2)    該日誌通過EmptyDir掛載出來,故日誌文件在宿主機的/var/lib/kubelet目錄下

3)    該容器申請10Mi的磁盤空間,上限為100Mi,emptyDir路徑上限為40Mi

  • 創建該Pod

使用kubectl apply -f  xxxxxxxx.yaml

  • 查詢日誌路徑以及Pod運行情況


可以看到日誌已經到了32Mi,目前Pod運行正常

  • 繼續等待,觀察Pod情況


Pod被驅逐了(容器殺死,全部數據丟失)

  • 查看Pod事件


可見該日誌磁盤空間被限制了

2.4   /var/log目錄日誌

一般Pod的啟動日誌(k8s上的控制台日誌)會記錄到宿主機的/var/log目錄下,並且根據前面介紹得知ephemeral-storage會對該目錄下的容器日誌磁盤空間大小進行管理,但是由於我使用的測試鏡像並無啟動日誌,故通過hostPath掛載的方式掛載到該路徑下,看看我們显示指定掛載路徑的時候,ephemeral-storage還能否生效。

  • 部署文件


  • 創建該Pod


  • 觀察Pod運行情況


可以看到,自己显示掛載的路徑並做不到磁盤空間限制。

  • 換一種思路

由於無啟動日誌,故想書寫腳本向容器的啟動日誌瘋狂輸出日誌,觀測Pod運行情況

1)  修改start.sh


2)  修改部署文件


3)  創建該Pod


Docker logs查看,容器在瘋狂的輸出日誌


4)  持續一段時間,觀察Pod運行狀態


Pod驅逐了

2.5   其他情況說明

  1. /var/lib/docker和/var/lib/docker分區文件系統不一致。未做截圖,但是已經實際驗證:/var/lib/docker的分區和kubelet分區不一致的時候,ephemeral-storage對/var/lib/docker目錄磁盤空間大小不做管控

3.  驗證結論

  1. 分區要一致,否則ephemeral-storage管理不到
  2. ephemeral-storage管理的是容器相關的目錄路徑下的磁盤大小,自己顯式掛載的定製化路徑無法控制磁盤空間

4.  參考文檔

  1. https://kubernetes.io/docs/concepts/configuration/manage-resources-containers/
  2. https://blog.csdn.net/sdmei/article/details/101017405(總結的非常好)

本站聲明:網站內容來源於博客園,如有侵權,請聯繫我們,我們將及時處理

【其他文章推薦】

USB CONNECTOR掌控什麼技術要點? 帶您認識其相關發展及效能

台北網頁設計公司這麼多該如何選擇?

※智慧手機時代的來臨,RWD網頁設計為架站首選

※評比南投搬家公司費用收費行情懶人包大公開

※回頭車貨運收費標準

分類
發燒車訊

面試必問系列之JDK動態代理

掃描文末二維碼或者微信搜索公眾號小李不禿,即可關注微信公眾號,獲取到更多 Java 相關內容。

1. 帶着問題去學習

面試中經常會問到關於 Spring 的代理方式有哪兩種?大家異口同聲的回答:JDK 動態代理和 CGLIB 動態代理。

這兩種代理有什麼區別呢?JDK 動態代理的類通過接口實現,CGLIB 動態代理是通過子類來實現的。

那 JDK 動態代理你了到底了解多少呢?有去看過代理對象的 class 文件么?下面兩個關於 JDK 動態代理的問題你能回答上來么?

  • 問題1:為什麼 JDK 動態代理要基於接口實現?而不是基於繼承來實現?
  • 問題2:JDK 動態代理中,目標對象調用自己的另一個方法,會經過代理對象么

小李帶着大家更深入的了解一下 JDK 的動態代理。

2. JDK 動態代理的寫法

  • JDK 動態代理需要這幾部分內容:接口、實現類、代理對象。
  • 代理對象需要繼承 InvocationHandler,代理類調用方法時會調用 InvocationHandlerinvoke 方法。
  • Proxy 是所有代理類的父類,它提供了一個靜態方法 newProxyInstance 動態創建代理對象。
public interface IBuyService {
     void buyItem(int userId);
     void refund(int nums);
}


@Service
public class BuyServiceImpl implements IBuyService {
    @Override
    public void buyItem(int userId) {
        System.out.println("小李不禿要買東西!小李不禿的id是: " + userId);
    }
    @Override
    public void refund(int nums) {
        System.out.println("商品過保質期了,需要退款,退款數量 :" + nums);
    }
}


public class JdkProxy implements InvocationHandler {

    private Object target;
    public JdkProxy(Object target) {
        this.target = target;
    }
    // 方法增強
    @Override
    public Object invoke(Object proxy, Method method, Object[] args) throws Throwable {
        before(args);
        Object result = method.invoke(target,args);
        after(args);
        return result;
    }
    private void after(Object result) { System.out.println("調用方法后執行!!!!" ); }
    private void before(Object[] args) { System.out.println("調用方法前執行!!!!" ); }

    // 獲取代理對象
    public <T> getProxy(){
        return (T) Proxy.newProxyInstance(target.getClass().getClassLoader(),
                target.getClass().getInterfaces(),this);
    }
}


public class JdkProxyMain {
    public static void main(String[] args) {
        // 標明目標 target 是 BuyServiceImpl
        JdkProxy proxy = new JdkProxy(new BuyServiceImpl());
        // 獲取代理對象實例
        IBuyService buyItem = proxy.getProxy();
        // 調用方法
        buyItem.buyItem(12345);
    }
}

查看運行結果

調用方法前執行!!!!
小李不禿要買東西!小李不禿的id是: 12345
調用方法后執行!!!!

我們完成了對目標方法的增強,開始對代理對象進行一個更全面的分析。

3. 剖析代理對象並解答問題

剖析代理對象的前提得是有代理對象,動態代理的對象是在運行時期創建的,我們就沒辦法通過打斷點的方式進行分析了。但是我們可以通過反編譯 .class 文件進行分析。如何獲取到 .class 文件呢?

通過在代碼中添加:System.getProperties().put("sun.misc.ProxyGenerator.saveGeneratedFiles", "true") ,就能夠實現將動態代理對象的 class 文件寫入到磁盤中。代碼如下:

public class JdkProxyMain {
    public static void main(String[] args) {
        // 代理對象的 class 文件寫入到磁盤中
        System.getProperties().put("sun.misc.ProxyGenerator.saveGeneratedFiles""true");
        // 標明目標 target 是 BuyServiceImpl
        JdkProxy proxy = new JdkProxy(new BuyServiceImpl());
        // 獲取代理對象實例
        IBuyService buyItem = proxy.getProxy();
        // 調用方法
        buyItem.buyItem(12345);
    }
}

在項目的根目錄下多了一個 $Proxy0.class 文件

看一下這個文件的內容

public final class $Proxy0 extends Proxy implements IBuyService {
    private static Method m1;
    private static Method m3;
    private static Method m2;
    private static Method m4;
    private static Method m0;

    public $Proxy0(InvocationHandler var1) throws  {
        super(var1);
    }

    public final boolean equals(Object var1) throws  {
        try {
            return (Boolean)super.h.invoke(this, m1, new Object[]{var1});
        } catch (RuntimeException | Error var3) {
            throw var3;
        } catch (Throwable var4) {
            throw new UndeclaredThrowableException(var4);
        }
    }

    public final void buyItem(int var1) throws  {
        try {
            super.h.invoke(this, m3, new Object[]{var1});
        } catch (RuntimeException | Error var3) {
            throw var3;
        } catch (Throwable var4) {
            throw new UndeclaredThrowableException(var4);
        }
    }

    public final String toString() throws  {
        try {
            return (String)super.h.invoke(this, m2, (Object[])null);
        } catch (RuntimeException | Error var2) {
            throw var2;
        } catch (Throwable var3) {
            throw new UndeclaredThrowableException(var3);
        }
    }

    public final void refund(int var1) throws  {
        try {
            super.h.invoke(this, m4, new Object[]{var1});
        } catch (RuntimeException | Error var3) {
            throw var3;
        } catch (Throwable var4) {
            throw new UndeclaredThrowableException(var4);
        }
    }

    public final int hashCode() throws  {
        try {
            return (Integer)super.h.invoke(this, m0, (Object[])null);
        } catch (RuntimeException | Error var2) {
            throw var2;
        } catch (Throwable var3) {
            throw new UndeclaredThrowableException(var3);
        }
    }

    static {
        try {
            m1 = Class.forName("java.lang.Object").getMethod("equals", Class.forName("java.lang.Object"));
            m3 = Class.forName("com.example.springtest.service.IBuyService").getMethod("buyItem", Integer.TYPE);
            m2 = Class.forName("java.lang.Object").getMethod("toString");
            m4 = Class.forName("com.example.springtest.service.IBuyService").getMethod("refund", Integer.TYPE);
            m0 = Class.forName("java.lang.Object").getMethod("hashCode");
        } catch (NoSuchMethodException var2) {
            throw new NoSuchMethodError(var2.getMessage());
        } catch (ClassNotFoundException var3) {
            throw new NoClassDefFoundError(var3.getMessage());
        }
    }
}

動態代理對象 $Proxy0 繼承了 Proxy 類並且實現了 IBuyService 接口。那問題 1 的答案就出來了:動態代理對象默認繼承了 Proxy 對象,而且 Java 不支持多繼承,所以 JDK 動態代理要基於接口來實現。

$Proxy0 重寫了 IBuyService 接口的方法,還有 Object 的方法。在重寫的方法中,統一調用 super.h.invoke 方法。super 指的是 Proxyh 代表 InvocationHandler,這裏就是 JdkProxy。所以這裏調用的是 JdkProxyinvoke 方法。

所以每次調用 buyItem 方法的時候,會先打印出 調用方法前執行!!!!

@Override
public Object invoke(Object proxy, Method method, Object[] args) throws Throwable {
before(args);
// 通過反射調用方法
Object result = method.invoke(target,args);
after(args);
return result;
}
private void after(Object result) { System.out.println("調用方法后執行!!!!" ); }
private void before(Object[] args) { System.out.println("調用方法前執行!!!!" ); }

問題 2 還沒解決呢,接着往下看

@Service
public class BuyServiceImpl implements IBuyService {
    @Override
    public void buyItem(int userId) {
        System.out.println("小李不禿要買東西!小李不禿的id是: " + userId);
        refund(100);
    }
    @Override
    public void refund(int nums) {
        System.out.println("商品過保質期了,需要退款,退款數量 :" + nums);
    }
}

上面這段代碼中,在 buyItem 調用內部的 refund 方法,那這個內部調用方法是否走代理對象呢?看一下執行結果:

調用方法前執行!!!!
小李不禿要買東西!小李不禿的id是: 12345
商品過保質期了,需要退款,退款數量 :100
調用方法后執行!!!!

確實是沒有走代理對象,其實我們期待的結果是下面這樣的

調用方法前執行!!!!
小李不禿要買東西!小李不禿的id是: 12345
調用方法前執行!!!!
商品過保質期了,需要退款,退款數量 :100
調用方法后執行!!!!
調用方法后執行!!!!

那為什麼會造成這種差異呢?

因為內部調用 refund 方法的調用,相當於 this.refund(100),而這個 this 指的是 BuyServiceImpl 對象,而不是代理對象,所以refund 方法沒有得到增強

4. 總結和延伸

  • 本篇文章了解了 JDK 動態代理的使用,通過分析 JDK 動態代理生成對象的 class 文件,解決了兩個問題:

    • 問題1:為什麼 JDK 動態代理要基於接口實現?而不是基於繼承來實現?
    • 解答:因為 JDK 動態代理生成的對象默認是繼承 Proxy ,Java 不支持多繼承,所以 JDK 動態代理要基於接口來實現。
    • 問題2:JDK 動態代理中,目標對象調用自己的另一個方法,會經過代理對象么
    • 解答:內部調用方法使用的對象是目標對象本身,被調用的方法不會經過代理對象。
  • 我們知道了 JDK 動態代理內部調用是不走代理對象的。那對於 @Transactional 和 @Async 等註解不起作用是不是就搞清楚為啥了?

  • 因為 @Transactional@Async 等註解是通過 Spring AOP 來進行實現的,如果動態代理使用的是 JDK 動態代理,那麼在方法的內部調用該方法中其它帶有該註解的方法,由於此時調用的不是動態代理對象,所以註解失效

  • 上面這些問題就是 JDK 動態代理的缺點,那 Spring 如何避免這個問題呢?就是另個一個動態代理:CGLIB 動態代理,我會在下篇文章進行分析。

5. 參考

  • https://juejin.im/post/5d8a0799f265da5b7a752e7c#heading-6
  • https://blog.csdn.net/varyall/article/details/102952365

6. 猜你喜歡

  • JSON的學習和使用

  • 學習反射看這一篇就夠了

  • 併發編程學習(一)Java 內存模型

掃描下方二維碼即可關注微信公眾號小李不禿,一起高效學習 Java。

本站聲明:網站內容來源於博客園,如有侵權,請聯繫我們,我們將及時處理

【其他文章推薦】

網頁設計公司推薦不同的風格,搶佔消費者視覺第一線

※廣告預算用在刀口上,台北網頁設計公司幫您達到更多曝光效益

※自行創業缺乏曝光? 網頁設計幫您第一時間規劃公司的形象門面

南投搬家公司費用需注意的眉眉角角,別等搬了再說!

※教你寫出一流的銷售文案?

分類
發燒車訊

Spring Data JPA

一、JPA概述:

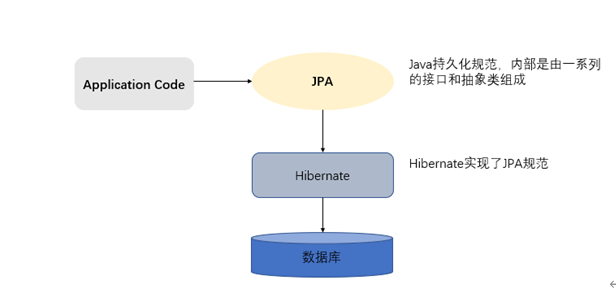
  JPA的全稱是Java Persistence API, 即Java 持久化API,是SUN公司推出的一套基於ORM的規範,內部是由一系列的接口和抽象類構成。JPA通過JDK 5.0註解描述對象-關係表的映射關係,並將運行期的實體對象持久化到數據庫中。

  JPA的優勢:標準化、容器級特性的支持、簡單方便、查詢能力、高級特性

二、JPA與Hibernate的關係:

  JPA規範本質上就是一種ORM規範,注意不是ORM框架——因為JPA並未提供ORM實現,它只是制訂了一些規範,提供了一些編程的API接口,但具體實現則由服務廠商來提供實現。JPAHibernate的關係就像JDBCJDBC驅動的關係,JPA是規範,Hibernate除了作為ORM框架之外,它也是一種JPA實現。


三、JPA環境搭建:

1、創建一個maven工程,在pom.xml中導入對應的坐標

 1    <properties>
 2         <project.build.sourceEncoding>UTF-8</project.build.sourceEncoding>
 3         <project.hibernate.version>5.0.7.Final</project.hibernate.version>
 4     </properties>
 5 
 6     <dependencies>
 7         <!-- junit -->
 8         <dependency>
 9             <groupId>junit</groupId>
10             <artifactId>junit</artifactId>
11             <version>4.12</version>
12             <scope>test</scope>
13         </dependency>
14 
15         <!-- hibernate對jpa的支持包 -->
16         <dependency>
17             <groupId>org.hibernate</groupId>
18             <artifactId>hibernate-entitymanager</artifactId>
19             <version>${project.hibernate.version}</version>
20         </dependency>
21 
22         <!-- c3p0 -->
23         <dependency>
24             <groupId>org.hibernate</groupId>
25             <artifactId>hibernate-c3p0</artifactId>
26             <version>${project.hibernate.version}</version>
27         </dependency>
28 
29         <!-- log日誌 -->
30         <dependency>
31             <groupId>log4j</groupId>
32             <artifactId>log4j</artifactId>
33             <version>1.2.17</version>
34         </dependency>
35 
36         <!-- Mysql and MariaDB -->
37         <dependency>
38             <groupId>mysql</groupId>
39             <artifactId>mysql-connector-java</artifactId>
40             <version>5.1.6</version>
41         </dependency>
42     </dependencies>

2、編寫實體類和數據表的映射配置,創建實體類以後,使用對應的註釋配置映射關係

     @Entity
            作用:指定當前類是實體類。
        @Table
            作用:指定實體類和表之間的對應關係。
            屬性:
                name:指定數據庫表的名稱
        @Id
            作用:指定當前字段是主鍵。
        @GeneratedValue
            作用:指定主鍵的生成方式。。
            屬性:
                strategy :指定主鍵生成策略。
        @Column
            作用:指定實體類屬性和數據庫表之間的對應關係
            屬性:
                name:指定數據庫表的列名稱。
                unique:是否唯一  
                nullable:是否可以為空  
                inserttable:是否可以插入  
                updateable:是否可以更新  
                columnDefinition: 定義建表時創建此列的DDL  
                secondaryTable: 從表名。如果此列不建在主表上(默認建在主表),該屬性定義該列所在從表的名字搭建開發環境[重點]

3、配置JPA的核心配置文件

在java工程的src路徑下創建一個名為META-INF的文件夾,在此文件夾下創建一個名為persistence.xml的配置文件

<?xml version="1.0" encoding="UTF-8"?>
<persistence xmlns="http://java.sun.com/xml/ns/persistence"
    xmlns:xsi="http://www.w3.org/2001/XMLSchema-instance"
    xsi:schemaLocation="http://java.sun.com/xml/ns/persistence  
    http://java.sun.com/xml/ns/persistence/persistence_2_0.xsd"
    version="2.0">
    <!--配置持久化單元 
        name:持久化單元名稱 
        transaction-type:事務類型
             RESOURCE_LOCAL:本地事務管理 
             JTA:分佈式事務管理 -->
    <persistence-unit name="myJpa" transaction-type="RESOURCE_LOCAL">
        <!--配置JPA規範的服務提供商 -->
        <provider>org.hibernate.jpa.HibernatePersistenceProvider</provider>
        <properties>
            <!-- 數據庫驅動 -->
            <property name="javax.persistence.jdbc.driver" value="com.mysql.jdbc.Driver" />
            <!-- 數據庫地址 -->
            <property name="javax.persistence.jdbc.url" value="jdbc:mysql://localhost:3306/jpa" />
            <!-- 數據庫用戶名 -->
            <property name="javax.persistence.jdbc.user" value="root" />
            <!-- 數據庫密碼 -->
            <property name="javax.persistence.jdbc.password" value="111111" />

            <!--jpa提供者的可選配置:我們的JPA規範的提供者為hibernate,所以jpa的核心配置中兼容hibernate的配 -->
<property name="hibernate.show_sql" value="true" /> <property name="hibernate.format_sql" value="true" />
        
       <!--自動創建數據庫表:create(運行時創建表),update(如過有表則不創建表),none(不創建表) <property name="hibernate.hbm2ddl.auto" value="create" /> </properties> </persistence-unit> </persistence>

4、測試數據庫操作

通過調用EntityManager的方法完成獲取事務,以及持久化數據庫的操作

方法說明:    
    getTransaction : 獲取事務對象
    persist : 保存操作
    merge : 更新操作
    remove : 刪除操作
    find/getReference : 根據id查詢
 1 @Test
 2     public void test() {
 3         /**
 4          * 創建實體管理類工廠,藉助Persistence的靜態方法獲取
 5          *         其中傳遞的參數為持久化單元名稱,需要jpa配置文件中指定
 6          */
 7         EntityManagerFactory factory = Persistence.createEntityManagerFactory("myJpa");
 8         //創建實體管理類
 9         EntityManager em = factory.createEntityManager();
10         //獲取事務對象
11         EntityTransaction tx = em.getTransaction();
12         //開啟事務
13         tx.begin();
14         Customer c = new Customer();
15         c.setCustName("天地壹號");
16         //保存操作
17         em.persist(c);
18         //提交事務
19         tx.commit();
20         //釋放資源
21         em.close();
22         factory.close();
23     }

6、抽取JPAUtil工具類,通過工具類生成實體類管理器對象

package top.biyenanhai.dao;

import javax.persistence.EntityManager;
import javax.persistence.EntityManagerFactory;
import javax.persistence.Persistence;

public final class JPAUtil {
    // JPA的實體管理器工廠:相當於Hibernate的SessionFactory
    private static EntityManagerFactory em;
    // 使用靜態代碼塊賦值
    static {
        // 注意:該方法參數必須和persistence.xml中persistence-unit標籤name屬性取值一致
        em = Persistence.createEntityManagerFactory("myPersistUnit");
    }

    /**
     * 使用管理器工廠生產一個管理器對象
     * 
     * @return
     */
    public static EntityManager getEntityManager() {
        return em.createEntityManager();
    }
}


三、Spring Data JPA概述:

  Spring Data JPA 是 Spring 基於 ORM 框架、JPA 規範的基礎上封裝的一套JPA應用框架,可使開發者用極簡的代碼即可實現對數據庫的訪問和操作。它提供了包括增刪改查等在內的常用功能,且易於擴展!學習並使用 Spring Data JPA 可以極大提高開發效率!Spring Data JPA 讓我們解脫了DAO層的操作,基本上所有CRUD都可以依賴於它來實現,在實際的工作工程中,推薦使用Spring Data JPA + ORM(如:hibernate)完成操作,這樣在切換不同的ORM框架時提供了極大的方便,同時也使數據庫層操作更加簡單,方便解耦。

四、Spring Data JPA 與 JPA和hibernate之間的關係:

  JPA是一套規範,內部是有接口和抽象類組成的。hibernate是一套成熟的ORM框架,而且Hibernate實現了JPA規範,所以也可以稱hibernate為JPA的一種實現方式,我們使用JPA的API編程,意味着站在更高的角度上看待問題(面向接口編程)。Spring Data JPA是Spring提供的一套對JPA操作更加高級的封裝,是在JPA規範下的專門用來進行數據持久化的解決方案。

五、Spring Data JPA快速搭建開發環境:

1、創建maven工程,導入Spring Data JPA的坐標

  1    <properties>
  2         <spring.version>4.2.4.RELEASE</spring.version>
  3         <hibernate.version>5.0.7.Final</hibernate.version>
  4         <slf4j.version>1.6.6</slf4j.version>
  5         <log4j.version>1.2.12</log4j.version>
  6         <c3p0.version>0.9.1.2</c3p0.version>
  7         <mysql.version>5.1.6</mysql.version>
  8     </properties>
  9 
 10     <dependencies>
 11         <!-- junit單元測試 -->
 12         <dependency>
 13             <groupId>junit</groupId>
 14             <artifactId>junit</artifactId>
 15             <version>4.12</version>
 16             <scope>test</scope>
 17         </dependency>
 18         
 19         <!-- spring beg -->
 20         <dependency>
 21             <groupId>org.aspectj</groupId>
 22             <artifactId>aspectjweaver</artifactId>
 23             <version>1.6.8</version>
 24         </dependency>
 25 
 26         <dependency>
 27             <groupId>org.springframework</groupId>
 28             <artifactId>spring-aop</artifactId>
 29             <version>${spring.version}</version>
 30         </dependency>
 31 
 32         <dependency>
 33             <groupId>org.springframework</groupId>
 34             <artifactId>spring-context</artifactId>
 35             <version>${spring.version}</version>
 36         </dependency>
 37 
 38         <dependency>
 39             <groupId>org.springframework</groupId>
 40             <artifactId>spring-context-support</artifactId>
 41             <version>${spring.version}</version>
 42         </dependency>
 43 
 44         <dependency>
 45             <groupId>org.springframework</groupId>
 46             <artifactId>spring-orm</artifactId>
 47             <version>${spring.version}</version>
 48         </dependency>
 49 
 50         <dependency>
 51             <groupId>org.springframework</groupId>
 52             <artifactId>spring-beans</artifactId>
 53             <version>${spring.version}</version>
 54         </dependency>
 55 
 56         <dependency>
 57             <groupId>org.springframework</groupId>
 58             <artifactId>spring-core</artifactId>
 59             <version>${spring.version}</version>
 60         </dependency>
 61         
 62         <!-- spring end -->
 63 
 64         <!-- hibernate beg -->
 65         <dependency>
 66             <groupId>org.hibernate</groupId>
 67             <artifactId>hibernate-core</artifactId>
 68             <version>${hibernate.version}</version>
 69         </dependency>
 70         <dependency>
 71             <groupId>org.hibernate</groupId>
 72             <artifactId>hibernate-entitymanager</artifactId>
 73             <version>${hibernate.version}</version>
 74         </dependency>
 75         <dependency>
 76             <groupId>org.hibernate</groupId>
 77             <artifactId>hibernate-validator</artifactId>
 78             <version>5.2.1.Final</version>
 79         </dependency>
 80         <!-- hibernate end -->
 81 
 82         <!-- c3p0 beg -->
 83         <dependency>
 84             <groupId>c3p0</groupId>
 85             <artifactId>c3p0</artifactId>
 86             <version>${c3p0.version}</version>
 87         </dependency>
 88         <!-- c3p0 end -->
 89 
 90         <!-- log end -->
 91         <dependency>
 92             <groupId>log4j</groupId>
 93             <artifactId>log4j</artifactId>
 94             <version>${log4j.version}</version>
 95         </dependency>
 96 
 97         <dependency>
 98             <groupId>org.slf4j</groupId>
 99             <artifactId>slf4j-api</artifactId>
100             <version>${slf4j.version}</version>
101         </dependency>
102 
103         <dependency>
104             <groupId>org.slf4j</groupId>
105             <artifactId>slf4j-log4j12</artifactId>
106             <version>${slf4j.version}</version>
107         </dependency>
108         <!-- log end -->
109 
110         
111         <dependency>
112             <groupId>mysql</groupId>
113             <artifactId>mysql-connector-java</artifactId>
114             <version>${mysql.version}</version>
115         </dependency>
116 
117         <dependency>
118             <groupId>org.springframework.data</groupId>
119             <artifactId>spring-data-jpa</artifactId>
120             <version>1.9.0.RELEASE</version>
121         </dependency>
122 
123         <dependency>
124             <groupId>org.springframework</groupId>
125             <artifactId>spring-test</artifactId>
126             <version>4.2.4.RELEASE</version>
127         </dependency>
128         
129         <!-- el beg 使用spring data jpa 必須引入 -->
130         <dependency>  
131             <groupId>javax.el</groupId>  
132             <artifactId>javax.el-api</artifactId>  
133             <version>2.2.4</version>  
134         </dependency>  
135           
136         <dependency>  
137             <groupId>org.glassfish.web</groupId>  
138             <artifactId>javax.el</artifactId>  
139             <version>2.2.4</version>  
140         </dependency> 
141         <!-- el end -->
142 
143         <dependency>
144             <groupId>javax.xml.bind</groupId>
145             <artifactId>jaxb-api</artifactId>
146             <version>2.3.0</version>
147         </dependency>
148         <dependency>
149             <groupId>com.sun.xml.bind</groupId>
150             <artifactId>jaxb-impl</artifactId>
151             <version>2.3.0</version>
152         </dependency>
153         <dependency>
154             <groupId>com.sun.xml.bind</groupId>
155             <artifactId>jaxb-core</artifactId>
156             <version>2.3.0</version>
157         </dependency>
158         <dependency>
159             <groupId>javax.activation</groupId>
160             <artifactId>activation</artifactId>
161             <version>1.1.1</version>
162         </dependency>
163     </dependencies>
164         

2、整合Spring Data JPA與Spring

 1 <?xml version="1.0" encoding="UTF-8"?>
 2 <beans xmlns="http://www.springframework.org/schema/beans"
 3     xmlns:xsi="http://www.w3.org/2001/XMLSchema-instance" xmlns:aop="http://www.springframework.org/schema/aop"
 4     xmlns:context="http://www.springframework.org/schema/context"
 5     xmlns:jdbc="http://www.springframework.org/schema/jdbc" xmlns:tx="http://www.springframework.org/schema/tx"
 6     xmlns:jpa="http://www.springframework.org/schema/data/jpa" xmlns:task="http://www.springframework.org/schema/task"
 7     xsi:schemaLocation="
 8         http://www.springframework.org/schema/beans http://www.springframework.org/schema/beans/spring-beans.xsd
 9         http://www.springframework.org/schema/aop http://www.springframework.org/schema/aop/spring-aop.xsd
10         http://www.springframework.org/schema/context http://www.springframework.org/schema/context/spring-context.xsd
11         http://www.springframework.org/schema/jdbc http://www.springframework.org/schema/jdbc/spring-jdbc.xsd
12         http://www.springframework.org/schema/tx http://www.springframework.org/schema/tx/spring-tx.xsd
13         http://www.springframework.org/schema/data/jpa 
14         http://www.springframework.org/schema/data/jpa/spring-jpa.xsd">
15     
16     <!-- 1.dataSource 配置數據庫連接池-->
17     <bean id="dataSource" class="com.mchange.v2.c3p0.ComboPooledDataSource">
18         <property name="driverClass" value="com.mysql.jdbc.Driver" />
19         <property name="jdbcUrl" value="jdbc:mysql://localhost:3306/jpa" />
20         <property name="user" value="root" />
21         <property name="password" value="111111" />
22     </bean>
23     
24     <!-- 2.配置entityManagerFactory -->
25     <bean id="entityManagerFactory" class="org.springframework.orm.jpa.LocalContainerEntityManagerFactoryBean">
26         <property name="dataSource" ref="dataSource" />
27         <property name="packagesToScan" value="cn.itcast.entity" />
28         <property name="persistenceProvider">
29             <bean class="org.hibernate.jpa.HibernatePersistenceProvider" />
30         </property>
31         <!--JPA的供應商適配器-->
32         <property name="jpaVendorAdapter">
33             <bean class="org.springframework.orm.jpa.vendor.HibernateJpaVendorAdapter">
34                 <property name="generateDdl" value="false" />
35                 <property name="database" value="MYSQL" />
36                 <property name="databasePlatform" value="org.hibernate.dialect.MySQLDialect" />
37                 <property name="showSql" value="true" />
38             </bean>
39         </property>
40         <property name="jpaDialect">
41             <bean class="org.springframework.orm.jpa.vendor.HibernateJpaDialect" />
42         </property>
43     </bean>
44     
45     
46     <!-- 3.事務管理器-->
47     <!-- JPA事務管理器  -->
48     <bean id="transactionManager" class="org.springframework.orm.jpa.JpaTransactionManager">
49         <property name="entityManagerFactory" ref="entityManagerFactory" />
50     </bean>
51     
52     <!-- 整合spring data jpa-->
53     <jpa:repositories base-package="top.biyenanhai.mapper"
54         transaction-manager-ref="transactionManager"
55         entity-manager-factory-ref="entityManagerFactory"></jpa:repositories>
56         
57     <!-- 4.txAdvice-->
58     <tx:advice id="txAdvice" transaction-manager="transactionManager">
59         <tx:attributes>
60             <tx:method name="*" propagation="REQUIRED"/>
61             <tx:method name="get*" read-only="true"/>
62             <tx:method name="find*" read-only="true"/>
63         </tx:attributes>
64     </tx:advice>
65     
66     <!-- 5.aop-->
67     <aop:config>
68         <aop:pointcut id="pointcut" expression="execution(* top.biyenanhai.service.*.*(..))" />
69         <aop:advisor advice-ref="txAdvice" pointcut-ref="pointcut" />
70     </aop:config>
71     
72     <context:component-scan base-package="cn.itcast"></context:component-scan>
73     <!--6、配置包掃描-->
74     <context:component-scan base-package="top.biyenanhai"/>
75     <!--組裝其它 配置文件-->
76     
77 </beans>

3、使用JPA註解配置映射關係

package top.biyenanhai.entity;

import javax.persistence.Column;
import javax.persistence.Entity;
import javax.persistence.GeneratedValue;
import javax.persistence.GenerationType;
import javax.persistence.Id;
import javax.persistence.Table;

/**
 * 
 *      * 所有的註解都是使用JPA的規範提供的註解,
 *      * 所以在導入註解包的時候,一定要導入javax.persistence下的
 */
@Entity //聲明實體類
@Table(name="cst_customer") //建立實體類和表的映射關係
public class Customer {
    
    @Id//聲明當前私有屬性為主鍵
    @GeneratedValue(strategy=GenerationType.IDENTITY) //配置主鍵的生成策略
    @Column(name="cust_id") //指定和表中cust_id字段的映射關係
    private Long custId;
    
    @Column(name="cust_name") //指定和表中cust_name字段的映射關係
    private String custName;
    
    @Column(name="cust_source")//指定和表中cust_source字段的映射關係
    private String custSource;
    
    @Column(name="cust_industry")//指定和表中cust_industry字段的映射關係
    private String custIndustry;
    
    @Column(name="cust_level")//指定和表中cust_level字段的映射關係
    private String custLevel;
    
    @Column(name="cust_address")//指定和表中cust_address字段的映射關係
    private String custAddress;
    
    @Column(name="cust_phone")//指定和表中cust_phone字段的映射關係
    private String custPhone;
    
    //添加get,set方法,toString方法
}

3、編寫符合Spring Data JPA規範的Dao層接口,繼承JpaRepository<T,ID>和JpaSpecificationExecutor<T>

 *     JpaRepository<操作的實體類類型,實體類中主鍵屬性的類型>
 *              *封裝了基本CURD操作
 *     JpaSpecificationExecutor<操作的實體類類型>
 *              *封裝了複雜查詢(分頁)
package top.biyenanhai.dao;

import org.springframework.data.jpa.repository.JpaRepository;
import org.springframework.data.jpa.repository.JpaSpecificationExecutor;
import org.springframework.data.jpa.repository.Modifying;
import org.springframework.data.jpa.repository.Query;
import top.biyenanhai.domain.Customer;

import java.util.List;

/**
 * Created with IntelliJ IDEA.
 *
 * @Auther: 畢業男孩
 *
 * 符合SpringDataJpa的dao接口規範
 *      JpaRepository<操作的實體類類型,實體類中主鍵屬性的類型>
 *              *封裝了基本CURD操作
 *      JpaSpecificationExecutor<操作的實體類類型>
 *              *封裝了複雜查詢(分頁)
 *
 */
public interface CustomerDao extends JpaRepository<Customer, Long>, JpaSpecificationExecutor<Customer> {

    /**
     * 案例:根據客戶名稱查詢客戶
     *      使用jpql的形式查詢
     *
     *  jpql:from Customer where custName = ?
     *
     *  配置jpql語句,使用@Query註解
     */
    @Query(value="from Customer where custName = ? ")
    Customer findJpql(String custName);

    /**
     * 案例:根據客戶名稱和客戶id查詢客戶
     *      jqpl:from Customer where cutName = ? and custId = ?
     *
     *   對於多個佔位符參數
     *          賦值的時候,默認的情況下,佔位符的位置需要和方法參數中的位置保持一致
     *   可以指定佔位符參數的位置
     *          ?索引的方式,指定此佔位的取值來源
     */
    @Query(value = "from Customer where custName=?2 and custId=?1")
    Customer findCustNameAndCustId(Long id,String name);


    /**
     * 使用jpql完成更新操作
     *      案例:根據id更新,客戶的名稱
     *          更新4號客戶的名稱,將名稱改為“老男孩”
     *
     *
     * sql:update cst_customer set cust_name = ?where cust_id=?
     * jpql:update Customer set custName=? where custId=?
     *
     * @Query:代表的是進行查詢
     *      聲明此方法是用來更新操作
     * @Modifying:當前執行的是一個更新操作
     */
    @Query(value = "update Customer set custName=?2 where custId=?1")
    @Modifying
    void updateCustomer(long id, String custName);


    /**
     * 使用sql的形式查詢:
     *      查詢全部的客戶
     *      sql:select * from cst_custimer;
     *      Query:配置sql查詢
     *          value: sql語句
     *          nativeQuery: 查詢方式
     *              true:sql查詢
     *              false:jpql查詢
     */
//    @Query(value = "select * from cst_customer", nativeQuery = true)  //查詢全部

    @Query(value = "select * from cst_customer where cust_name like ?1",nativeQuery = true) //條件查詢
    List<Object[]> findSql(String name);


    /**
     * 方法名的約定:
     *      findBy:查詢
     *          對象中的屬性名(首字母大寫):查詢的條件
     *          CustName
     *          *默認情況:使用 等於的方式查詢
     *              特殊的查詢方式
     * findByCustName --  根據客戶名稱查詢
     *
     * 在springdataJpa的運行階段
     *      會根據方法名稱進行解析  findBy  from xxx(實體類)
     *                                  屬性名稱    where custName =
     *
     *
     *      1、findBy + 屬性名稱(根據屬性名稱進行完成匹配的查詢=)
     *      2、findBy + 屬性名稱 + “查詢方式(Like|isnull)”
     *      3、多條件查詢
     *          findBy + 屬性名 + "查詢條件" + "多條件的連接符(and|or)" + 屬性名 + “查詢方式”
     *
     */
    Customer findByCustName(String custName);

    List<Customer> findByCustNameLike(String name);

    List<Customer> findByCustNameLikeAndCustIndustry(String name, String industry);

}

4、測試基本CRUD操作

@RunWith(SpringJUnit4ClassRunner.class) //聲明spring提供的單元測試環境
@ContextConfiguration(locations = "classpath:applicationContext.xml")//指定spring容器的配置信息
public class CustomerDaoTest {

    @Autowired
    private CustomerDao customerDao;

    /**
     * 根據id查詢
     */
    @Test
    public void testFindOne(){
        Customer customer = customerDao.findOne(1l);
        System.out.println(customer);
    }
......
    
    /**
     * 測試jqpl的更新操作
     * 更新和刪除操作要加上事務的註解
     *
     * springDataJpa中使用jpql完成  更新/刪除操作
     *          需要手動添加事務的支持
     *          默認回執行結束之後,回滾事務
     *    @Rollback:設置是否自動回滾
     */
    @Test
    @Transactional//添加事務的支持
    @Rollback(false)
    public void testUpdate(){
        customerDao.updateCustomer(1l, "航空航天科技有限公司");
    }
......

5、具體關鍵字,使用方法和生產成SQL如下錶所示

Keyword

Sample

JPQL

And

findByLastnameAndFirstname

… where x.lastname = ?1 and x.firstname = ?2

Or

findByLastnameOrFirstname

… where x.lastname = ?1 or x.firstname = ?2

Is,Equals

findByFirstnameIs,

findByFirstnameEquals

… where x.firstname = ?1

Between

findByStartDateBetween

… where x.startDate between ?1 and ?2

LessThan

findByAgeLessThan

… where x.age < ?1

LessThanEqual

findByAgeLessThanEqual

… where x.age ?1

GreaterThan

findByAgeGreaterThan

… where x.age > ?1

GreaterThanEqual

findByAgeGreaterThanEqual

… where x.age >= ?1

After

findByStartDateAfter

… where x.startDate > ?1

Before

findByStartDateBefore

… where x.startDate < ?1

IsNull

findByAgeIsNull

… where x.age is null

IsNotNull,NotNull

findByAge(Is)NotNull

… where x.age not null

Like

findByFirstnameLike

… where x.firstname like ?1

NotLike

findByFirstnameNotLike

… where x.firstname not like ?1

StartingWith

findByFirstnameStartingWith

… where x.firstname like ?1 (parameter bound with appended %)

EndingWith

findByFirstnameEndingWith

… where x.firstname like ?1 (parameter bound with prepended %)

Containing

findByFirstnameContaining

… where x.firstname like ?1 (parameter bound wrapped in %)

OrderBy

findByAgeOrderByLastnameDesc

… where x.age = ?1 order by x.lastname desc

Not

findByLastnameNot

… where x.lastname <> ?1

In

findByAgeIn(Collection ages)

… where x.age in ?1

NotIn

findByAgeNotIn(Collection age)

… where x.age not in ?1

TRUE

findByActiveTrue()

… where x.active = true

FALSE

findByActiveFalse()

… where x.active = false

IgnoreCase

findByFirstnameIgnoreCase

… where UPPER(x.firstame) = UPPER(?1)


六、Specifications動態查詢:

  有時我們在查詢某個實體的時候,給定的條件是不固定的,這時就需要動態構建相應的查詢語句,在Spring Data JPA中可以通過JpaSpecificationExecutor接口查詢。相比JPQL,其優勢是類型安全,更加的面向對象。對於JpaSpecificationExecutor,這個接口基本是圍繞着Specification接口來定義的。我們可以簡單的理解為,Specification構造的就是查詢條件。

/**
    *    root    :Root接口,代表查詢的根對象,可以通過root獲取實體中的屬性
    *    query    :代表一個頂層查詢對象,用來自定義查詢
    *    cb        :用來構建查詢,此對象里有很多條件方法
    **/
    public Predicate toPredicate(Root<T> root, CriteriaQuery<?> query, CriteriaBuilder cb);

案例:使用Specifications完成條件查詢

//依賴注入customerDao
    @Autowired
    private CustomerDao customerDao;    
    @Test
    public void testSpecifications() {
          //使用匿名內部類的方式,創建一個Specification的實現類,並實現toPredicate方法
        Specification <Customer> spec = new Specification<Customer>() {
            public Predicate toPredicate(Root<Customer> root, CriteriaQuery<?> query, CriteriaBuilder cb) {
                //cb:構建查詢,添加查詢方式   like:模糊匹配
                //root:從實體Customer對象中按照custName屬性進行查詢
                return cb.like(root.get("custName").as(String.class), "航天航空%");
            }
        };
        Customer customer = customerDao.findOne(spec);
        System.out.println(customer);
    }

案例:基於Specifications的分頁查詢

@Test
    public void testPage() {
        //構造查詢條件
        Specification<Customer> spec = new Specification<Customer>() {
            public Predicate toPredicate(Root<Customer> root, CriteriaQuery<?> query, CriteriaBuilder cb) {
                return cb.like(root.get("custName").as(String.class), "航天%");
            }
        };
        
        /**
         * 構造分頁參數
         *         Pageable : 接口
         *             PageRequest實現了Pageable接口,調用構造方法的形式構造
         *                 第一個參數:頁碼(從0開始)
         *                 第二個參數:每頁查詢條數
         */
        Pageable pageable = new PageRequest(0, 5);
        
        /**
         * 分頁查詢,封裝為Spring Data Jpa 內部的page bean
         *         此重載的findAll方法為分頁方法需要兩個參數
         *             第一個參數:查詢條件Specification
         *             第二個參數:分頁參數
         */
        Page<Customer> page = customerDao.findAll(spec,pageable);
        
    }

對於Spring Data JPA中的分頁查詢,是其內部自動實現的封裝過程,返回的是一個Spring Data JPA提供的pageBean對象。其中的方法說明如下:

//獲取總頁數
int getTotalPages();
//獲取總記錄數    
long getTotalElements();
//獲取列表數據
List<T> getContent();

方法對應關係:

方法名稱

Sql對應關係

equal

filed = value

gt(greaterThan )

filed > value

lt(lessThan )

filed < value

ge(greaterThanOrEqualTo )

filed >= value

le( lessThanOrEqualTo)

filed <= value

notEqual

filed != value

like

filed like value

notLike

filed not like value

七、JPA中的一對多:

實體類(一對多,一的實體類)

/**
 * 客戶的實體類
 * 明確使用的註解都是JPA規範的
 * 所以導包都要導入javax.persistence包下的
 */
@Entity//表示當前類是一個實體類
@Table(name="cst_customer")//建立當前實體類和表之間的對應關係
public class Customer implements Serializable {
    
    @Id//表明當前私有屬性是主鍵
    @GeneratedValue(strategy=GenerationType.IDENTITY)//指定主鍵的生成策略
    @Column(name="cust_id")//指定和數據庫表中的cust_id列對應
    private Long custId;
    @Column(name="cust_name")//指定和數據庫表中的cust_name列對應
    private String custName;
    
    //配置客戶和聯繫人的一對多關係
    @OneToMany(targetEntity=LinkMan.class)
    @JoinColumn(name="lkm_cust_id",referencedColumnName="cust_id")
    private Set<LinkMan> linkmans = new HashSet<LinkMan>();

...get,set方法

實體類(一對多,多的實體類)

/**
 * 聯繫人的實體類(數據模型)
 */
@Entity
@Table(name="cst_linkman")
public class LinkMan implements Serializable {
    @Id
    @GeneratedValue(strategy=GenerationType.IDENTITY)
    @Column(name="lkm_id")
    private Long lkmId;
    @Column(name="lkm_name")
    private String lkmName;
    @Column(name="lkm_gender")
    private String lkmGender;
    @Column(name="lkm_phone")
    private String lkmPhone;

    //多對一關係映射:多個聯繫人對應客戶
    @ManyToOne(targetEntity=Customer.class)
    @JoinColumn(name="lkm_cust_id",referencedColumnName="cust_id")
    private Customer customer;//用它的主鍵,對應聯繫人表中的外鍵

...get,set方法

八、JPA中的多對多:

/**
 * 用戶的數據模型
 */
@Entity
@Table(name="sys_user")
public class SysUser implements Serializable {
    
    @Id
    @GeneratedValue(strategy=GenerationType.IDENTITY)
    @Column(name="user_id")
    private Long userId;
    @Column(name="user_name")
    private String userName;

    
    //多對多關係映射
    @ManyToMany(mappedBy="users")
    private Set<SysRole> roles = new HashSet<SysRole>();
/**
 * 角色的數據模型
 */
@Entity
@Table(name="sys_role")
public class SysRole implements Serializable {
    
    @Id
    @GeneratedValue(strategy=GenerationType.IDENTITY)
    @Column(name="role_id")
    private Long roleId;
    @Column(name="role_name")
    private String roleName;
    
    //多對多關係映射
    @ManyToMany
    @JoinTable(name="user_role_rel",//中間表的名稱
              //中間表user_role_rel字段關聯sys_role表的主鍵字段role_id
              joinColumns={@JoinColumn(name="role_id",referencedColumnName="role_id")},
              //中間表user_role_rel的字段關聯sys_user表的主鍵user_id
              inverseJoinColumns={@JoinColumn(name="user_id",referencedColumnName="user_id")}
    )
    private Set<SysUser> users = new HashSet<SysUser>();


映射的註解說明

@OneToMany:
       作用:建立一對多的關係映射
    屬性:
        targetEntityClass:指定多的多方的類的字節碼
        mappedBy:指定從表實體類中引用主表對象的名稱。
        cascade:指定要使用的級聯操作
        fetch:指定是否採用延遲加載

@ManyToOne
    作用:建立多對一的關係
    屬性:
        targetEntityClass:指定一的一方實體類字節碼
        cascade:指定要使用的級聯操作
        fetch:指定是否採用延遲加載
        optional:關聯是否可選。如果設置為false,則必須始終存在非空關係。

@JoinColumn
     作用:用於定義主鍵字段和外鍵字段的對應關係。
     屬性:
        name:指定外鍵字段的名稱
        referencedColumnName:指定引用主表的主鍵字段名稱
        unique:是否唯一。默認值不唯一
        nullable:是否允許為空。默認值允許。
        insertable:是否允許插入。默認值允許。
        updatable:是否允許更新。默認值允許。
        columnDefinition:列的定義信息。


九、Spring Data JPA中的多表查詢:

  對象導航查詢:對象導航檢索方式是根據已經加載的對象,導航到他的關聯對象。它利用類與類之間的關係來檢索對象。例如:我們通過ID查詢方式查出一個客戶,可以調用Customer類中的getLinkMans()方法來獲取該客戶的所有聯繫人。對象導航查詢的使用要求是:兩個對象之間必須存在關聯關係。

//查詢一個客戶,獲取該客戶下的所有聯繫人
@Autowired
private CustomerDao customerDao;
    
@Test
//由於是在java代碼中測試,為了解決no session問題,將操作配置到同一個事務中
@Transactional 
public void testFind() {
    Customer customer = customerDao.findOne(5l);
    Set<LinkMan> linkMans = customer.getLinkMans();//對象導航查詢
    for(LinkMan linkMan : linkMans) {
          System.out.println(linkMan);
    }
}
//查詢一個聯繫人,獲取該聯繫人的所有客戶
@Autowired
private LinkManDao linkManDao;
    
@Test
public void testFind() {
    LinkMan linkMan = linkManDao.findOne(4l);
    Customer customer = linkMan.getCustomer(); //對象導航查詢
    System.out.println(customer);
}

採用延遲加載的思想。通過配置的方式來設定當我們在需要使用時,發起真正的查詢。

配置方式:

/**
 * 在客戶對象的@OneToMany註解中添加fetch屬性
 *     FetchType.EAGER    :立即加載
 *     FetchType.LAZY            :延遲加載
 */
 @OneToMany(mappedBy="customer",fetch=FetchType.EAGER)
 private Set<LinkMan> linkMans = new HashSet<>();
    
/**
 * 在聯繫人對象的@ManyToOne註解中添加fetch屬性
 *         FetchType.EAGER    :立即加載
 *         FetchType.LAZY    :延遲加載
 */
 @ManyToOne(targetEntity=Customer.class,fetch=FetchType.EAGER)
 @JoinColumn(name="cst_lkm_id",referencedColumnName="cust_id")
 private Customer customer;

使用Specification查詢

/**
 * Specification的多表查詢
 */
@Test
public void testFind() {
    Specification<LinkMan> spec = new Specification<LinkMan>() {
        public Predicate toPredicate(Root<LinkMan> root, CriteriaQuery<?> query, CriteriaBuilder cb) {
            //Join代錶鏈接查詢,通過root對象獲取
            //創建的過程中,第一個參數為關聯對象的屬性名稱,第二個參數為連接查詢的方式(left,inner,right)
            //JoinType.LEFT : 左外連接,JoinType.INNER:內連接,JoinType.RIGHT:右外連接
            Join<LinkMan, Customer> join = root.join("customer",JoinType.INNER);
            return cb.like(join.get("custName").as(String.class),"航空航天");
        }
    };
    List<LinkMan> list = linkManDao.findAll(spec);
    for (LinkMan linkMan : list) {
        System.out.println(linkMan);
    }
}


本站聲明:網站內容來源於博客園,如有侵權,請聯繫我們,我們將及時處理

【其他文章推薦】

網頁設計公司推薦不同的風格,搶佔消費者視覺第一線

※廣告預算用在刀口上,台北網頁設計公司幫您達到更多曝光效益

※自行創業缺乏曝光? 網頁設計幫您第一時間規劃公司的形象門面

南投搬家公司費用需注意的眉眉角角,別等搬了再說!

※教你寫出一流的銷售文案?

分類
發燒車訊

.NET進行客戶端Web開發又一利器 – Ant Design Blazor

你好,我是Dotnet9,繼上篇介紹Bootstrap風格的BlazorUI組件庫后,今天我來介紹另一款Blazor UI組件庫:一套基於 Ant Design 和 Blazor 的企業級組件庫。

本文導航:

  • 一、關於Ant Design Blazor
  • 二、Ant Design Blazor的社區貢獻
    • 2.1 項目關注度
    • 2.2 Ant Design官方認可
    • 2.3 微軟官方認可
  • 三、Ant Design Blazor UI庫介紹
  • 四、Ant Design Blazor後續計劃
  • 五、Ant Design Blazor技術交流

一、關於Ant Design Blazor

項目名稱:Ant Design Blazor

項目作者:James Yeung(社區發起者,目前項目參与度高,有較多貢獻者)

開源許可協議:MIT

項目地址:https://github.com/ant-design-blazor/ant-design-blazor

特性

  • 提煉自企業級中後台產品的交互語言和視覺風格。
  • 開箱即用的高質量 Blazor 組件,可在多種託管方式共享。
  • 支持基於 WebAssembly 的客戶端和基於 SignalR 的服務端 UI 事件交互。
  • 支持漸進式 Web 應用(PWA)
  • 使用 C# 構建,多範式靜態語言帶來高效的開發體驗。
  • ️ 基於 .NET Standard 2.1,可直接引用豐富的 .NET 類庫。
  • 可與已有的 ASP.NET Core MVC、Razor Pages 項目無縫集成。

關於開源協議:MIT

參考百度百科

被授權人權利

被授權人有權利使用、複製、修改、合併、出版發行、散布、再授權及販售軟件及軟件的副本。

被授權人可根據程序的需要修改授權條款為適當的內容。

被授權人義務

在軟件和軟件的所有副本中都必須包含版權聲明和許可聲明。

其他重要特性

此授權條款並非屬copyleft的自由軟件授權條款,允許在自由/開放源碼軟件或非自由軟件(proprietary software)所使用。

MIT的內容可依照程序著作權者的需求更改內容。此亦為MIT與BSD(The BSD license, 3-clause BSD license)本質上不同處。

MIT條款可與其他授權條款並存。另外,MIT條款也是自由軟件基金會(FSF)所認可的自由軟件授權條款,與GPL兼容。

二、Ant Design Blazor的社區貢獻

該庫是國內目前社區宣傳度做的最好的一款Blazor UI組件庫,對於Blazor的社區推廣起到很大的作用,Dotnet9是通過該庫作者的一篇文章《如何用 Blazor 實現 Ant Design 組件庫?》開始關注Blazor的,關於該庫作者的心路歷程,大家可點擊原文了解。

距離作者發文已有3月之久,文中作者的部分期望應該說是實現了一個個小目標了,也體現在了對社區的貢獻上(對Blazor推廣作用):

2.1 項目關注度

作者將庫發布在Github上,README支持中英文,日常代碼提交使用英文,讓全球的.Neter參与其中,使得更多的社區成員開始關注Ant Design Blazor,也使得更多的社區成員開始關注Blazor的發展了。

庫作者發文時star統計(2020年03月21日)

3個月後的今天star統計(2020年06月20日)

2.2 Ant Design官方認可

原文作者的小期望:

在為了與官方高度一致上的努力,還會繼續。希望有一天能在豐富 Blazor 生態的同時,還能成為被 Ant Design 生態認可的框架實現,能成為他們 Design 夢的一個延續。

Ant Design官方前端實現介紹鏈接

2.3 微軟官方認可

微軟Build2020開發者大會Blazor介紹中,提及Ant Design Pro。

一圖勝千言,得到微軟認可是對作者最大的獎勵,也是對社區的最好宣傳。

三、Ant Design Blazor UI庫組件介紹

Ant Design Blazor UI組件瀏覽地址:https://ant-design-blazor.github.io/

Ant Design Blazor的開發初衷是盡量與Ant Design組件庫一致,可對比查看:Ant Design

下面只對部分組件截圖介紹,更多組件請戳上面鏈接查看:

3.1 首頁介紹

網站風格和Ant Design官網高度一致,更方便熟悉Ant Design組件的朋友使用。

3.2 組件概覽

組件整體印象,這隻是其中一部分,豐富的組件需要點擊Ant Design Blazor了解更多喲。

四、Ant Design Blazor後續計劃

目前組件開發基本已經完成,可應用於常規項目開發,組件庫後續計劃:

  • 6月底發布0.1版本;
  • 添加測試、完善文檔、企業級應用和反饋;
  • 完成一個開箱即用的模板(偉大目標,像Ant Design Pro靠攏);
  • 添加頁面生成工具,類似UMI添加block,查看Ant Design的區塊介紹。

五、Ant Design Blazor技術交流

  • 微信群
    可添加作者微信號拉你入群:JamesYeungMVP

  • 釘釘群

本站聲明:網站內容來源於博客園,如有侵權,請聯繫我們,我們將及時處理

【其他文章推薦】

USB CONNECTOR掌控什麼技術要點? 帶您認識其相關發展及效能

台北網頁設計公司這麼多該如何選擇?

※智慧手機時代的來臨,RWD網頁設計為架站首選

※評比南投搬家公司費用收費行情懶人包大公開

※回頭車貨運收費標準