angular 接入 IdentityServer4
Intro
最近把活動室預約的項目做了一個升級,預約活動室需要登錄才能預約,並用 IdentityServer4 做了一個統一的登錄註冊中心,這樣以後就可以把其他的需要用戶操作的應用統一到 IdentityServer 這裏,這樣就不需要在每個應用里都做一套用戶的機制,接入 IdentityServer 就可以了。
目前活動室預約的服務器端和基於 angular 的客戶端已經完成了 IdentityServer 的接入,並增加了用戶的相關的一些功能,比如用戶可以查看自己的預約記錄並且可以取消自己未開始的預約,
還有一個小程序版的客戶端暫時還未完成接入,所以小程序版目前暫時是不能夠預約的
為什麼要寫這篇文章
目前在網上看到很多都是基於 implicit 模式接入 IdentityServer,這樣實現起來很簡單,但是現在 OAuth 已經不推薦這樣做了,OAuth 推薦使用 code 模式來代替 implicit
implicit 模式會有一些安全風險,implicit 模式會將 accessToken 直接返回到客戶端,而 code 模式只是會返回一個 code,accessToken 和 code 的分離的兩步,implicit 模式很有可能會將 token 泄露出去
詳細可以參考 StackOverflow 上的這個問答
https://stackoverflow.com/questions/13387698/why-is-there-an-authorization-code-flow-in-oauth2-when-implicit-flow-works
除此之外,還有一個小原因,大多是直接基於 oidc-client 的 一個 npm 包來實現的,我是用了一個針對 angular 封裝的一個庫 angular-oauth2-oidc,如果你在用 angular ,建議你可以嘗試一下,針對 angular 做了一些封裝和優化,對 angular 更友好一些
準備接入吧
API 配置
預約系統的 API 和網站管理系統是在一起的,針對需要登錄才能訪問的 API 單獨設置了的 policy 訪問
services.AddAuthentication()
    .AddIdentityServerAuthentication(IdentityServerAuthenticationDefaults.AuthenticationScheme, options =>
    {
        options.Authority = Configuration["Authorization:Authority"];
        options.RequireHttpsMetadata = false;

        options.NameClaimType = "name";
        options.RoleClaimType = "role";
    })
    ;

services.AddAuthorization(options =>
{
    options.AddPolicy("ReservationApi", builder => builder
        .AddAuthenticationSchemes(IdentityServerAuthenticationDefaults.AuthenticationScheme)
        .RequireAuthenticatedUser()
        .RequireScope("ReservationApi")
    );
});
需要授權才能訪問的接口設置 Authorize 並指定 Policy 為 ReservationApi
[Authorize(Policy = "ReservationApi")]
[HttpPost]
public async Task<IActionResult> MakeReservation([FromBody] ReservationViewModel model)
IdentityServer Client 配置
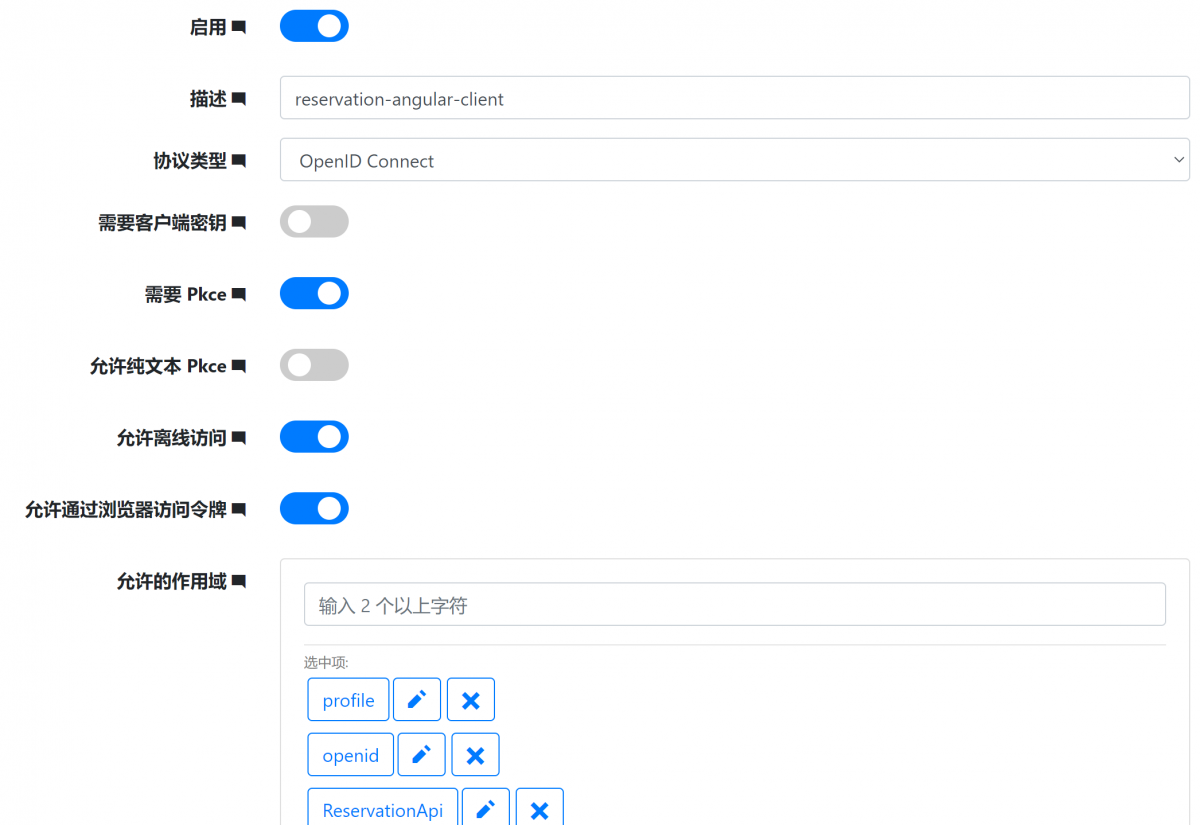
首先我們需要在 IdentityServer 這邊添加一個客戶端,因為我們要使用 code 模式,所以授權類型需要配置 authorization-code 模式,不使用 implicit 模式
允許的作用域(scope) 是客戶端允許訪問的 api 資源和用戶的信息資源,openid 必選,profile 是默認的用戶基本信息的集合,根據自己客戶端的需要進行配置,ReservationApi 是訪問 API 需要的 scope,其他的 scope 根據客戶端需要進行配置
angular 客戶端配置
安裝 angular-oauth2-oidc npm 包,我現在使用的是 9.2.0 版本
添加 oidc 配置:
export const authCodeFlowConfig: AuthConfig = {
  issuer: 'https://id.weihanli.xyz',

  // URL of the SPA to redirect the user to after login
  redirectUri: window.location.origin + '/account/callback',

  clientId: 'reservation-angular-client',

  dummyClientSecret: 'f6f1f917-0899-ef36-63c8-84728f411e7c',

  responseType: 'code',

  scope: 'openid profile ReservationApi offline_access',

  useSilentRefresh: false,

  showDebugInformation: true,

  sessionChecksEnabled: true,

  timeoutFactor: 0.01,

  // disablePKCI: true,

  clearHashAfterLogin: false
};
在 app.module 引入 oauth 配置
  imports: [
    BrowserModule,
    AppRoutingModule,
    AppMaterialModule,
    HttpClientModule,
    FormsModule,
    ReactiveFormsModule,
    BrowserAnimationsModule,
    OAuthModule.forRoot({
      resourceServer: {
        allowedUrls: ['https://reservation.weihanli.xyz/api'],
        sendAccessToken: true
      }
    })
  ]
OAuthModule 里 resourceServer 中的 allowedUrls 是配置的資源的地址,訪問的資源符合這個地址時就會自動發送 accessToken,這樣就不需要自己實現一個 interceptor 來實現自動在請求頭中設置 accessToken 了
在 AppComponment 的構造器中初始化 oauth 配置,並加載 ids 的發現文檔
export class AppComponent {
  constructor(
        private oauth: OAuthService
    ) {
    this.oauth.configure(authConfig.authCodeFlowConfig);
    this.oauth.loadDiscoveryDocument();
    }
    // ...
}
添加一個 AuthGuard,路由守衛,需要登錄才能訪問的頁面自動跳轉到 /account/login 自動登錄
AuthGuard:
import { Injectable } from '@angular/core';
import { CanActivate, Router } from '@angular/router';
import { OAuthService } from 'angular-oauth2-oidc';

@Injectable({
  providedIn: 'root'
})
export class AuthGuard implements CanActivate {
  constructor(private router: Router, private oauthService: OAuthService) {}

  canActivate() {
    if (this.oauthService.hasValidAccessToken()) {
      return true;
    } else {
      this.router.navigate(['/account/login']);
      return false;
    }
  }
}
路由配置:
import { NgModule } from '@angular/core';
import { Routes, RouterModule } from '@angular/router';
import { ReservationListComponent } from './reservation/reservation-list/reservation-list.component';
import { NoticeListComponent } from './notice/notice-list/notice-list.component';
import { NoticeDetailComponent } from './notice/notice-detail/notice-detail.component';
import { AboutComponent } from './about/about.component';
import { NewReservationComponent } from './reservation/new-reservation/new-reservation.component';
import { LoginComponent } from './account/login/login.component';
import { AuthGuard } from './shared/auth.guard';
import { AuthCallbackComponent } from './account/auth-callback/auth-callback.component';
import { MyReservationComponent } from './account/my-reservation/my-reservation.component';

const routes: Routes = [
  { path: '', component: ReservationListComponent },
  { path: 'reservations/new', component:NewReservationComponent, canActivate: [AuthGuard] },
  { path: 'reservations', component: ReservationListComponent },
  { path: 'notice', component: NoticeListComponent },
  { path: 'notice/:noticePath', component: NoticeDetailComponent },
  { path: 'about', component: AboutComponent },
  { path: 'account/login', component: LoginComponent },
  { path: 'account/callback', component: AuthCallbackComponent },
  { path: 'account/reservations', component: MyReservationComponent, canActivate: [AuthGuard] },
  { path: '**', redirectTo: '/'}
];

@NgModule({
  imports: [RouterModule.forRoot(routes)],
  exports: [RouterModule]
})
export class AppRoutingModule { }
AccountLogin 會將用戶引導到 ids 進行登錄,登錄之後會跳轉到配置的重定向 url,我配置的是 account/callback
import { Component, OnInit } from '@angular/core';
import { OAuthService } from 'angular-oauth2-oidc';

@Component({
  selector: 'app-login',
  templateUrl: './login.component.html',
  styleUrls: ['./login.component.less']
})
export class LoginComponent implements OnInit {

  constructor(private oauthService: OAuthService) {
  }

  ngOnInit(): void {
    // 登錄
    this.oauthService.initLoginFlow();
  }

}
Auth-Callback
import { Component, OnInit } from '@angular/core';
import { OAuthService } from 'angular-oauth2-oidc';
import { Router } from '@angular/router';

@Component({
  selector: 'app-auth-callback',
  templateUrl: './auth-callback.component.html',
  styleUrls: ['./auth-callback.component.less']
})
export class AuthCallbackComponent implements OnInit {

  constructor(private oauthService: OAuthService, private router:Router) {
  }

  ngOnInit(): void {
    this.oauthService.loadDiscoveryDocumentAndTryLogin()
    .then(_=> {
      this.oauthService.loadUserProfile().then(x=>{
        this.router.navigate(['/reservations/new']);
      });
    });
  }

}
More
當前實現還不太完善,重定向現在始終是跳轉到的新預約的頁面,應當在跳轉登錄之前記錄一下當前的地址保存在 storage 中,在 auth-callback 里登錄成功之後跳轉到 storage 中之前的地址
Reference
- https://sunnycoding.cn/2020/03/14/angular-spa-auth-with-ocelot-and-ids4-part3/#i-2
- https://github.com/OpenReservation/angular-client
- https://github.com/manfredsteyer/angular-oauth2-oidc/
- https://github.com/OpenReservation/ReservationServer
本站聲明:網站內容來源於博客園,如有侵權,請聯繫我們,我們將及時處理
【其他文章推薦】
※網頁設計一頭霧水該從何著手呢? 台北網頁設計公司幫您輕鬆架站!
※網頁設計公司推薦不同的風格,搶佔消費者視覺第一線
※想知道購買電動車哪裡補助最多?台中電動車補助資訊懶人包彙整
※南投搬家公司費用,距離,噸數怎麼算?達人教你簡易估價知識!
※教你寫出一流的銷售文案?
※超省錢租車方案