目錄
- 1. USB攝像頭取圖
- 2. 圖像預處理:獲取屏幕ROI
- 2.1. 分離提取屏幕區域
- 2.2. 計算屏幕區域的旋轉角度
- 2.3. 裁剪屏幕區域
- 2.4. 旋轉圖像至正向視角
- 2.5. 提取文字圖像
- 2.6. 封裝上述過程
- 3. 字符分割,獲取單個字符的圖像
- 4. 模板匹配:確定字符內容
- 4.1. make_template
- 4.2. 模板修復
- 4.3. 重新加載模板數據
- 4.4. 模板匹配
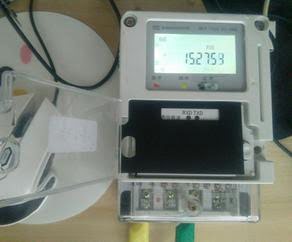
1. USB攝像頭取圖
由於分辨率越高,處理的像素就越多,導致分析圖像的時間變長,這裏,我們設定攝像頭的取圖像素為(240,320):
cap = cv2.VideoCapture(0)  # 根據電腦連接的情況填入攝像頭序號
assert cap.isOpened()

# 以下設置显示屏的寬高
cap.set(cv2.CAP_PROP_FRAME_WIDTH, 320)
cap.set(cv2.CAP_PROP_FRAME_HEIGHT, 240)
cap.set(cv2.CAP_PROP_FOURCC, cv2.VideoWriter.fourcc('M', 'J', 'P', 'G'))
這裏提幾個常用的標準分辨率:
- VGA (Video Graphics Array): 640×480
- QVGA (QuarterVGA): 240×320
- QQVGA: 120×160
接下來可以捕獲一幀數據看一下狀態:
# %% 捕獲一幀清晰的圖像
def try_frame():
    while True:
        ret, im_frame = cap.read()
        cv2.imshow("frame", im_frame)  # 显示圖像

        # im_gray = cv2.cvtColor(frame, cv2.COLOR_BGR2GRAY)  # 可選擇轉換為灰度圖
        if cv2.waitKey(1) & 0xFF == ord('q'):
            break

    cv2.destroyAllWindows()
    return im_frame

im_frame = try_frame()
env.imshow(im_frame)
ps: 鏡頭角度會存在一定的歪斜,沒有關係,我們後面會進行處理。
2. 圖像預處理:獲取屏幕ROI
利用屏幕的亮度,通過簡單的閾值操作和輪廓操作,獲取屏幕輪廓,然後將圖像角度校正,最後獲得正向的文字內容。
2.1. 分離提取屏幕區域
通過OTSU的閾值化操作,將圖像處理為二值狀態。這個很重要,因為如果直接使用彩圖或灰度圖,會由於外部光線的變化,導致後期字符匹配時整體灰度值與模板的差別而降低置信度,導致較大的誤差。而二值圖可以避免這個問題。
然後利用開運算(白底黑字,如果黑底白字則為閉運算),消除噪點。
im_latest = try_frame()
im_gray = mvlib.color.rgb2gray(image)
im_bin = mvlib.filters.threshold(im_gray, invert=False)
# im_erosion = mvlib.morphology.erosion(im_bin, (11, 11))
# im_dilation = mvlib.morphology.dilation(im_erosion, (5, 5))
im_opening = mvlib.morphology.opening(im_bin, (11, 11))
env.imshow(im_opening)
2.2. 計算屏幕區域的旋轉角度
提取圖像的最大輪廓,然後獲取其包絡矩形。
list_cnts = mvlib.contours.find_cnts(im_opening)
if len(list_cnts) != 1:
    print(f"非唯一輪廓,請通過面積篩選過濾")
    # assert 0
    cnts_sorted = mvlib.contours.cnts_sort(list_cnts, mvlib.contours.cnt_area)
    list_cnts = [cnts_sorted[0]]

box, results = mvlib.contours.approx_rect(list_cnts[0], True)
angle = results[2]  # 此處的角度是向逆時針傾斜,記作:-4
if abs(angle) > 45:
    angle = (angle + 45) % 90 - 45
print(angle, box)
上述過程輸出:
1.432098388671875
[[282 173]
 [ 29 167]
 [ 32  41]
 [285  47]]
2.3. 裁剪屏幕區域
至此可以丟棄im_opening以及im_bin的圖像了。我們重新回到im_gray上進行操作(需要重新進行閾值化以獲取文字的二值圖)。
list_width = box[:,0]
list_height= box[:,1]
w_min, w_max = min(list_width), max(list_width)
h_min, h_max = min(list_height), max(list_height)

im_screen = im_gray[h_min:h_max, w_min:w_max]
env.imshow(im_screen)
2.4. 旋轉圖像至正向視角
im_screen_orthogonal = mvlib.transform.rotate(im_screen, angle, False)
# env.imshow(im_screen_orthogonal)
im_screen_core = im_screen_orthogonal[20:-20, 20:-20]
env.imshow(im_screen_core)
2.5. 提取文字圖像
第二次執行閾值化操作,但這一次是在屏幕內部,排除了屏幕外複雜的背景后,可以很容易的獲取到文字的內容。由於我們只關心数字,所以通過閉運算將細體字過濾掉。
im_core_bin = mvlib.filters.threshold(im_screen_core, invert=False)
im_closing = mvlib.morphology.closing(im_core_bin, (3,3))
env.imshow(im_closing)
2.6. 封裝上述過程
瑣碎的預處理過程就告一段落了,我們可以將上述的內容封裝成一個簡單的函數:
def preprocess():
    # 獲取屏幕區域
    im_latest = try_frame()
    ...
    im_closing = mvlib.morphology.closing(im_core_bin, (3,3))
    return im_closing
3. 字符分割,獲取單個字符的圖像
字符分割,一方面是製作模板的需要(當然,你也可以直接用畫圖工具裁剪出一張模板圖像);另一方面是為了加速模板匹配的效率。當然,你完全可以在整張圖像上利用 match_template() 查找模板,但如果進行多模板匹配,重複的掃描整張圖像,效率就大打折扣了。
先提供完整的代碼
char_width_min = 7
gap_height_max = 5

def segment_chars(im_core):
    list_char_img = []
    # 字符區域
    raw_bkg = np.all(im_core, axis=0)
    col_bkg = np.all(im_core, axis=1)

    # 計算字高
    ndarr_char_height = np.where(False == col_bkg)[0]
    char_height_start = ndarr_char_height[0]
    item_last = ndarr_char_height[0]
    for item in ndarr_char_height:
        if item - item_last > gap_height_max:
            char_height_start = item
        item_last = item
    char_height_end = ndarr_char_height[-1] +1
    print(f"字高【{char_height_end - char_height_start}】")

    ndarr_chars_pos = np.where(False == raw_bkg)[0]
    ndarr_chars_pos = np.append(ndarr_chars_pos,
                                im_core.shape[1] + char_width_min)

    last_idx = ndarr_chars_pos[0]
    curr_char_width = 1
    for curr_idx in ndarr_chars_pos:
        idx_diff = curr_idx - last_idx
        # 這裏應該限制最小寬度>=2,否則認為是一個粘連字
        if idx_diff <= 2:
            curr_char_width += idx_diff
        else:  # 新的字符
            char_width_end = last_idx +1
            char_width_start = char_width_end - curr_char_width
            im_char_last = im_core[char_height_start:char_height_end,
                                char_width_start:char_width_end]
            list_char_img.append(im_char_last)
            curr_char_width = 0
        last_idx = curr_idx
    return list_char_img
按照行列,獲取圖像中的文字像素點集:
raw_bkg = np.all(im_core, axis=0)
col_bkg = np.all(im_core, axis=1)
由此,可以知道255(黑色)的區域從大約 39 到 75,那麼 75 - 29 = 36 就是字高。
另外,圖像中有可能存在噪點,去掉就是了(我這裏只是簡單粗暴的處理下,請見諒)。
行的處理同樣。如果發現間隔,那麼就可以分離字符。最後,輸出每個字符的圖像。
檢驗下效果:
list_char_imgs = segment_chars(im_core)
env.imshow(list_char_imgs[1])
4. 模板匹配:確定字符內容
利用模板匹配,實現字符識別的過程。這裏不再細說OpenCV的 cv2.matchTemplate() 函數,只描述應用過程。
4.1. make_template
首先,有必要把字符先作為模板存儲下來。
def make_tpls(list_tpl_imgs, dir_save, dict_tpl=None):
    if not dict_tpl:
        dict_tpl = {}

    str_items = input("請輸入模板上的文本內容,用於校對(例如215801): ")

    assert len(str_items) == len(list_tpl_imgs)
    for i, v in enumerate(str_items):
        filename = v
        if v in dict_tpl:
            filename = v + "_" + str(random.random())
        else:
            dict_tpl[v] = list_tpl_imgs[i]
        path_save = os.path.join(dir_save, filename + ".jpg")
        mvlib.io.imsave(path_save, list_tpl_imgs[i])

    return dict_tpl
這裏,同一字符有必要多存儲幾張,最後擇優(或者一個字符通過多個模板匹配的結果來確定)。
4.2. 模板修復
這個過程,雖然沒啥子技術含量,但卻對結果影響很大。在前一步驟中,我們每一個字符都收集了多張模板圖像。現在,從中擇優錄取。還有,可以手動編輯模板的圖片,去除模板多餘的白邊(邊並不是文字內容的一部分,而且會降低字符的匹配度)。
4.3. 重新加載模板數據
def load_saved_tpls(dir_tpl):
    saved_tpls = os.listdir(dir_tpl)

    dict_tpl = {}  # {"1": imread("mvdev/tmp/tpl/1.jpg"), ...}
    for i in saved_tpls:
        filename = os.path.splitext(i)[0]
        path_tpl = os.path.join(dir_tpl, i)

        im_rgb = cv2.imread(path_tpl)
        im_gray = mvlib.color.rgb2gray(im_rgb)
        dict_tpl[filename] = im_gray
    return dict_tpl

dir_tpl = "tpl/"
dict_tpls = load_saved_tpls(dir_tpl)
4.4. 模板匹配
def number_ocr_matching(im_char):
    most_likely = [1, ""]
    for key, im_tpl in dict_tpls.items():
        try:
            pos, similarity = mvlib.feature.match_template(im_char, im_tpl, way="most")
            if similarity < most_likely[0]:
                most_likely = [similarity, key]
        except:
            im_char_old = im_char.copy()
            h = max(im_char.shape[0], im_tpl.shape[0])
            w = max(im_char.shape[1], im_tpl.shape[1])
            im_char = np.ones((h,w), dtype="uint8") * 255
            # im_char2 = mvlib.pixel.bitwise_and(z, im_char)
            im_char[:im_char_old.shape[0], :im_char_old.shape[1]] = im_char_old

            pos, similarity = mvlib.feature.match_template(im_char, im_tpl, way="most")
            if similarity < most_likely[0]:
                most_likely = [similarity, key]

    print(f"字符識別為【{most_likely[1]}】相似度【{most_likely[0]}】")
    return most_likely[1]

def application(list_char_imgs):
    str_ocr = ""
    for im_char in list_char_imgs:
        width_img = im_char.shape[1]
        # 判斷字符
        match_char = number_ocr_matching(im_char)
        str_ocr += match_char
    return str_ocr

str_ocr2 = application(list_char_imgs)
print(str_ocr2)
過程中,opencv出現了報錯,是由於模板的shape大於當前分割字符的shape。這個很正常,採集圖像時由於距離的微調(注意,距離變化不能太大,OpenCV的默認算子不支持模板縮放)可能導致字符尺寸更小。解決方案也很簡單,直接把字符圖像拓展到大於模板的狀態就OK了。
額,忘了刪除debug信息了……再來一次~
本站聲明:網站內容來源於博客園,如有侵權,請聯繫我們,我們將及時處理
【其他文章推薦】
※為什麼 USB CONNECTOR 是電子產業重要的元件?
※網頁設計一頭霧水該從何著手呢? 台北網頁設計公司幫您輕鬆架站!
※台北網頁設計公司全省服務真心推薦
※想知道最厲害的網頁設計公司"嚨底家"!
※推薦評價好的iphone維修中心