環境資訊中心綜合外電;姜唯 編譯;林大利 審校
本站聲明:網站內容來源環境資訊中心https://e-info.org.tw/,如有侵權,請聯繫我們,我們將及時處理
【其他文章推薦】
※超省錢租車方案
※別再煩惱如何寫文案,掌握八大原則!
※回頭車貨運收費標準
※教你寫出一流的銷售文案?
※FB行銷專家,教你從零開始的技巧
9月17日,中國財政部、科技部、工信部、發改委聯合出臺的《關于繼續開展新能源汽車推廣應用工作的通知》(以下簡稱“通知”), 新能源家用汽車每臺直補3.5萬~6萬元(人民幣),被經濟界稱為“節能家電補貼”嫁接出了新能源汽車版。
同時,今年購買新能源汽車將最為實惠。2014年、2015年,會按照補貼標準依次下降補貼10%、20%。此次“通知”補貼的主要范疇為純電動乘用車、插電式混合動力(含增程式)乘用車、純電動專用車、燃料電池汽車四類。相比2010年4部委首次頒布的“新能源汽車補貼標準”,“通知”的最大特點是對全國普惠、優化補貼流程,並兼顧惠及生產、銷售、消費三方利益。
一步到位的購車補貼流程對消費市場是重大利好,消費者到4S店購車,即可從車款中直接減掉對應的補貼款。此後,由中央財政與車企完成結算。同時,“通知”也採取了分級補貼的形式:純電動汽車續航裏程在80~150公裏補貼3.5萬元/臺;150~250公裏補貼5萬元/臺;250公裏以上補貼6萬元/臺。插電式混合動力(含增程式)乘用車,一次直補3.5萬元。
但是,也許政策補貼可讓純電動汽車裸車購買價更低,但其綜合經濟性並不能完全超過傳統汽車。由於購車價格較高,充電不方便,以及消費者對於新能源汽車的安全係數與技術問題的擔憂,導致目前新能源汽車在中國仍沒有很大的需求。
本站聲明:網站內容來源於EnergyTrend https://www.energytrend.com.tw/ev/,如有侵權,請聯繫我們,我們將及時處理
【其他文章推薦】
※USB CONNECTOR掌控什麼技術要點? 帶您認識其相關發展及效能
※台北網頁設計公司這麼多該如何選擇?
※智慧手機時代的來臨,RWD網頁設計為架站首選
※評比南投搬家公司費用收費行情懶人包大公開
※幫你省時又省力,新北清潔一流服務好口碑
※回頭車貨運收費標準
中國科技部部長萬鋼上周在2013中國汽車產業發展(泰達)國際論壇上透露,國務院已正式批復新一輪的新能源汽車示范推廣方案,四部委正在制定實施細則,並將盡快正式啟動。「直接補貼到企業」將是新一輪補貼政策最大的變化。
新一輪補貼政策的內容主要有:以試點城市為核心,設立試點區域,擴大輻射范圍,加速區域電動汽車推廣;改善原有財政資金補貼方式,加快資金補貼落實力度;混合動力客車將向全國推廣;對充電站的建設進行財政支持。
另外,發改委、工信部、商務部等多部委對特斯拉總部進行了訪問考察。此次訪問或對特斯拉順利進入中國市場有促進作用。
中國國內電動汽車也在快速發展。以杭州為例,在國內率先啟用了可出租的純電動微公交,每小時20元(人民幣),一次充滿電可跑80-100公裏,每次充電大約耗時30分鐘。杭州市未來設想,每5-10公裏有1個立體車庫站點,建成綠色的微公交網點係統。
本站聲明:網站內容來源於EnergyTrend https://www.energytrend.com.tw/ev/,如有侵權,請聯繫我們,我們將及時處理
【其他文章推薦】
※教你寫出一流的銷售文案?
※廣告預算用在刀口上,台北網頁設計公司幫您達到更多曝光效益
※回頭車貨運收費標準
※別再煩惱如何寫文案,掌握八大原則!
※超省錢租車方案
※產品缺大量曝光嗎?你需要的是一流包裝設計!
據外媒本週二報導,美國電動跑車製造商特斯拉(Tesla)執行長Elon Musk本週在慕尼黑特斯拉展示中心表示,很多人都說純電動車根本沒有未來,但他認為,氫燃料電池基本上只是一種行銷的伎倆,氫是一種危險性頗高的氣體,比較適合用來推動火箭。
Elon Musk在演說中提到,旗下價格較低的大眾車種(可能會被命名為「Model E」)預料將在12-15個月內開發完成、2016年開賣,而休旅車「Model X」則會在明(2014)年問世。
此前,豐田汽車(Toyota) 董事長內山田武(Takeshi Uchiyamada)曾與9月30日在華盛頓特區經濟俱樂部(Economic Club of Washington, D.C.)發表演說後表示,Toyota之所以並未推出任何一款重量級純電動車,是因為該公司不認為這種產品會有市場。
目前全球燃料電池車的研發以日系車廠為軸心形成三大陣營,其中Toyota已表明計劃於2015年開賣燃料電池車。據日經新聞報導,預估2025年日本國內的燃料電池車普及數量將達200萬台。
另據日經新聞報導,日本政府也計劃於2015年度結束前,在國內整備100座氫燃料充填據點「氫氣站」,其他日本企業也紛紛著手進行相關技術的研發。為促進燃料電池車的普及,千代田化工建設(CHIYODA)計畫投下約300億日圓,於2015年在川崎市興建全球首座大規模氫燃料供應基地。
本站聲明:網站內容來源於EnergyTrend https://www.energytrend.com.tw/ev/,如有侵權,請聯繫我們,我們將及時處理
【其他文章推薦】
※超省錢租車方案
※別再煩惱如何寫文案,掌握八大原則!
※回頭車貨運收費標準
※教你寫出一流的銷售文案?
※FB行銷專家,教你從零開始的技巧
TCP(Transmission Control Protocol) 傳輸控制協議,是一種 面向連接的、可靠的、基於字節流的傳輸層 通信協議。
TCP是一種面向連接(連接導向)的、可靠的基於字節流的傳輸層通信協議。TCP將用戶數據打包成報文段,它發送后啟動一個定時器,另一端收到的數據進行確認、對失序的數據重新排序、丟棄重複數據。
TCP把連接作為最基本的對象,每一條TCP連接都有兩個端點,這種端點我們叫作套接字(socket),將端口號拼接到IP地址即構成了套接字,例如 192.1.1.6:50030
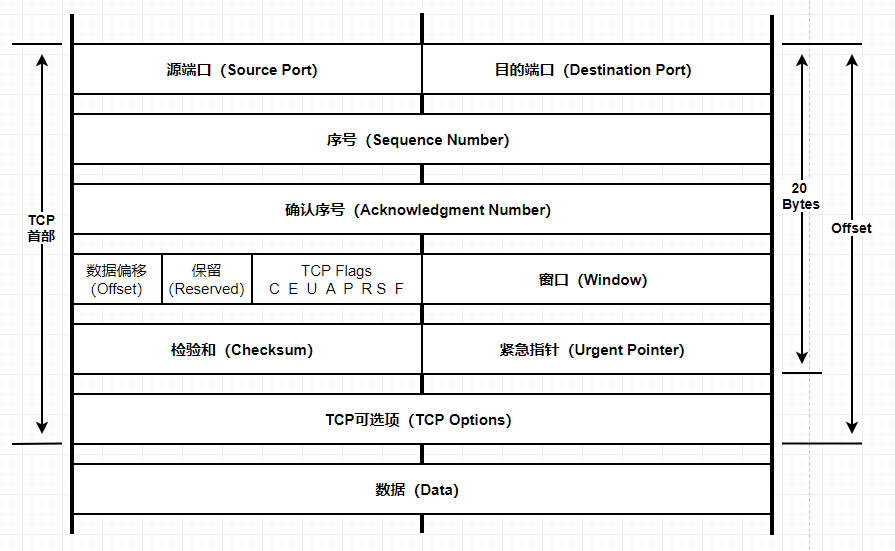
1、源端口(Source Port)/ 目的端口(Destination Port):他們各佔2個字節,標示該段報文來自哪裡(源端口)以及要傳給哪個上層協議或應用程序(目的端口)。進行tcp通信時,一般client是通過系統自動選擇的臨時端口號,而服務器一般是使用知名服務端口號或者自己指定的端口號(比如DNS協議對應端口53,HTTP協議對應80)
2、序號(Sequence Number):佔據四個字節,TCP是面向字節流的,TCP連接中傳送的字節流中的每個字節都按順序編號,例如如一段報文的序號字段值是107,而攜帶的數據共有100個字段,如果有下一個報文過來,那麼序號就從207(100+107)開始,整個要傳送的字節流的起始序號必須要在連接建立時設置。首部中的序號字段值指的是本報文段所發送的數據的第一個字節的序號
3、確認序號(Acknowledgment Number):4個字節,是期望收到對方下一個報文段的第一個數據字節的序號,若確認號=N,則表明:到序號N-1為止的所有數據都已正確收到,例如:B收到A發送過來的報文,其序列號字段是301,而數據長度是200字節,這表明了B正確的收到了A到序號500(301+200-1)為止的數據,因此B希望收到A的下一個數據序號是501,於是B在發送給A的確認報文段中,會把ACK確認號設置為501
4、數據偏移(Offset):4個字節。指出TCP報文段的數據起始處距離報文段的起始處有多遠,這個字段實際上是指出TCP報文段的首部長度。由於首部中還有長度不確定的選項字段,因此數據偏移字段是必要的。單位是32位字,也就是4字節,4位二進制最大表示15,所以數據偏移也就是TCP首部最大60字節
5、保留(Reserved):6個字節。保留域
6、TCP Flags:控制位,由八個標誌位組成,每個標誌位表示控制的功能,我們主要來介紹TCP Flags中常用的六個,
URG(緊急指針標誌):當URG=1時,表明緊急指針字段有效。它告訴系統此報文段中有緊急數據,應儘快傳送(相當於高優先級的數據),而不要按原來的排隊順序來傳送。例如,已經發送了很長的一個程序在主機上運行。但後來發現了一些問題,需要取消該程序的運行。因此用戶從鍵盤發出中斷命令。如果不使用緊急數據,那麼這兩個字符將存儲在接收TCP的緩存末尾。只有在所有的數據被處理完畢后這兩個字符才被交付接收方的應用進程。這樣做就浪費了許多時間
ACK(確認序號標誌):當ACK=1時確認號字段有效。當ACK=0時,確認號無效。TCP規定,在連接建立后所有的傳送的報文段都必須把ACK置1
PSH(push標誌):當兩個應用進程進行交互式的通信時,有時在一端的應用進程希望在鍵入一個命令后立即就能收到對方的響應。在這種情況下,TCP就可以使用推送操作。這時,發送方TCP把PSH置1,並立即創建一個報文段發送出去。接收方TCP收到PSH=1的報文段,就儘快地交付接收應用進程,而不再等到整個緩存都填滿了後向上交付
RST(重置連接標誌):TCP連接中出現嚴重差錯(如由於主機崩潰或其他原因),必須釋放連接,然後再重新建立運輸連接,可以用來拒絕一個非法的報文段或拒絕打開一個連接
SYN(同步序號,用於建立連接過程):在連接建立時用來同步序號。當SYN=1而ACK=0時,表明這是一個連接請求報文段。對方若同意建立連接,則應在相應的報文段中使用SYN=1和ACK=1。因此,SYN置為1就表示這是一個連接請求或連接接受保溫。
FIN(finish標誌,用於釋放連接):當FIN=1時,表明此報文段的發送方的數據已發送完畢,並要求釋放運輸連接
7、窗口(Window):是TCP流量控制的一個手段。這裏說的窗口,指的是接收通告窗口(Receiver Window,RWND)。它告訴對方本端的TCP接收緩衝區還能容納多少字節的數據,這樣就可以控制發送數據的速度
8、檢驗和(Checksum):檢驗範圍包括首部和數據兩部分,由發送端填充,接收端對TCP報文段執行CRC算法以檢驗TCP報文段在傳輸過程中是否損壞。這也是TCP可靠傳輸的一個重要保障
9、緊急指針(Urgent Pointer):緊急指針僅在URG=1時才有意義,它指出本報文段中的緊急數據的字節數(緊急數據結束后就是普通數據)。因此,緊急指針指出了緊急數據的末尾在報文段中的位置。當所有緊急數據都處理完時,TCP就告訴應用程序恢復到正常操作。值得注意的是,即使窗口為零時也可發送緊急數據。
10、TCP可選項(TCP Options):長度可變,最長可達40字節。當沒有使用“選項”時,TCP的首部長度是20字節。
所謂三次握手(Three-Way Handshake)即建立TCP連接,就是指建立一個TCP連接時,需要客戶端和服務端總共發送3個包以確認連接的建立。在socket編程中,這一過程由客戶端執行connect來觸發,整個流程如下圖所示:
在TCP/IP協議中,TCP協議提供可靠的連接服務,採用三次握手建立一個連接。
第一次握手: 建立連接時,客戶端發送SYN包(syn=j)到服務器,並進入SYN_SEND狀態,等待服務器確認,SYN:同步序列編號(Synchronize Sequence Numbers)。
第二次握手: 服務器收到 SYN 包,必須確認客戶的 SYN(ack=j+1),同時自己也發送一個SYN包(syn=k),即SYN+ACK包,此時服務器進入SYN_RECV狀態;
第三次握手: 客戶端收到服務器的SYN + ACK包,向服務器發送確認包ACK(ack=k+1),此包發送完畢,客戶端和服務器進入ESTABLISHED(TCP連接成功)狀態,完成三次握手。
當我們建立連接后,Client出現故障怎麼辦?
所謂四次揮手(Four-Way Wavehand)即終止TCP連接,就是指斷開一個TCP連接時,需要客戶端和服務端總共發送4個包以確認連接的斷開。在socket編程中,這一過程由客戶端或服務端任一方執行close來觸發,整個流程如下圖所示:
由於TCP連接時全雙工的,因此,每個方向都必須要單獨進行關閉,這一原則是當一方完成數據發送任務后,發送一個FIN來終止這一方向的連接,收到一個FIN只是意味着這一方向上沒有數據流動了,即不會再收到數據了,但是在這個TCP連接上仍然能夠發送數據,直到這一方向也發送了FIN。首先進行關閉的一方將執行主動關閉,而另一方則執行被動關閉。
客戶端連接在收到服務器的結束報文段之後,不會直接進入CLOSED狀態,而是轉移到TIME_WAIT狀態。在這個狀態,客戶端連接要等待一段長為2MSL,即兩倍的報文段最大生存時間,才能完全關閉,其原因主要有兩點:
因為TCP連接是全雙工的網絡協議,允許同時通信的雙方同時進行數據的收發,同樣也允許收發兩個方向的連接被獨立關閉,以避免client數據發送完畢,向server發送FIN關閉連接,而server還有發送到client的數據沒有發送完畢的情況。所以關閉TCP連接需要進行四次握手,每次關閉一個方向上的連接需要FIN和ACK兩次握手,發送發和接收方都需要FIN報文和ACK報文
是由於對方關閉socket連接,我方忙於讀或寫,沒有及時關閉連接
當客戶端因為某種原因先於服務端發出了FIN信號,就會導致服務端被動關閉,若服務端不主動關閉socket發FIN給Client,此時服務端Socket會處於CLOSE_WAIT狀態(而不是LAST_ACK狀態)。通常來說,一個CLOSE_WAIT會維持至少2個小時的時間(系統默認超時時間的是7200秒,也就是2小時)。如果服務端程序因某個原因導致系統造成一堆CLOSE_WAIT消耗資源,那麼通常是等不到釋放那一刻,系統就已崩潰
解決:
1、檢查代碼,特別是釋放資源的代碼
2、檢查配置,特別是處理請求的線程配置
Linux的檢查代碼:netstat -n | awk '/^tcp/{++S[$NF]}END{for(a in S) print a,S[a]}'
到這裏TCP的三次握手四次揮手就講完了,好久都沒有寫技術文章了,寫了一下,感覺還挺好的,上面是博主的認識,有寫的不好的地方,大家可以在評論區討論或者提問,博主看到了會第一時間回復大家,最近也準備開始面試了,先好好準備一下,希望今年可以找到心滿意足的工作,也希望今年面試的小夥伴們都有一個好的office,大家一起加油,我是牧小農,我喂自己帶鹽,大家加油。
本站聲明:網站內容來源於博客園,如有侵權,請聯繫我們,我們將及時處理
【其他文章推薦】
※USB CONNECTOR掌控什麼技術要點? 帶您認識其相關發展及效能
※台北網頁設計公司這麼多該如何選擇?
※智慧手機時代的來臨,RWD網頁設計為架站首選
※評比南投搬家公司費用收費行情懶人包大公開
※幫你省時又省力,新北清潔一流服務好口碑
※回頭車貨運收費標準

如需轉載,請註明出處:Flutter學習筆記(36)–常用內置動畫
Flutter給我們提供了很多而且很好用的內置動畫,這些動畫僅僅需要簡單的幾行代碼就可以實現一些不錯的效果,Flutter的動畫分為補間動畫和基於物理的動畫,基於物理的動畫我們先不說。
補間動畫很簡單,Android裏面也有補間動畫,就是給UI設置初始的狀態和結束狀態,經過我們定義的一段時間,系統去幫助我們實現開始到結束的過渡變化,這就是補間動畫。
今天我們要看的Flutter的內置動畫就是補間動畫,根據Flutter提供的動畫組件,我們去設置初始、結尾的狀態,並且定義一下這個變化過程所需要的時間,再經過系統的處理(其實就是setState())來達到動畫的效果。
接下來我們會寫一下常用的內置動畫組件,並且提供一下動畫效果的gif,方便大家更直觀的去理解。
看到Container我們就會知道這是一個帶有動畫屬性的容器組件,這個組件可以定義大小、顏色等屬性,那麼我們是不是就可以給這個組件設置初始和結束的大小及顏色的屬性值,然後通過系統來幫助我們來補足中間過程的動畫呢?
答案是可以的,下面看一下demo和動畫效果:
class _MyHomePageState extends State<MyHomePage> {
  double _width = 100.0;
  double _height = 100.0;
  Color _color = Colors.red;

  @override
  Widget build(BuildContext context) {
    return Scaffold(
      appBar: AppBar(
        title: Text(widget.title),
      ),
      body: AnimatedContainer(
        width: _width,
        height: _height,
        duration: Duration(seconds: 2),
        color: _color,
        curve: Curves.bounceInOut,
      ),
      floatingActionButton: FloatingActionButton(
        onPressed: () {
          setState(() {
            _width = 300.0;
            _height = 300.0;
            _color = Colors.green;
          });
        },
        tooltip: 'Increment',
        child: Icon(Icons.adjust),
      ), // This trailing comma makes auto-formatting nicer for build methods.
    );
  }
}
demo很簡單,就是先定義好組件初始的大小和顏色,點擊按鈕,在按鈕事件裏面去更改大小和顏色的屬性值。這裏唯一需要特別說一下就是curve這個屬性。
curve指的是動畫曲線?我開始的時候不理解這個動畫曲線是什麼意思,後來看了一組圖之後,豁然開朗。demo裏面curve我們用的是Curves.bounceInOut。如下:
它其實就是一個非線性的動畫的變化形式(變化過程)也可以理解為就是一種函數,也不知道這麼說大家能不能理解。
/// {@animation 464 192 https://flutter.github.io/assets-for-api-docs/assets/animation/curve_bounce_in.mp4}
/// {@animation 464 192 https://flutter.github.io/assets-for-api-docs/assets/animation/curve_bounce_in_out.mp4}
/// {@animation 464 192 https://flutter.github.io/assets-for-api-docs/assets/animation/curve_bounce_out.mp4}
/// {@animation 464 192 https://flutter.github.io/assets-for-api-docs/assets/animation/curve_decelerate.mp4}
/// {@animation 464 192 https://flutter.github.io/assets-for-api-docs/assets/animation/curve_ease.mp4}
/// {@animation 464 192 https://flutter.github.io/assets-for-api-docs/assets/animation/curve_ease_in.mp4}
/// {@animation 464 192 https://flutter.github.io/assets-for-api-docs/assets/animation/curve_ease_in_sine.mp4}
/// {@animation 464 192 https://flutter.github.io/assets-for-api-docs/assets/animation/curve_ease_in_quad.mp4}
/// {@animation 464 192 https://flutter.github.io/assets-for-api-docs/assets/animation/curve_ease_in_cubic.mp4}
/// {@animation 464 192 https://flutter.github.io/assets-for-api-docs/assets/animation/curve_ease_in_quart.mp4}
/// {@animation 464 192 https://flutter.github.io/assets-for-api-docs/assets/animation/curve_ease_in_quint.mp4}
/// {@animation 464 192 https://flutter.github.io/assets-for-api-docs/assets/animation/curve_ease_in_expo.mp4}
/// {@animation 464 192 https://flutter.github.io/assets-for-api-docs/assets/animation/curve_ease_in_circ.mp4}
/// {@animation 464 192 https://flutter.github.io/assets-for-api-docs/assets/animation/curve_ease_in_back.mp4}
/// {@animation 464 192 https://flutter.github.io/assets-for-api-docs/assets/animation/curve_ease_in_out.mp4}
/// {@animation 464 192 https://flutter.github.io/assets-for-api-docs/assets/animation/curve_ease_in_out_sine.mp4}
/// {@animation 464 192 https://flutter.github.io/assets-for-api-docs/assets/animation/curve_ease_in_out_quad.mp4}
/// {@animation 464 192 https://flutter.github.io/assets-for-api-docs/assets/animation/curve_ease_in_out_cubic.mp4}
/// {@animation 464 192 https://flutter.github.io/assets-for-api-docs/assets/animation/curve_ease_in_out_quart.mp4}
/// {@animation 464 192 https://flutter.github.io/assets-for-api-docs/assets/animation/curve_ease_in_out_quint.mp4}
/// {@animation 464 192 https://flutter.github.io/assets-for-api-docs/assets/animation/curve_ease_in_out_expo.mp4}
/// {@animation 464 192 https://flutter.github.io/assets-for-api-docs/assets/animation/curve_ease_in_out_circ.mp4}
/// {@animation 464 192 https://flutter.github.io/assets-for-api-docs/assets/animation/curve_ease_in_out_back.mp4}
/// {@animation 464 192 https://flutter.github.io/assets-for-api-docs/assets/animation/curve_ease_out.mp4}
/// {@animation 464 192 https://flutter.github.io/assets-for-api-docs/assets/animation/curve_ease_out_sine.mp4}
/// {@animation 464 192 https://flutter.github.io/assets-for-api-docs/assets/animation/curve_ease_out_quad.mp4}
/// {@animation 464 192 https://flutter.github.io/assets-for-api-docs/assets/animation/curve_ease_out_cubic.mp4}
/// {@animation 464 192 https://flutter.github.io/assets-for-api-docs/assets/animation/curve_ease_out_quart.mp4}
/// {@animation 464 192 https://flutter.github.io/assets-for-api-docs/assets/animation/curve_ease_out_quint.mp4}
/// {@animation 464 192 https://flutter.github.io/assets-for-api-docs/assets/animation/curve_ease_out_expo.mp4}
/// {@animation 464 192 https://flutter.github.io/assets-for-api-docs/assets/animation/curve_ease_out_circ.mp4}
/// {@animation 464 192 https://flutter.github.io/assets-for-api-docs/assets/animation/curve_ease_out_back.mp4}
/// {@animation 464 192 https://flutter.github.io/assets-for-api-docs/assets/animation/curve_elastic_in.mp4}
/// {@animation 464 192 https://flutter.github.io/assets-for-api-docs/assets/animation/curve_elastic_in_out.mp4}
/// {@animation 464 192 https://flutter.github.io/assets-for-api-docs/assets/animation/curve_elastic_out.mp4}
/// {@animation 464 192 https://flutter.github.io/assets-for-api-docs/assets/animation/curve_fast_out_slow_in.mp4}
/// {@animation 464 192 https://flutter.github.io/assets-for-api-docs/assets/animation/curve_slow_middle.mp4}
/// {@animation 464 192 https://flutter.github.io/assets-for-api-docs/assets/animation/curve_linear.mp4}
這裡是每一種curve曲線的表現形式,大家可以看看,也可以在demo裏面多嘗試,或者可以看另一篇博客,有動畫曲線Curves 效果。
Flutter中文網:一個widget,在兩個孩子之間交叉淡入,並同時調整他們的尺寸。
個人說明:CrossFade,故名思意,淡入淡出,AnimatedCrossFade組件包含兩個子widget,一個firstChild一個secondChild,這兩個組件根據狀態(我們自己定義的一個標識)改變狀態,
一個淡入,一個淡出,同時改變大小或顏色等屬性。
class _MyHomePageState extends State<MyHomePage> {
  bool _showFirst = true;

  @override
  Widget build(BuildContext context) {
    return Scaffold(
      appBar: AppBar(
        title: Text(widget.title),
      ),
      body: AnimatedCrossFade(
        firstChild: Container(
          width: 100,
          height: 100,
          color: Colors.red,
          alignment: Alignment.center,
          child: Text('firstChild'),
        ),
        secondChild: Container(
          width: 200,
          height: 200,
          color: Colors.green,
          alignment: Alignment.center,
          child: Text('secondChild'),
        ),
        duration: Duration(seconds: 3),
        crossFadeState:
            _showFirst ? CrossFadeState.showFirst : CrossFadeState.showSecond,
      ),
      floatingActionButton: FloatingActionButton(
        onPressed: () {
          setState(() {
            _showFirst = false;
          });
        },
        tooltip: 'Increment',
        child: Icon(Icons.adjust),
      ), // This trailing comma makes auto-formatting nicer for build methods.
    );
  }
}
Hero常用於頁面跳轉的過長動畫,比如電商App有一個商品列表,列表的每個item都有一張縮略圖,點擊會跳轉到詳情頁面,在Flutter中將圖片從一個路由飛到另一個路由稱為hero動畫,儘管相同的動作有時也稱為 共享元素轉換。
class _MyHomePageState extends State<MyHomePage> {
  @override
  Widget build(BuildContext context) {
    return Scaffold(
      appBar: AppBar(
        title: Text(widget.title),
      ),
      body: Hero(
        tag: 'heroTag',
        child: ClipOval(
          child: Image.asset(
            'images/banner.png',
            width: 60,
            height: 60,
            fit: BoxFit.cover,
          ),
        ),
      ),
      floatingActionButton: FloatingActionButton(
        onPressed: () {
          setState(() {
            Navigator.push(context, MaterialPageRoute(builder: (_) {
              return new HeroPage();
            }));
          });
        },
        tooltip: 'Increment',
        child: Icon(Icons.adjust),
      ), // This trailing comma makes auto-formatting nicer for build methods.
    );
  }
}
詳情頁面:
import 'package:flutter/material.dart';

class HeroPage extends StatelessWidget {
  @override
  Widget build(BuildContext context) {
    return MaterialApp(
      title: 'HeroPage',
      home: Scaffold(
        appBar: AppBar(
          title: Text('HeroPage'),
        ),
        body: Center(
          child: GestureDetector(
            child: Hero(
              tag: 'heroTag',
              child: ClipOval(
                child: Image.asset(
                  'images/banner.png',
                  width: 300,
                  height: 300,
                  fit: BoxFit.cover,
                ),
              ),
            ),
            onTap: () {
              Navigator.pop(context);
            },
          ),
        ),
      ),
    );
  }
}
注:特彆強調一下,為了將兩個頁面的元素關聯起來,hero有個tag標識,前後兩個頁面的tag標識必須一樣,不然的話元素是關聯不起來的,也就意味着不會產生hero動畫。
1.同級tag不允許相同。
2.前後頁面想要有hero動畫,tag必須相同。
3.前後關聯起來的hero組件,其各自內部的child組件不是必須一樣的,就是說前面的hero的子組件可以是image,後面的hero的子組件可以是image以外的其他組件。
class _MyHomePageState extends State<MyHomePage>
    with SingleTickerProviderStateMixin {
  Animation<double> _animation;
  AnimationController _animationController;

  @override
  void initState() {
    _animationController =
        AnimationController(duration: Duration(seconds: 3), vsync: this);
    _animation =
        new Tween(begin: 0.0, end: 200.0).animate(_animationController);
    _animationController.forward();
    super.initState();
  }

  @override
  void dispose() {
    _animationController.dispose();
    super.dispose();
  }

  @override
  Widget build(BuildContext context) {
    return Scaffold(
        appBar: AppBar(
          title: Text(widget.title),
        ),
        body: AnimatedBuilder(
          animation: _animation,
          builder: (BuildContext context, Widget child) {
            return Center(
              child: Container(
                color: Colors.red,
                width: _animation.value,
                height: _animation.value,
                child: child,
              ),
            );
          },
        ));
  }
}
AnimationController:動畫控制器(定義動畫過程時長)。
Animation:動畫變化區間值(也可以說是開始和結束的關鍵幀值),demo里定義的值為初始0,結束200。
_animation.value:關鍵幀值是0和200,_animation.value的值為0–200之間連續變化的值(0-1-2-3-…-198-199-200)。
Decortated可以給容器添加各種外觀裝飾,比如增加圓角、陰影等裝飾。DecoratedBox的動畫版本,可以給它的Decoration不同屬性使用動畫
class _MyHomePageState extends State<MyHomePage>
    with SingleTickerProviderStateMixin {
  Animation<Decoration> _animation;
  AnimationController _animationController;

  @override
  void initState() {
    _animationController =
        AnimationController(duration: Duration(seconds: 3), vsync: this);
    _animation = DecorationTween(
            begin: BoxDecoration(
                borderRadius: BorderRadius.all(Radius.circular(0.0)),
                color: Colors.red),
            end: BoxDecoration(
                borderRadius: BorderRadius.all(Radius.circular(30.0)),
                color: Colors.green))
        .animate(_animationController);
    _animationController.forward();
    super.initState();
  }

  @override
  void dispose() {
    _animationController.dispose();
    super.dispose();
  }

  @override
  Widget build(BuildContext context) {
    return Scaffold(
      appBar: AppBar(title: Text(widget.title)),
      body: Center(
        child: DecoratedBoxTransition(
          decoration: _animation,
          child: Container(
            width: 100,
            height: 100,
          ),
        ),
      ),
    );
  }
}
透明度變化動畫,因為透明度也是在0-1之間變化的,所以animation就還繼續用double類型的就可以了。
class _MyHomePageState extends State<MyHomePage>
    with SingleTickerProviderStateMixin {
  Animation<double> _animation;
  AnimationController _animationController;

  @override
  void initState() {
    _animationController =
        AnimationController(duration: Duration(seconds: 2), vsync: this);
    _animation = Tween(begin: 1.0, end: 0.0).animate(_animationController);
    _animationController.forward();
    super.initState();
  }

  @override
  void dispose() {
    _animationController.dispose();
    super.dispose();
  }

  @override
  Widget build(BuildContext context) {
    return Scaffold(
      appBar: AppBar(title: Text(widget.title)),
      body: Center(
        child: FadeTransition(
          opacity: _animation,
          child: Container(
            width: 100,
            height: 100,
            decoration: BoxDecoration(
              color: Colors.red,
            ),
          ),
        ),
      ),
    );
  }
}
旋轉動畫,對widget使用旋轉動畫 1~360°(Tween(begin: 0.0, end: 1.0))這裏的0-1指的是0°-360°
class _MyHomePageState extends State<MyHomePage>
    with SingleTickerProviderStateMixin {
  Animation<double> _animation;
  AnimationController _animationController;

  @override
  void initState() {
    _animationController =
        AnimationController(duration: Duration(seconds: 2), vsync: this);
    _animation = Tween(begin: 0.0, end: 1.0).animate(_animationController);
    _animationController.forward();
    super.initState();
  }

  @override
  void dispose() {
    _animationController.dispose();
    super.dispose();
  }

  @override
  Widget build(BuildContext context) {
    return Scaffold(
      appBar: AppBar(title: Text(widget.title)),
      body: Center(
        child: RotationTransition(
          turns: _animation,
          child: Container(
            width: 100,
            height: 100,
            decoration: BoxDecoration(
              color: Colors.red,
            ),
            child: Center(child: Text('data')),
          ),
        ),
      ),
    );
  }
}
縮放動畫,Tween(begin: 1.0, end: 0.2)指的是原大小的倍數,demo里是由原大小縮小到原來的0.2倍。
class _MyHomePageState extends State<MyHomePage>
    with SingleTickerProviderStateMixin {
  Animation<double> _animation;
  AnimationController _animationController;

  @override
  void initState() {
    _animationController =
        AnimationController(duration: Duration(seconds: 2), vsync: this);
    _animation = Tween(begin: 1.0, end: 0.2).animate(_animationController);
    _animationController.forward();
    super.initState();
  }

  @override
  void dispose() {
    _animationController.dispose();
    super.dispose();
  }

  @override
  Widget build(BuildContext context) {
    return Scaffold(
      appBar: AppBar(title: Text(widget.title)),
      body: Center(
        child: ScaleTransition(
          scale: _animation,
          child: Container(
            width: 200,
            height: 200,
            decoration: BoxDecoration(
              color: Colors.red,
            ),
            child: Center(child: Text('data')),
          ),
        ),
      ),
    );
  }
}
僅一個方向進行縮放
class _MyHomePageState extends State<MyHomePage>
    with SingleTickerProviderStateMixin {
  Animation<double> _animation;
  AnimationController _animationController;

  @override
  void initState() {
    _animationController =
        AnimationController(duration: Duration(seconds: 2), vsync: this);
    _animation = Tween(begin: 1.0, end: 0.2).animate(_animationController);
    _animationController.forward();
    super.initState();
  }

  @override
  void dispose() {
    _animationController.dispose();
    super.dispose();
  }

  @override
  Widget build(BuildContext context) {
    return Scaffold(
      appBar: AppBar(title: Text(widget.title)),
      body: Center(
        child: SizeTransition(
          axis: Axis.horizontal,
          sizeFactor: _animation,
          child: Center(
            child: Container(
              width: 200,
              height: 200,
              decoration: BoxDecoration(
                color: Colors.red,
              ),
              child: Center(child: Text('data')),
            ),
          ),
        ),
      ),
    );
  }
}
以上!有任何疑問歡迎留言!
本站聲明:網站內容來源於博客園,如有侵權,請聯繫我們,我們將及時處理
【其他文章推薦】
※教你寫出一流的銷售文案?
※廣告預算用在刀口上,台北網頁設計公司幫您達到更多曝光效益
※回頭車貨運收費標準
※別再煩惱如何寫文案,掌握八大原則!
※超省錢租車方案
※產品缺大量曝光嗎?你需要的是一流包裝設計!
Spring的事務管理功能能讓我們非常簡單地進行事務管理。只需要進行簡單的兩步配置即可:
step1:開啟事務管理功能
@Configuration
//@EnableTransactionManagement註解有以下幾個屬性
//proxyTargetClass屬相:指定事務的AOP是通過JDK動態代理實現,還是CGLIB動態代理實現。true的話是CGLIB,false的話是JDK動態代理
//                     需要注意的是這個屬性只有在AdviceMode設置成AdviceMode.PROXY的情況下才會生效,加入使用ASPECTJ這AOP框架的話,這個屬性就失效了。
//                     另外,這個屬性的設定可能會影響其他需要動態代理的類。比如說將這個屬性設置成true,@Async註解的方法也會使用CGLIB生成代理類。
//                     但是總的來說,這個屬性的設置不會造成什麼負面影響,畢竟JDK動態代理和CGLIB動態代理都能實現我們的需求

//mode屬性:Spring提供的AOP功能有兩種實現方式,一種是Spring自帶的AOP功能,主要靠JDK代理和CGLIB代理實現,另外一種是通過第三方框架ASPECTJ實現。這個選項
//        就是設定Spring用哪種方式提供AOP功能。AdviceMode.PROXY表示用Spring自帶的AOP功能,AdviceMode.ASPECTJ表示使用AdviceMode提供AOP功能。
//        需要注意的是Spring自帶的AOP功能不支持本地調用的代理功能,也就是說同一個類中的方法互相調用不會“觸發”代理方法。如果想讓自調用觸發代理,可以考慮使用ASPECTJ。

//order屬性:表示當一個連接點(方法)被切多次時(也就是說有多個Advice和連接點關聯),這些連接點的執行順序。
@EnableTransactionManagement
public class TxConfig {
}
step2:在需要事務管理的方法上添加@Transactional註解
@Override
@Transactional
public int saveSysUser(SysUser user) {
    int i = sysUserMapper.insert(user);
    return i;
}
整個使用流程就這麼簡單。這篇博客就來簡單分析下Spring是怎麼實現事務管理的。
Spring的很多功能都是通過AOP功能實現的,事務管理也是。我們之前的文章分析過Spring基礎AOP實現的原理。這邊再簡單提下Spring實現AOP的
原理:
Spring基礎的AOP功能的開關是@EnableAspectJAutoProxy,這個註解註冊了一個Bean——AnnotationAwareAspectJAutoProxyCreator,這個Bean才是實現AOP功能的關鍵。
這個Bean實現了InstantiationAwareBeanPostProcessor接口(這個接口是BeanPostProcessor的子接口)。熟悉Spring的讀者知道,實現BeanPostProcessor接口的Bean
會在其他Bean初始化之前初始,然後在其他Bean初始化的時候,BeanPostProcessor的實現會對這些Bean進行“加工處理”。這邊AnnotationAwareAspectJAutoProxyCreator就承擔了加工處理類的角色。這個Bean在其他Bean初始化前後會判斷這個Bean中的方法是不是有對應的Advice,如果有的話就會
通過動態代理的方式生成動態代理類將通知織入進去。
我們發現開啟事務管理的方式和開啟AOP功能的方式很像,也是通過Enable註解開啟。所以很自然就猜想事務管理是不是也是通過BeanPostProcessor的方式實現的。帶着這個猜想去看下@EnableTransactionManagement註解。
@Target(ElementType.TYPE)
@Retention(RetentionPolicy.RUNTIME)
@Documented
@Import(TransactionManagementConfigurationSelector.class)
public @interface EnableTransactionManagement {

	boolean proxyTargetClass() default false;
	AdviceMode mode() default AdviceMode.PROXY;
	int order() default Ordered.LOWEST_PRECEDENCE;
}
看到上面的代碼,我們很自然的會去看TransactionManagementConfigurationSelector的代碼。Spring有兩種方式提供AOP功能,一種是自帶的動態代理的功能,一種是
通過ASPECTJ的方式提供。這邊主要討論Spring自帶的AOP功能。
protected String[] selectImports(AdviceMode adviceMode) {
    switch (adviceMode) {
        //用代理的方式實現事務管理的AOP功能
        case PROXY:
            return new String[] {AutoProxyRegistrar.class.getName(),
                    ProxyTransactionManagementConfiguration.class.getName()};
        case ASPECTJ:
            return new String[] {determineTransactionAspectClass()};
        default:
            return null;
    }
}
上面的代碼中,我們主要關注PROXY這個case中的方法。這個case中註冊了兩個類:AutoProxyRegistrar和ProxyTransactionManagementConfiguration。
首先我們來看AutoProxyRegistrar這個類,層層點進入,我們發現這個類最終就是註冊了InfrastructureAdvisorAutoProxyCreator這個類。仔細看InfrastructureAdvisorAutoProxyCreator
這個類實現的接口的話,你會發現這個類也是BeanPostProcesser系列的類。看到這裏,我的直覺是事務管理的AOP過程和Spring基礎的AOP功能原理可能是一樣的。
再仔細看InfrastructureAdvisorAutoProxyCreator對BeanPostProcesser系列接口的實現,你會發現都是繼承的AbstractAutoProxyCreator。看到這個驗證了我之前的想法。
下面是Spring對事務管理進行AOP的過程,你會發現和基礎的AOP功能是一套代碼。
@Override
public Object postProcessAfterInitialization(@Nullable Object bean, String beanName) {
    if (bean != null) {
        Object cacheKey = getCacheKey(bean.getClass(), beanName);
        if (this.earlyProxyReferences.remove(cacheKey) != bean) {
            return wrapIfNecessary(bean, beanName, cacheKey);
        }
    }
    return bean;
}


protected Object wrapIfNecessary(Object bean, String beanName, Object cacheKey) {
    if (StringUtils.hasLength(beanName) && this.targetSourcedBeans.contains(beanName)) {
        return bean;
    }
    if (Boolean.FALSE.equals(this.advisedBeans.get(cacheKey))) {
        return bean;
    }
    if (isInfrastructureClass(bean.getClass()) || shouldSkip(bean.getClass(), beanName)) {
        this.advisedBeans.put(cacheKey, Boolean.FALSE);
        return bean;
    }

    // Create proxy if we have advice.
    // 代碼1
    // 這邊是獲取Advice和Advisor的具體代碼
    Object[] specificInterceptors = getAdvicesAndAdvisorsForBean(bean.getClass(), beanName, null);
    if (specificInterceptors != DO_NOT_PROXY) {
        this.advisedBeans.put(cacheKey, Boolean.TRUE);
        //生成代理類
        Object proxy = createProxy(
                bean.getClass(), beanName, specificInterceptors, new SingletonTargetSource(bean));
        this.proxyTypes.put(cacheKey, proxy.getClass());
        return proxy;
    }

    this.advisedBeans.put(cacheKey, Boolean.FALSE);
    return bean;
}
再來看看ProxyTransactionManagementConfiguration做了些啥?點進源代碼你會發現這個類的功能很簡單,就是註冊了下面幾個事務管理相關的基礎Bean。
上面的章節中講了Spring是怎麼生成事務相關的AOP代理類的。這邊來講下Spring的事務管理是怎麼生效的——怎麼開啟事務,怎麼回滾事務,怎麼提交事務,Spring中的事務傳播
機制是怎麼生效的。
這塊的代碼主要是在TransactionAspectSupport的invokeWithinTransaction方法中(不要問我是怎麼找到這段代碼的…)。下面講下這個方法中的幾個關鍵點。
protected Object invokeWithinTransaction(Method method, @Nullable Class<?> targetClass,
			final InvocationCallback invocation) throws Throwable {

    // If the transaction attribute is null, the method is non-transactional.
    TransactionAttributeSource tas = getTransactionAttributeSource();
    //獲取TransactionAttribute,這個類主要是@Transactional註解的配置信息
    final TransactionAttribute txAttr = (tas != null ? tas.getTransactionAttribute(method, targetClass) : null);
    //確認事務管理器
    final TransactionManager tm = determineTransactionManager(txAttr);

    if (this.reactiveAdapterRegistry != null && tm instanceof ReactiveTransactionManager) {
        ReactiveTransactionSupport txSupport = this.transactionSupportCache.computeIfAbsent(method, key -> {
            if (KotlinDetector.isKotlinType(method.getDeclaringClass()) && KotlinDelegate.isSuspend(method)) {
                throw new TransactionUsageException(
                        "Unsupported annotated transaction on suspending function detected: " + method +
                        ". Use TransactionalOperator.transactional extensions instead.");
            }
            ReactiveAdapter adapter = this.reactiveAdapterRegistry.getAdapter(method.getReturnType());
            if (adapter == null) {
                throw new IllegalStateException("Cannot apply reactive transaction to non-reactive return type: " +
                        method.getReturnType());
            }
            return new ReactiveTransactionSupport(adapter);
        });
        return txSupport.invokeWithinTransaction(
                method, targetClass, invocation, txAttr, (ReactiveTransactionManager) tm);
    }

    PlatformTransactionManager ptm = asPlatformTransactionManager(tm);
    final String joinpointIdentification = methodIdentification(method, targetClass, txAttr);

    if (txAttr == null || !(ptm instanceof CallbackPreferringPlatformTransactionManager)) {
        // Standard transaction demarcation with getTransaction and commit/rollback calls.
        TransactionInfo txInfo = createTransactionIfNecessary(ptm, txAttr, joinpointIdentification);

        Object retVal;
        try {
            // This is an around advice: Invoke the next interceptor in the chain.
            // This will normally result in a target object being invoked.
            retVal = invocation.proceedWithInvocation();
        }
        catch (Throwable ex) {
            // target invocation exception
            completeTransactionAfterThrowing(txInfo, ex);
            throw ex;
        }
        finally {
            cleanupTransactionInfo(txInfo);
        }

        if (vavrPresent && VavrDelegate.isVavrTry(retVal)) {
            // Set rollback-only in case of Vavr failure matching our rollback rules...
            TransactionStatus status = txInfo.getTransactionStatus();
            if (status != null && txAttr != null) {
                retVal = VavrDelegate.evaluateTryFailure(retVal, txAttr, status);
            }
        }

        commitTransactionAfterReturning(txInfo);
        return retVal;
    }else {
        final ThrowableHolder throwableHolder = new ThrowableHolder();

        // It's a CallbackPreferringPlatformTransactionManager: pass a TransactionCallback in.
        try {
            Object result = ((CallbackPreferringPlatformTransactionManager) ptm).execute(txAttr, status -> {
                TransactionInfo txInfo = prepareTransactionInfo(ptm, txAttr, joinpointIdentification, status);
                try {
                    Object retVal = invocation.proceedWithInvocation();
                    if (vavrPresent && VavrDelegate.isVavrTry(retVal)) {
                        // Set rollback-only in case of Vavr failure matching our rollback rules...
                        retVal = VavrDelegate.evaluateTryFailure(retVal, txAttr, status);
                    }
                    return retVal;
                }
                catch (Throwable ex) {
                    if (txAttr.rollbackOn(ex)) {
                        // A RuntimeException: will lead to a rollback.
                        if (ex instanceof RuntimeException) {
                            throw (RuntimeException) ex;
                        }
                        else {
                            throw new ThrowableHolderException(ex);
                        }
                    }
                    else {
                        // A normal return value: will lead to a commit.
                        throwableHolder.throwable = ex;
                        return null;
                    }
                }
                finally {
                    cleanupTransactionInfo(txInfo);
                }
            });

            // Check result state: It might indicate a Throwable to rethrow.
            if (throwableHolder.throwable != null) {
                throw throwableHolder.throwable;
            }
            return result;
        }
        catch (ThrowableHolderException ex) {
            throw ex.getCause();
        }
        catch (TransactionSystemException ex2) {
            if (throwableHolder.throwable != null) {
                logger.error("Application exception overridden by commit exception", throwableHolder.throwable);
                ex2.initApplicationException(throwableHolder.throwable);
            }
            throw ex2;
        }
        catch (Throwable ex2) {
            if (throwableHolder.throwable != null) {
                logger.error("Application exception overridden by commit exception", throwableHolder.throwable);
            }
            throw ex2;
        }
    }
}
事務操作的主要代碼都在這個方法中,要詳細將這個方法能寫很多內容。這邊就不詳細展開了,大家感興趣的可以仔細研究下這個方法。
如果你仔細看過Spring的相關源代碼,會發現Spring的Enable系列的註解都是上面的“套路”,熟悉了@EnableTransactionManagement註解生效的原理,其他註解都是類似的生效規則。比如
希望大家能做到觸類旁通。
本站聲明:網站內容來源於博客園,如有侵權,請聯繫我們,我們將及時處理
【其他文章推薦】
※超省錢租車方案
※別再煩惱如何寫文案,掌握八大原則!
※回頭車貨運收費標準
※教你寫出一流的銷售文案?
※FB行銷專家,教你從零開始的技巧

接口測試是對系統或組件之間的接口進行測試,主要是校驗數據的交換,傳遞和控制管理過程,以及相互邏輯依賴關係。
接口自動化相對於UI自動化來說,屬於更底層的測試,這樣帶來的好處就是測試收益更大,且維護成本相對來說較低,是我們進行自動化測試的首選
目前接口自動化的框架比較多,比如jmeter,就可以集接口自動化和性能測試於一體,該工具編寫用例效率不高;還有我們常用的postman,結合newman也可以實現接口自動化;Python+unittest+requests+HTMLTestRunner 是目前比較主流的測試框架,對python有一定的編碼要求;
本期我們選擇robotframework(文中後續統一簡稱為RF)這一個比較老牌的測試框架進行介紹,RF是一個完全基於 關鍵字 測試驅動的框架,它即能夠基於它的一定規則,導入你需要的測試庫(例如:其集成了selenium的測試庫,即可以理解為操作控件的測試底層庫),然後基於這些測試庫,你能應用TXT形式編寫自己的關鍵字(支持python和java語言,這些關鍵字即你的庫組成),之後,再編寫(測試用例由測試關鍵字組成)進行測試;他支持移動端、UI自動化和接口自動化的測試
4.1 需求內容
接口內容:實現一個下單,並檢查訂單狀態是否正常的場景;該需求涉及到如下三個接口
環境覆蓋:需要支持能在多套環境運行,比如測試和預發布環境
系統集成:需要能夠集成在CICD中,實現版本更新后的自動檢測
4.2 用例設計
4.2.1 用例設計,根據業務場景設計測試用例,方便後續實現
4.2.2 測試數據構造,預置不同環境的測試數據,供實現調用
接口測試實現層:在RF,通過引用默認關鍵字 RequestsLibrary (實現http請求)和通過python自定義關鍵字來完成用例實現的需求;
jenkins調度:在jenkins上配置一個job,設置好RF用例執行的服務器和發送給服務器相關的RF執行的指令,並且在jenkins中配置好測試報告模板,這樣用例便可以通過jenkins完成執行併發送測試結果給項目干係人;
生成用例執行的API:上圖中藍色部分,就是為了將jenkins的job生成一個可訪問api接口,方便被測項目的CICD集成;
集成到被測系統CICD流程:將上面步驟中封裝的API配置在被測應用的__gitlab-ci.yml__中,完成整個接口自動化的閉環
6.1 引用的內置關鍵字
getRequests
# get請求的入參
    [Arguments]    ${url_domain}    ${getbody}    ${geturl}    ${getToken}
    Create session    postmain    ${url_domain}
# 定義header的內容
    ${head}    createdictionary    content-type=application/json    Authorization=${getToken}    MerchantId=${s_merchant_id}
# get請求
    ${addr}    getRequest    postmain    ${geturl}    params=${getbody}    headers=${head}
# 請求狀態碼斷言
    Should Be Equal As Strings    ${addr.status_code}    200
    ${response_get_data}    To Json    ${addr.content}
# 返回http_get請求結果
    Set Test Variable    ${response_get_data}
    Delete All Sessions
6.2 自定義關鍵字
# 獲取configs.ini的內容
import configparser
def getEnv(path,env):
    config = configparser.ConfigParser()
    config.read(path)
    passport = config[env]['passport']
    stock=config[env]['stock']
    finance=config[env]['finance']
    SUP = config[env]['SUP']
    publicApi = config[env]['publicApi']
    publicOrder = config[env]['publicOrder']
    data_dict={'passport':passport,'stock':stock,'finance':finance,'SUP':SUP,'publicApi':publicApi,'publicOrder':publicOrder}
    return data_dict
import xlrd

'''
通用獲取excel數據
@:param path excel文件路徑
@:param sheet_name excel文件裏面sheet的名稱 如:Sheet1
@:env 環境,是IT還是PRE
'''
def getExcelDate(path, sheet_name,env):
    bk = xlrd.open_workbook(path)
    sh = bk.sheet_by_name(sheet_name)
    row_num = sh.nrows
    data_list = []
    for i in range(1, row_num):
        row_data = sh.row_values(i)
        data = {}
        for index, key in enumerate(sh.row_values(0)):
            data[key] = row_data[index]
        data_list.append(data)
    data_list1 = []
    for x in data_list:
        #print('這是'+str(x))
        if(x.get('env')==env):
            data_list1.append(x)
    return data_list1
*** Keywords ***
# 根據傳入的clientid、secret生成對應的token
getToken
    [Arguments]    ${client_id}    ${client_secret}    ${url_domain}
    Create session    postmain    ${url_domain}
    ${auth}    createdictionary    grant_type=client_credentials    client_id=${client_id}    client_secret=${client_secret}
    ${header}    createdictionary    content-type=application/x-www-form-urlencoded
    ${addr}    postRequest    postmain    /oauth/token    data=${auth}    headers=${header}
    Should Be Equal As Strings    ${addr.status_code}    200
    ${responsedata}    To Json    ${addr.content}
    ${access}    Get From Dictionary    ${responsedata}    access_token
    ${token}    set variable    bearer ${access}
    Set Test Variable    ${token}
    Delete All Sessions
getAllData
    [Arguments]    ${row_no}
    getEnvDomain
    getBalance    ${row_no}
    getStockNum    ${row_no}
    getSupProPrice    ${row_no}
    getProPrice    ${row_no}
    Set Test Variable    ${publicOrderUrl}
    Set Test Variable    ${FPbalance}
    Set Test Variable    ${Pbalance}
    Set Test Variable    ${Sbalance}
    Set Test Variable    ${Jbalance}
    Set Test Variable    ${Cardnum}
    Set Test Variable    ${sprice}
    Set Test Variable    ${price}
    Set Test Variable    ${j_merchant_id}
    Set Test Variable    ${s_merchant_id}
    Set Test Variable    ${stock_id}
    Set Test Variable    ${p_product_id}
    Set Test Variable    ${s_product_id}
*** Settings ***
Test Template
Resource          引用所有資源.txt

*** Test Cases ***
*** Settings ***
Test Template
Resource          引用所有資源.txt

*** Test Cases ***
01 下單卡密直儲商品
    [Tags]    order
    LOG    ---------------------獲取下單前的數量、餘額------------------------------------------
    getAllData    0
    ${Cardnum1}    set variable    ${Cardnum}
    ${FPbalance1}    set variable    ${FPbalance}
    ${Pbalance1}    set variable    ${Pbalance}
    ${Sbalance1}    set variable    ${Sbalance}
    ${Jbalance1}    set variable    ${Jbalance}
    ${CustomerOrderNo1}    Evaluate    random.randint(1000000, 9999999)    random
    ${Time}    Get Time
    log    ------------------------下單操作-------------------------------------------------------
    getToken    100xxxx    295dab07a9xxxx9780be0eb95xxxx   ${casUrl}
    ${input_cs}    create dictionary    memberId=${j_merchant_id}    clientId=1xxx079    userId=string    shopType=string    customerOrderNo=${CustomerOrderNo1}
    ...    productId=${p_product_id}    buyNum=1    chargeAccount=otest888888    notifyUrl=string    chargeIp=string    chargePassword=string
    ...    chargeGameName=string    chargeGameRole=string    chargeGameRegion=string    chargeGameSrv=string    chargeType=string    remainingNumber=0
    ...    contactTel=string    contactQQ=string    customerPrice=0    poundage=0    batchNumber=    originalOrderId=string
    ...    shopName=string    appointSupProductId=0    stemFromSubOrderId=123456    externalBizId=456789
    postRequests    ${publicOrderUrl}    ${input_cs}    /api/Order    ${token}
    ${data}    get from dictionary    ${responsedata}    data
    ${orderid}    get from dictionary    ${data}    id
    sleep    6
    ${getdata}    create dictionary    Id=${orderid}    PageIndex=1    PageSize=1
    getRequests    ${publicOrderUrl}    ${getdata}    /api/Order/GetList    ${token}
    ${datalist}    get from dictionary    ${response_get_data}    data
    ${data}    get from dictionary    ${datalist}    list
    ${dict}    set variable    ${data}[0]
    ${orderOuterStatus}    get from dictionary    ${dict}    orderOuterStatus
    LOG    ---------------------獲取下單后的數量、餘額----------------------------------------------
    getAllData    0
    ${Cardnum2}    set variable    ${Cardnum}
    ${FPbalance2}    set variable    ${FPbalance}
    ${Pbalance2}    set variable    ${Pbalance}
    ${Sbalance2}    set variable    ${Sbalance}
    ${Jbalance2}    set variable    ${Jbalance}
    ${sprice}    set variable    ${sprice}
    ${price}    set variable    ${price}
    log    ------------------斷言-----------------------------------------------------------------
    ${Cardnum3}    Evaluate    ${Cardnum1}
    ${Jbalance3}    Evaluate    ${Jbalance1}
    ${Sbalance3}    Evaluate    ${Sbalance1}
    ${Pbalance3}    Evaluate    ${Pbalance1}
    should be true    ${orderOuterStatus}==90
    should be true    ${Cardnum3}==${Cardnum2}
    should be true    ${Jbalance3}==${Jbalance2}
    should be true    ${Sbalance3}==${Sbalance2}
    should be true    ${Pbalance3}==${Pbalance2}
7.1 jenkins配置job
通過jenkins的參數化構建,定義it和pre兩套環境
jenkins發送RF執行的命令
7.2 封裝的jenkins_job的執行接口地址
通過python的flask框架,根據測試和pre兩套環境包一層jenkins的job執行接口
__author__ = 'paul'

# !/usr/bin/env python
# -*- coding: utf-8 -*-
from flask import Flask, abort, request, jsonify
import jenkins

server = jenkins.Jenkins('http://10.0.1.xxx:80', username='xxx', password='fuluxxxx')

app = Flask(__name__)

tasks = []

# it的測試集合http請求接口
@app.route('/test/it', methods=['get'])
def robot_Test_It():
    server.build_job('CI_FuluOrder', {'environment': 'IT'})
    return jsonify({'result': 'success'})

# pre的測試集合http請求接口
@app.route('/test/pre', methods=['get'])
def robot_Test_Pre():
    server.build_job('CI_FuluOrder', {'environment': 'PRE'})
    return jsonify({'result': 'success'})

if __name__ == "__main__":
    # 將host設置為0.0.0.0,則外網用戶也可以訪問到這個服務
    app.run(host="0.0.0.0", port=80, debug=True)
7.3 將上述flask封裝的接口打包成鏡像
根據dockerfile生成鏡像
FROM python:3.6
WORKDIR /app
EXPOSE 80
COPY .	.
RUN pip install -r requirements.txt
ENTRYPOINT ["python","robotTestApi.py"]
7.4 將鏡像部署到kubernetes,對外提供服務
供觸發測試執行的調用入口 ,這部分封裝的接口部署在本地的k8s集群下ordermiddle
IT: http://ordermiddle.xxx.cn/test/it
pre:http://ordermiddle.xxx.cn/test/pre
7.5 被測項目的CICD集成接口自動化測試
gitlab目前採取直接對CICD腳本加入測試步驟,在部署到容器30秒后(考慮到容器在K8S啟動時間)調用測試接口
7.6 發送測試報告
本站聲明:網站內容來源於博客園,如有侵權,請聯繫我們,我們將及時處理
【其他文章推薦】
※USB CONNECTOR掌控什麼技術要點? 帶您認識其相關發展及效能
※台北網頁設計公司這麼多該如何選擇?
※智慧手機時代的來臨,RWD網頁設計為架站首選
※評比南投搬家公司費用收費行情懶人包大公開
※幫你省時又省力,新北清潔一流服務好口碑
※回頭車貨運收費標準
摘錄自2018年7月28日新華社報導
葡萄牙、西班牙和法國27日在葡萄牙首都里斯本舉行的第二屆能源互聯峰會上正式簽署了三國能源互聯協議。
根據協議,西葡兩國同歐洲的能源互聯水平到2020年達到10%,2030年達到15%。此外,歐盟委員會將投資5.7億歐元在西班牙以北的比斯開灣建造一個用於連接西班牙、葡萄牙和法國的電力互聯項目。
葡萄牙總理科斯塔、西班牙首相桑切斯和法國總統馬克宏在會後舉行了聯合記者會。馬克宏表示,最晚到2022年,法國將關閉所有煤電廠。
科斯塔說,葡萄牙計劃到2020年使清潔能源占比超過60%,葡萄牙在逐步減少煤電行業投入的同時尋求清潔能源出口。
本站聲明:網站內容來源環境資訊中心https://e-info.org.tw/,如有侵權,請聯繫我們,我們將及時處理
【其他文章推薦】
※USB CONNECTOR掌控什麼技術要點? 帶您認識其相關發展及效能
※台北網頁設計公司這麼多該如何選擇?
※智慧手機時代的來臨,RWD網頁設計為架站首選
※評比南投搬家公司費用收費行情懶人包大公開
※幫你省時又省力,新北清潔一流服務好口碑
※回頭車貨運收費標準
摘錄自2018年8月5日東森新聞報導
美國國家海洋暨大氣總署(NOAA)1日發布了2017年的氣候狀況報告,顯示地球的溫室氣體突破80萬年來的紀錄,這份報告由超過500名全球科學家共同研究,測量2017年的溫度、降水和天氣現象。美國氣象學會公報主編羅森菲爾德(Jeff Rosenfeld)說,這個報告就像地球的身體檢查一樣。
「每年都會檢查同樣的項目,這些數據可以讓我們了解長時間來看,什麼是正常狀況,什麼是異常」,羅森菲爾德說。根據這份長達300頁的報告,2017年地球表面的全球平均二氧化碳濃度是405ppm,比2016年高出2.2ppm,是近代大氣測量記錄和80萬年的冰芯紀錄中最高的。
報告指出,自1960年代以來,二氧化碳濃度已經成長近4倍,海平面高度也創下新高,平均每年上升1.2英吋(3.05公分),現在的海平面高度已經比1993年高約3英吋(7.62公分)。此外,2017年是有記錄以來最熱的非聖嬰年,巴基斯坦甚至在5月份時達到目前世界記錄的5月最高溫攝氏53.5度。
本站聲明:網站內容來源環境資訊中心https://e-info.org.tw/,如有侵權,請聯繫我們,我們將及時處理
【其他文章推薦】
※教你寫出一流的銷售文案?
※廣告預算用在刀口上,台北網頁設計公司幫您達到更多曝光效益
※回頭車貨運收費標準
※別再煩惱如何寫文案,掌握八大原則!
※超省錢租車方案
※產品缺大量曝光嗎?你需要的是一流包裝設計!