分類
發燒車訊

蘋果電動車傳技術性問題,將延至2021年亮相

蘋果(Apple)電動車開發案「泰坦計畫」(Project Titan)又有新傳聞,不過卻是一項令人失望的消息,據悉因技術性問題,故蘋果電動車亮相時間恐延至2021年!

日本蘋果情報網站gori.me 22日報導,期待在2020年東京奧運駕駛蘋果電動車的夢想恐將破滅,據The Information網站21日指出,蘋果電動車亮相時間已被延後至2021年。

報導指出,之前曾傳出蘋果電動車最快將在2019年發表、或是將在2020年開始進行生產,不過據The Information指出,蘋果雖持續朝上述2020年的目標進行研發,但因技術性問題,故蘋果電動車亮相時間已延至2021年。蘋果電動車企劃始於2014年,據悉目前參與該企劃的蘋果員工達約1,000人。

gori.me指出,Google計畫於2020年發表自動駕駛車,因此5年後的IT業界主戰場或許不是智慧手機、也不是穿戴裝置,而是有可能在「車子」。

根據嘉實XQ全球贏家系統報價,蘋果21日下跌0.53%、收99.43美元,4個交易日來首度走跌。

9to5Mac、Electrek 4月19日獨家報導,蘋果已聘請特斯拉(Tesla)前任汽車工程副總裁暨英國豪華車商奧斯頓馬丁(Aston Martin)的前任首席工程師Chirs Porritt,而Porritt將負責研究「特殊方案」。大家都知道,所謂的特殊方案就是指蘋果的電動車開發案「泰坦計畫」。

AppleInsider 4月18日引述法蘭克福廣訊報(Frankfurter Allgemeine Zeitung)報導,蘋果已在柏林設立秘密開發實驗室,目前在當地擁有15-20名工程、軟體、硬體、行銷背景的德國汽車業頂尖人才。報導指出,蘋果進軍汽車業的第一款產品將是電動車、但初期不具備自駕功能。

不過,MarketWatch 5月26日報導,Edison Investment Research科技分析師Richard Windsor表示,蘋果先前也曾花大錢研發蘋果電視,最後卻從未發布,蘋果車的結局應該也一樣。華爾街日報報導,蘋果曾有意推出55~65吋的蘋果電視,但是因為產品缺乏特色,打消上市念頭,投入心血全數泡湯。

Windsor強調,蘋果車問題更大,蘋果發現打造汽車比想像更困難,車業門檻極高、管制多、蘋果又缺乏清楚的獲利計畫。儘管蘋果資本雄厚,口袋極深,就算如此,要打入車業也不容易。

(本文內容由授權提供)

本站聲明:網站內容來源於EnergyTrend https://www.energytrend.com.tw/ev/,如有侵權,請聯繫我們,我們將及時處理

【其他文章推薦】

網頁設計公司推薦更多不同的設計風格,搶佔消費者視覺第一線

※廣告預算用在刀口上,網站設計公司幫您達到更多曝光效益

※自行創業 缺乏曝光? 下一步”網站設計“幫您第一時間規劃公司的門面形象

分類
發燒車訊

星際爭霸2 AI開發(持續更新)

準備

我的環境是python3.6,sc2包0.11.1
機器學習包下載鏈接:
地圖下載鏈接
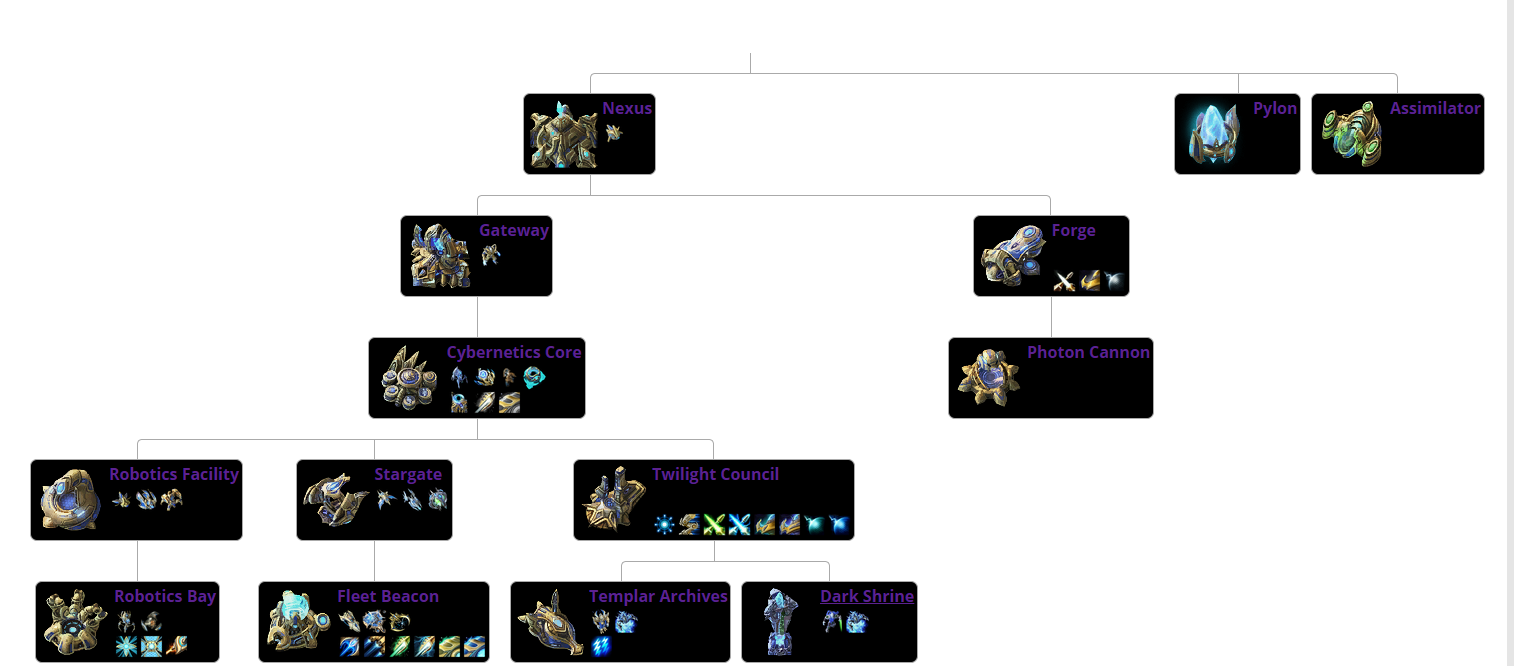
pysc2是DeepMind開發的星際爭霸Ⅱ學習環境。 它是封裝星際爭霸Ⅱ機器學習API,同時也提供Python增強學習環境。
以神族為例編寫代碼,神族建築科技圖如下:

採礦

# -*- encoding: utf-8 -*-
'''
@File    :   __init__.py.py    
@Modify Time      @Author       @Desciption
------------      -------       -----------
2019/11/3 12:32   Jonas           None
'''

import sc2
from sc2 import run_game, maps, Race, Difficulty
from sc2.player import Bot, Computer


class SentdeBot(sc2.BotAI):
    async def on_step(self, iteration: int):
        await self.distribute_workers()


run_game(maps.get("AcidPlantLE"), [
    Bot(Race.Protoss, SentdeBot()), Computer(Race.Terran, Difficulty.Easy)
],realtime = True)

注意
game_data.py的assert self.id != 0註釋掉
pixel_map.py的assert self.bits_per_pixel % 8 == 0, "Unsupported pixel density"註釋掉
否則會報錯

運行結果如下,农民開始採礦

可以正常採礦

建造农民和水晶塔

import sc2
from sc2 import run_game, maps, Race, Difficulty
from sc2.player import Bot, Computer
from sc2.constants import *


class SentdeBot(sc2.BotAI):
    async def on_step(self, iteration: int):
        await self.distribute_workers()
        await self.build_workers()
        await self.build_pylons()

    # 建造农民
    async def build_workers(self):
        # 星靈樞紐(NEXUS)無隊列建造,可以提高晶體礦的利用率,不至於佔用資源
        for nexus in self.units(UnitTypeId.NEXUS).ready.noqueue:
            # 是否有50晶體礦
            if self.can_afford(UnitTypeId.PROBE):
                await self.do(nexus.train(UnitTypeId.PROBE))

    ## 建造水晶
    async def build_pylons(self):
        ## 供應人口和現有人口之差小於5且水晶不是正在建造
        if self.supply_left<5 and not self.already_pending(UnitTypeId.PYLON):
            nexuses = self.units(UnitTypeId.NEXUS).ready
            if nexuses.exists:
                if self.can_afford(UnitTypeId.PYLON):
                    await self.build(UnitTypeId.PYLON,near=nexuses.first)

## 啟動遊戲
run_game(maps.get("AcidPlantLE"), [
    Bot(Race.Protoss, SentdeBot()), Computer(Race.Terran, Difficulty.Easy)
],realtime = True)

運行結果如下,基地造农民,农民造水晶

收集氣體和開礦

代碼如下

import sc2
from sc2 import run_game, maps, Race, Difficulty
from sc2.player import Bot, Computer
from sc2.constants import *


class SentdeBot(sc2.BotAI):
    async def on_step(self, iteration: int):
        await self.distribute_workers()
        await self.build_workers()
        await self.build_pylons()
        await self.build_assimilators()
        await self.expand()

    # 建造农民
    async def build_workers(self):
        # 星靈樞紐(NEXUS)無隊列建造,可以提高晶體礦的利用率,不至於佔用資源
        for nexus in self.units(UnitTypeId.NEXUS).ready.noqueue:
            # 是否有50晶體礦
            if self.can_afford(UnitTypeId.PROBE):
                await self.do(nexus.train(UnitTypeId.PROBE))

    ## 建造水晶
    async def build_pylons(self):
        ## 供應人口和現有人口之差小於5且建築不是正在建造
        if self.supply_left < 5 and not self.already_pending(UnitTypeId.PYLON):
            nexuses = self.units(UnitTypeId.NEXUS).ready
            if nexuses.exists:
                if self.can_afford(UnitTypeId.PYLON):
                    await self.build(UnitTypeId.PYLON, near=nexuses.first)

    ## 建造吸收廠
    async def build_assimilators(self):
        for nexus in self.units(UnitTypeId.NEXUS).ready:
            # 在瓦斯泉上建造吸收廠
            vaspenes = self.state.vespene_geyser.closer_than(15.0,nexus)
            for vaspene in vaspenes:
                if not self.can_afford(UnitTypeId.ASSIMILATOR):
                    break
                worker = self.select_build_worker(vaspene.position)
                if worker is None:
                    break
                if not self.units(UnitTypeId.ASSIMILATOR).closer_than(1.0,vaspene).exists:
                    await self.do(worker.build(UnitTypeId.ASSIMILATOR,vaspene))

    ## 開礦
    async def expand(self):
        if self.units(UnitTypeId.NEXUS).amount<3 and self.can_afford(UnitTypeId.NEXUS):
            await self.expand_now()

## 啟動遊戲
run_game(maps.get("AcidPlantLE"), [
    Bot(Race.Protoss, SentdeBot()), Computer(Race.Terran, Difficulty.Easy)
], realtime=False)

run_game的realtime設置成False,可以在加速模式下運行遊戲。
運行效果如下:

可以建造吸收廠和開礦

建造軍隊

import sc2
from sc2 import run_game, maps, Race, Difficulty
from sc2.player import Bot, Computer
from sc2.constants import *


class SentdeBot(sc2.BotAI):
    async def on_step(self, iteration: int):
        await self.distribute_workers()
        await self.build_workers()
        await self.build_pylons()
        await self.build_assimilators()
        await self.expand()
        await self.offensive_force_buildings()
        await self.build_offensive_force()

    # 建造农民
    async def build_workers(self):
        # 星靈樞紐(NEXUS)無隊列建造,可以提高晶體礦的利用率,不至於佔用資源
        for nexus in self.units(UnitTypeId.NEXUS).ready.noqueue:
            # 是否有50晶體礦
            if self.can_afford(UnitTypeId.PROBE):
                await self.do(nexus.train(UnitTypeId.PROBE))

    ## 建造水晶
    async def build_pylons(self):
        ## 供應人口和現有人口之差小於5且建築不是正在建造
        if self.supply_left < 5 and not self.already_pending(UnitTypeId.PYLON):
            nexuses = self.units(UnitTypeId.NEXUS).ready
            if nexuses.exists:
                if self.can_afford(UnitTypeId.PYLON):
                    await self.build(UnitTypeId.PYLON, near=nexuses.first)

    ## 建造吸收廠
    async def build_assimilators(self):
        for nexus in self.units(UnitTypeId.NEXUS).ready:
            # 在瓦斯泉上建造吸收廠
            vaspenes = self.state.vespene_geyser.closer_than(15.0,nexus)
            for vaspene in vaspenes:
                if not self.can_afford(UnitTypeId.ASSIMILATOR):
                    break
                worker = self.select_build_worker(vaspene.position)
                if worker is None:
                    break
                if not self.units(UnitTypeId.ASSIMILATOR).closer_than(1.0,vaspene).exists:
                    await self.do(worker.build(UnitTypeId.ASSIMILATOR,vaspene))

    ## 開礦
    async def expand(self):
        if self.units(UnitTypeId.NEXUS).amount<2 and self.can_afford(UnitTypeId.NEXUS):
            await self.expand_now()

    ## 建造進攻性建築
    async def offensive_force_buildings(self):
        if self.units(UnitTypeId.PYLON).ready.exists:
            pylon = self.units(UnitTypeId.PYLON).ready.random
            if self.units(UnitTypeId.PYLON).ready.exists:
                # 根據神族建築科技圖,折躍門建造過後才可以建造控制核心
                if self.units(UnitTypeId.GATEWAY).ready.exists:
                    if not self.units(UnitTypeId.CYBERNETICSCORE):
                        if self.can_afford(UnitTypeId.CYBERNETICSCORE) and not self.already_pending(UnitTypeId.CYBERNETICSCORE):
                            await self.build(UnitTypeId.CYBERNETICSCORE,near = pylon)
                # 否則建造折躍門
                else:
                    if self.can_afford(UnitTypeId.GATEWAY) and not self.already_pending(UnitTypeId.GATEWAY):
                        await self.build(UnitTypeId.GATEWAY,near=pylon)

    # 造兵
    async def build_offensive_force(self):
        # 無隊列化建造
        for gw in self.units(UnitTypeId.GATEWAY).ready.noqueue:
            if self.can_afford(UnitTypeId.STALKER) and self.supply_left>0:
                await self.do(gw.train(UnitTypeId.STALKER))


## 啟動遊戲
run_game(maps.get("AcidPlantLE"), [
    Bot(Race.Protoss, SentdeBot()), Computer(Race.Terran, Difficulty.Easy)
], realtime=False)

運行結果如下:

可以看到,我們建造了折躍門和控制核心並訓練了追獵者

控制部隊進攻

代碼如下


import sc2
from sc2 import run_game, maps, Race, Difficulty
from sc2.player import Bot, Computer
from sc2.constants import *
import random

class SentdeBot(sc2.BotAI):
    async def on_step(self, iteration: int):
        await self.distribute_workers()
        await self.build_workers()
        await self.build_pylons()
        await self.build_assimilators()
        await self.expand()
        await self.offensive_force_buildings()
        await self.build_offensive_force()
        await self.attack()

    # 建造农民
    async def build_workers(self):
        # 星靈樞紐(NEXUS)無隊列建造,可以提高晶體礦的利用率,不至於佔用資源
        for nexus in self.units(UnitTypeId.NEXUS).ready.noqueue:
            # 是否有50晶體礦
            if self.can_afford(UnitTypeId.PROBE):
                await self.do(nexus.train(UnitTypeId.PROBE))

    ## 建造水晶
    async def build_pylons(self):
        ## 供應人口和現有人口之差小於5且建築不是正在建造
        if self.supply_left < 5 and not self.already_pending(UnitTypeId.PYLON):
            nexuses = self.units(UnitTypeId.NEXUS).ready
            if nexuses.exists:
                if self.can_afford(UnitTypeId.PYLON):
                    await self.build(UnitTypeId.PYLON, near=nexuses.first)

    ## 建造吸收廠
    async def build_assimilators(self):
        for nexus in self.units(UnitTypeId.NEXUS).ready:
            # 在瓦斯泉上建造吸收廠
            vaspenes = self.state.vespene_geyser.closer_than(15.0,nexus)
            for vaspene in vaspenes:
                if not self.can_afford(UnitTypeId.ASSIMILATOR):
                    break
                worker = self.select_build_worker(vaspene.position)
                if worker is None:
                    break
                if not self.units(UnitTypeId.ASSIMILATOR).closer_than(1.0,vaspene).exists:
                    await self.do(worker.build(UnitTypeId.ASSIMILATOR,vaspene))

    ## 開礦
    async def expand(self):
        if self.units(UnitTypeId.NEXUS).amount<3 and self.can_afford(UnitTypeId.NEXUS):
            await self.expand_now()

    ## 建造進攻性建築
    async def offensive_force_buildings(self):
        if self.units(UnitTypeId.PYLON).ready.exists:
            pylon = self.units(UnitTypeId.PYLON).ready.random
            # 根據神族建築科技圖,折躍門建造過後才可以建造控制核心
            if self.units(UnitTypeId.GATEWAY).ready.exists and not self.units(UnitTypeId.CYBERNETICSCORE):
                if self.can_afford(UnitTypeId.CYBERNETICSCORE) and not self.already_pending(UnitTypeId.CYBERNETICSCORE):
                    await self.build(UnitTypeId.CYBERNETICSCORE,near = pylon)
            # 否則建造折躍門
            elif len(self.units(UnitTypeId.GATEWAY))<=3:
                if self.can_afford(UnitTypeId.GATEWAY) and not self.already_pending(UnitTypeId.GATEWAY):
                    await self.build(UnitTypeId.GATEWAY,near=pylon)

    ## 造兵
    async def build_offensive_force(self):
        # 無隊列化建造
        for gw in self.units(UnitTypeId.GATEWAY).ready.noqueue:
            if self.can_afford(UnitTypeId.STALKER) and self.supply_left>0:
                await self.do(gw.train(UnitTypeId.STALKER))

    ## 尋找目標
    def find_target(self,state):
        if len(self.known_enemy_units)>0:
            # 隨機選取敵方單位
            return random.choice(self.known_enemy_units)
        elif len(self.known_enemy_units)>0:
            # 隨機選取敵方建築
            return random.choice(self.known_enemy_structures)
        else:
            # 返回敵方出生點位
            return self.enemy_start_locations[0]

    ## 進攻
    async def attack(self):
        # 追獵者數量超過15個開始進攻
        if self.units(UnitTypeId.STALKER).amount>15:
            for s in self.units(UnitTypeId.STALKER).idle:
                await self.do(s.attack(self.find_target(self.state)))

        # 防衛模式:視野範圍內存在敵人,開始攻擊
        if self.units(UnitTypeId.STALKER).amount>5:
            if len(self.known_enemy_units)>0:
                for s in self.units(UnitTypeId.STALKER).idle:
                    await self.do(s.attack(random.choice(self.known_enemy_units)))

## 啟動遊戲
run_game(maps.get("AcidPlantLE"), [
    Bot(Race.Protoss, SentdeBot()), Computer(Race.Terran, Difficulty.Medium)
], realtime=False)

運行結果如下

可以看到,4個折躍門訓練追獵者並發動進攻。

擊敗困難電腦

我們目前的代碼只能擊敗中等和簡單電腦,那麼如何擊敗困難電腦呢?
代碼如下


import sc2
from sc2 import run_game, maps, Race, Difficulty
from sc2.player import Bot, Computer
from sc2.constants import *
import random


class SentdeBot(sc2.BotAI):
    def __init__(self):
        # 經過計算,每分鐘大約165迭代次數
        self.ITERATIONS_PER_MINUTE = 165
        # 最大农民數量
        self.MAX_WORKERS = 65

    async def on_step(self, iteration: int):
        self.iteration = iteration
        await self.distribute_workers()
        await self.build_workers()
        await self.build_pylons()
        await self.build_assimilators()
        await self.expand()
        await self.offensive_force_buildings()
        await self.build_offensive_force()
        await self.attack()

    # 建造农民
    async def build_workers(self):
        # 星靈樞鈕*16(一個基地配備16個农民)大於農民數量並且現有农民數量小於MAX_WORKERS
        if len(self.units(UnitTypeId.NEXUS))*16>len(self.units(UnitTypeId.PROBE)) and len(self.units(UnitTypeId.PROBE))<self.MAX_WORKERS:
                # 星靈樞紐(NEXUS)無隊列建造,可以提高晶體礦的利用率,不至於佔用資源
                for nexus in self.units(UnitTypeId.NEXUS).ready.noqueue:
                    # 是否有50晶體礦建造农民
                    if self.can_afford(UnitTypeId.PROBE):
                        await self.do(nexus.train(UnitTypeId.PROBE))

    ## 建造水晶
    async def build_pylons(self):
        ## 供應人口和現有人口之差小於5且建築不是正在建造
        if self.supply_left < 5 and not self.already_pending(UnitTypeId.PYLON):
            nexuses = self.units(UnitTypeId.NEXUS).ready
            if nexuses.exists:
                if self.can_afford(UnitTypeId.PYLON):
                    await self.build(UnitTypeId.PYLON, near=nexuses.first)

    ## 建造吸收廠
    async def build_assimilators(self):
        for nexus in self.units(UnitTypeId.NEXUS).ready:
            # 在瓦斯泉上建造吸收廠
            vaspenes = self.state.vespene_geyser.closer_than(15.0,nexus)
            for vaspene in vaspenes:
                if not self.can_afford(UnitTypeId.ASSIMILATOR):
                    break
                worker = self.select_build_worker(vaspene.position)
                if worker is None:
                    break
                if not self.units(UnitTypeId.ASSIMILATOR).closer_than(1.0,vaspene).exists:
                    await self.do(worker.build(UnitTypeId.ASSIMILATOR,vaspene))

    ## 開礦
    async def expand(self):
        # (self.iteration / self.ITERATIONS_PER_MINUTE)是一個緩慢遞增的值,動態開礦
        if self.units(UnitTypeId.NEXUS).amount<self.iteration / self.ITERATIONS_PER_MINUTE and self.can_afford(UnitTypeId.NEXUS):
            await self.expand_now()

    ## 建造進攻性建築
    async def offensive_force_buildings(self):
        print(self.iteration / self.ITERATIONS_PER_MINUTE)
        if self.units(UnitTypeId.PYLON).ready.exists:
            pylon = self.units(UnitTypeId.PYLON).ready.random
            # 根據神族建築科技圖,折躍門建造過後才可以建造控制核心
            if self.units(UnitTypeId.GATEWAY).ready.exists and not self.units(UnitTypeId.CYBERNETICSCORE):
                if self.can_afford(UnitTypeId.CYBERNETICSCORE) and not self.already_pending(UnitTypeId.CYBERNETICSCORE):
                    await self.build(UnitTypeId.CYBERNETICSCORE, near=pylon)
            # 否則建造折躍門
            # (self.iteration / self.ITERATIONS_PER_MINUTE)/2 是一個緩慢遞增的值
            elif len(self.units(UnitTypeId.GATEWAY)) < ((self.iteration / self.ITERATIONS_PER_MINUTE) / 2):
                if self.can_afford(UnitTypeId.GATEWAY) and not self.already_pending(UnitTypeId.GATEWAY):
                    await self.build(UnitTypeId.GATEWAY, near=pylon)
            # 控制核心存在的情況下建造星門
            if self.units(UnitTypeId.CYBERNETICSCORE).ready.exists:
                if len(self.units(UnitTypeId.STARGATE)) < ((self.iteration / self.ITERATIONS_PER_MINUTE) / 2):
                    if self.can_afford(UnitTypeId.STARGATE) and not self.already_pending(UnitTypeId.STARGATE):
                        await self.build(UnitTypeId.STARGATE, near=pylon)

    ## 造兵
    async def build_offensive_force(self):
        # 無隊列化建造
        for gw in self.units(UnitTypeId.GATEWAY).ready.noqueue:
            if not self.units(UnitTypeId.STALKER).amount > self.units(UnitTypeId.VOIDRAY).amount:

                if self.can_afford(UnitTypeId.STALKER) and self.supply_left > 0:
                    await self.do(gw.train(UnitTypeId.STALKER))

        for sg in self.units(UnitTypeId.STARGATE).ready.noqueue:
            if self.can_afford(UnitTypeId.VOIDRAY) and self.supply_left > 0:
                await self.do(sg.train(UnitTypeId.VOIDRAY))

    ## 尋找目標
    def find_target(self,state):
        if len(self.known_enemy_units)>0:
            # 隨機選取敵方單位
            return random.choice(self.known_enemy_units)
        elif len(self.known_enemy_units)>0:
            # 隨機選取敵方建築
            return random.choice(self.known_enemy_structures)
        else:
            # 返回敵方出生點位
            return self.enemy_start_locations[0]

    ## 進攻
    async def attack(self):
        # {UNIT: [n to fight, n to defend]}
        aggressive_units = {UnitTypeId.STALKER: [15, 5],
                            UnitTypeId.VOIDRAY: [8, 3]}

        for UNIT in aggressive_units:
            # 攻擊模式
            if self.units(UNIT).amount > aggressive_units[UNIT][0] and self.units(UNIT).amount > aggressive_units[UNIT][
                1]:
                for s in self.units(UNIT).idle:
                    await self.do(s.attack(self.find_target(self.state)))
            # 防衛模式
            elif self.units(UNIT).amount > aggressive_units[UNIT][1]:
                if len(self.known_enemy_units) > 0:
                    for s in self.units(UNIT).idle:
                        await self.do(s.attack(random.choice(self.known_enemy_units)))
## 啟動遊戲
run_game(maps.get("AcidPlantLE"), [
    Bot(Race.Protoss, SentdeBot()), Computer(Race.Terran, Difficulty.Hard)
], realtime=False)

運行結果如下

可以看到,擊敗了困難人族電腦,但是電腦選擇了rush戰術,我們寫得AI腳本會輸掉遊戲。顯然,這不是最佳方案。
“只有AI才能拯救我的勝率”,請看下文。

採集地圖數據

這次我們只造一個折躍門,全力通過星門造虛空光輝艦
修改offensive_force_buildings(self)方法的判斷

elif len(self.units(GATEWAY)) < 1:
                if self.can_afford(GATEWAY) and not self.already_pending(GATEWAY):
                    await self.build(GATEWAY, near=pylon)

註釋或者刪除build_offensive_force(self)的建造追獵者的代碼

        ## 造兵
    async def build_offensive_force(self):
        # 無隊列化建造
        # for gw in self.units(UnitTypeId.GATEWAY).ready.noqueue:
        #     if not self.units(UnitTypeId.STALKER).amount > self.units(UnitTypeId.VOIDRAY).amount:
        #
        #         if self.can_afford(UnitTypeId.STALKER) and self.supply_left > 0:
        #             await self.do(gw.train(UnitTypeId.STALKER))

        for sg in self.units(UnitTypeId.STARGATE).ready.noqueue:
            if self.can_afford(UnitTypeId.VOIDRAY) and self.supply_left > 0:
                await self.do(sg.train(UnitTypeId.VOIDRAY))

attack(self)中的aggressive_units註釋掉Stalker
導入numpy和cv2庫

game_data = np.zeros((self.game_info.map_size[1], self.game_info.map_size[0], 3), np.uint8)

建立以地圖Heigt為行,Width為列的三維矩陣

for nexus in self.units(NEXUS):
            nex_pos = nexus.position
            print(nex_pos)
            cv2.circle(game_data, (int(nex_pos[0]), int(nex_pos[1])), 10, (0, 255, 0), -1)  # BGR

遍歷星靈樞紐,獲取下一個位置,畫圓,circle(承載圓的img, 圓心, 半徑, 顏色, thickness=-1表示填充)
接下來我們要垂直翻轉三維矩陣,因為我們建立的矩陣左上角是原點(0,0),縱坐標向下延申,橫坐標向右延申。翻轉之後就成了正常的坐標系。

flipped = cv2.flip(game_data, 0)

圖像縮放,達到可視化最佳。

        resized = cv2.resize(flipped, dsize=None, fx=2, fy=2)
        cv2.imshow('Intel', resized)
        cv2.waitKey(1)

至此,完整代碼如下

import sc2
from sc2 import run_game, maps, Race, Difficulty
from sc2.player import Bot, Computer
from sc2.constants import *
import random
import numpy as np
import cv2


class SentdeBot(sc2.BotAI):
    def __init__(self):
        # 經過計算,每分鐘大約165迭代次數
        self.ITERATIONS_PER_MINUTE = 165
        # 最大农民數量
        self.MAX_WORKERS = 65

    async def on_step(self, iteration: int):
        self.iteration = iteration
        await self.distribute_workers()
        await self.build_workers()
        await self.build_pylons()
        await self.build_assimilators()
        await self.expand()
        await self.offensive_force_buildings()
        await self.build_offensive_force()
        await self.intel()
        await self.attack()

    async def intel(self):
        # 根據地圖建立的三維矩陣
        game_data = np.zeros((self.game_info.map_size[1], self.game_info.map_size[0], 3), np.uint8)
        for nexus in self.units(UnitTypeId.NEXUS):
            nex_pos = nexus.position
            # circle(承載圓的img, 圓心, 半徑, 顏色, thickness=-1表示填充)
            # 記錄星靈樞紐的位置
            cv2.circle(game_data, (int(nex_pos[0]), int(nex_pos[1])), 10, (0, 255, 0), -1)
        # 圖像翻轉垂直鏡像
        flipped = cv2.flip(game_data, 0)
        # 圖像縮放
        # cv2.resize(原圖像,輸出圖像的大小,width方向的縮放比例,height方向縮放的比例)
        resized = cv2.resize(flipped, dsize=None, fx=2, fy=2)
        cv2.imshow('Intel', resized)

        # cv2.waitKey(每Xms刷新圖像)
        cv2.waitKey(1)

    # 建造农民
    async def build_workers(self):
        # 星靈樞鈕*16(一個基地配備16個农民)大於農民數量並且現有农民數量小於MAX_WORKERS
        if len(self.units(UnitTypeId.NEXUS)) * 16 > len(self.units(UnitTypeId.PROBE)) and len(
                self.units(UnitTypeId.PROBE)) < self.MAX_WORKERS:
            # 星靈樞紐(NEXUS)無隊列建造,可以提高晶體礦的利用率,不至於佔用資源
            for nexus in self.units(UnitTypeId.NEXUS).ready.noqueue:
                # 是否有50晶體礦建造农民
                if self.can_afford(UnitTypeId.PROBE):
                    await self.do(nexus.train(UnitTypeId.PROBE))

    ## 建造水晶
    async def build_pylons(self):
        ## 供應人口和現有人口之差小於5且建築不是正在建造
        if self.supply_left < 5 and not self.already_pending(UnitTypeId.PYLON):
            nexuses = self.units(UnitTypeId.NEXUS).ready
            if nexuses.exists:
                if self.can_afford(UnitTypeId.PYLON):
                    await self.build(UnitTypeId.PYLON, near=nexuses.first)

    ## 建造吸收廠
    async def build_assimilators(self):
        for nexus in self.units(UnitTypeId.NEXUS).ready:
            # 在瓦斯泉上建造吸收廠
            vaspenes = self.state.vespene_geyser.closer_than(15.0, nexus)
            for vaspene in vaspenes:
                if not self.can_afford(UnitTypeId.ASSIMILATOR):
                    break
                worker = self.select_build_worker(vaspene.position)
                if worker is None:
                    break
                if not self.units(UnitTypeId.ASSIMILATOR).closer_than(1.0, vaspene).exists:
                    await self.do(worker.build(UnitTypeId.ASSIMILATOR, vaspene))

    ## 開礦
    async def expand(self):
        # (self.iteration / self.ITERATIONS_PER_MINUTE)是一個緩慢遞增的值,動態開礦
        if self.units(UnitTypeId.NEXUS).amount < self.iteration / self.ITERATIONS_PER_MINUTE and self.can_afford(
                UnitTypeId.NEXUS):
            await self.expand_now()

    ## 建造進攻性建築
    async def offensive_force_buildings(self):
        print(self.iteration / self.ITERATIONS_PER_MINUTE)
        if self.units(UnitTypeId.PYLON).ready.exists:
            pylon = self.units(UnitTypeId.PYLON).ready.random
            # 根據神族建築科技圖,折躍門建造過後才可以建造控制核心
            if self.units(UnitTypeId.GATEWAY).ready.exists and not self.units(UnitTypeId.CYBERNETICSCORE):
                if self.can_afford(UnitTypeId.CYBERNETICSCORE) and not self.already_pending(UnitTypeId.CYBERNETICSCORE):
                    await self.build(UnitTypeId.CYBERNETICSCORE, near=pylon)
            # 否則建造折躍門
            # (self.iteration / self.ITERATIONS_PER_MINUTE)/2 是一個緩慢遞增的值
            # elif len(self.units(UnitTypeId.GATEWAY)) < ((self.iteration / self.ITERATIONS_PER_MINUTE) / 2):
            elif len(self.units(UnitTypeId.GATEWAY)) < 1:
                if self.can_afford(UnitTypeId.GATEWAY) and not self.already_pending(UnitTypeId.GATEWAY):
                    await self.build(UnitTypeId.GATEWAY, near=pylon)
            # 控制核心存在的情況下建造星門
            if self.units(UnitTypeId.CYBERNETICSCORE).ready.exists:
                if len(self.units(UnitTypeId.STARGATE)) < ((self.iteration / self.ITERATIONS_PER_MINUTE) / 2):
                    if self.can_afford(UnitTypeId.STARGATE) and not self.already_pending(UnitTypeId.STARGATE):
                        await self.build(UnitTypeId.STARGATE, near=pylon)

    ## 造兵
    async def build_offensive_force(self):
        # 無隊列化建造
        for sg in self.units(UnitTypeId.STARGATE).ready.noqueue:
            if self.can_afford(UnitTypeId.VOIDRAY) and self.supply_left > 0:
                await self.do(sg.train(UnitTypeId.VOIDRAY))

    ## 尋找目標
    def find_target(self, state):
        if len(self.known_enemy_units) > 0:
            # 隨機選取敵方單位
            return random.choice(self.known_enemy_units)
        elif len(self.known_enemy_units) > 0:
            # 隨機選取敵方建築
            return random.choice(self.known_enemy_structures)
        else:
            # 返回敵方出生點位
            return self.enemy_start_locations[0]

    ## 進攻
    async def attack(self):
        # {UNIT: [n to fight, n to defend]}
        aggressive_units = {UnitTypeId.VOIDRAY: [8, 3]}

        for UNIT in aggressive_units:
            # 攻擊模式
            if self.units(UNIT).amount > aggressive_units[UNIT][0] and self.units(UNIT).amount > aggressive_units[UNIT][1]:
                for s in self.units(UNIT).idle:
                    await self.do(s.attack(self.find_target(self.state)))
            # 防衛模式
            elif self.units(UNIT).amount > aggressive_units[UNIT][1]:
                if len(self.known_enemy_units) > 0:
                    for s in self.units(UNIT).idle:
                        await self.do(s.attack(random.choice(self.known_enemy_units)))


## 啟動遊戲
run_game(maps.get("AcidPlantLE"), [
    Bot(Race.Protoss, SentdeBot()), Computer(Race.Terran, Difficulty.Hard)
], realtime=False)

運行結果如下

採集到了地圖位置。

偵察

在intel(self)里創建一個字典draw_dict,UnitTypeId作為key,半徑和顏色是value


        draw_dict = {
            UnitTypeId.NEXUS: [15, (0, 255, 0)],
            UnitTypeId.PYLON: [3, (20, 235, 0)],
            UnitTypeId.PROBE: [1, (55, 200, 0)],
            UnitTypeId.ASSIMILATOR: [2, (55, 200, 0)],
            UnitTypeId.GATEWAY: [3, (200, 100, 0)],
            UnitTypeId.CYBERNETICSCORE: [3, (150, 150, 0)],
            UnitTypeId.STARGATE: [5, (255, 0, 0)],
            UnitTypeId.ROBOTICSFACILITY: [5, (215, 155, 0)],

            UnitTypeId.VOIDRAY: [3, (255, 100, 0)]
        }

迭代同上

for unit_type in draw_dict:
            for unit in self.units(unit_type).ready:
                pos = unit.position
                cv2.circle(game_data, (int(pos[0]), int(pos[1])), draw_dict[unit_type][0], draw_dict[unit_type][1], -1)

存儲三族的主基地名稱(星靈樞紐,指揮中心,孵化場),刻畫敵方建築。

# 主基地名稱
        main_base_names = ["nexus", "supplydepot", "hatchery"]
        # 記錄敵方基地位置
        for enemy_building in self.known_enemy_structures:
            pos = enemy_building.position
            if enemy_building.name.lower() not in main_base_names:
                cv2.circle(game_data, (int(pos[0]), int(pos[1])), 5, (200, 50, 212), -1)
        for enemy_building in self.known_enemy_structures:
            pos = enemy_building.position
            if enemy_building.name.lower() in main_base_names:
                cv2.circle(game_data, (int(pos[0]), int(pos[1])), 15, (0, 0, 255), -1)

刻畫敵方單位,如果是农民畫得小些,其他單位則畫大些。

        for enemy_unit in self.known_enemy_units:

            if not enemy_unit.is_structure:
                worker_names = ["probe", "scv", "drone"]
                # if that unit is a PROBE, SCV, or DRONE... it's a worker
                pos = enemy_unit.position
                if enemy_unit.name.lower() in worker_names:
                    cv2.circle(game_data, (int(pos[0]), int(pos[1])), 1, (55, 0, 155), -1)
                else:
                    cv2.circle(game_data, (int(pos[0]), int(pos[1])), 3, (50, 0, 215), -1)

在offensive_force_buildings(self)方法中添加建造机械台

            if self.units(CYBERNETICSCORE).ready.exists:
                if len(self.units(ROBOTICSFACILITY)) < 1:
                    if self.can_afford(ROBOTICSFACILITY) and not self.already_pending(ROBOTICSFACILITY):
                        await self.build(ROBOTICSFACILITY, near=pylon)

創建scout(),訓練Observer

async def scout(self):
        if len(self.units(OBSERVER)) > 0:
            scout = self.units(OBSERVER)[0]
            if scout.is_idle:
                enemy_location = self.enemy_start_locations[0]
                move_to = self.random_location_variance(enemy_location)
                print(move_to)
                await self.do(scout.move(move_to))

        else:
            for rf in self.units(ROBOTICSFACILITY).ready.noqueue:
                if self.can_afford(OBSERVER) and self.supply_left > 0:
                    await self.do(rf.train(OBSERVER))

生成隨機位置,很簡單。意思是橫坐標累計遞增-0.2和0.2倍的橫坐標,限制條件為如果x超過橫坐標,那麼就是橫坐標最大值。
縱坐標同理。

    def random_location_variance(self, enemy_start_location):
        x = enemy_start_location[0]
        y = enemy_start_location[1]

        x += ((random.randrange(-20, 20))/100) * enemy_start_location[0]
        y += ((random.randrange(-20, 20))/100) * enemy_start_location[1]

        if x < 0:
            x = 0
        if y < 0:
            y = 0
        if x > self.game_info.map_size[0]:
            x = self.game_info.map_size[0]
        if y > self.game_info.map_size[1]:
            y = self.game_info.map_size[1]

        go_to = position.Point2(position.Pointlike((x,y)))
        return go_to

完整代碼如下

# -*- encoding: utf-8 -*-
'''
@File    :   demo.py
@Modify Time      @Author       @Desciption
------------      -------       -----------
2019/11/3 12:32   Jonas           None
'''

import sc2
from sc2 import run_game, maps, Race, Difficulty, position
from sc2.player import Bot, Computer
from sc2.constants import *
import random
import numpy as np
import cv2


class SentdeBot(sc2.BotAI):
    def __init__(self):
        # 經過計算,每分鐘大約165迭代次數
        self.ITERATIONS_PER_MINUTE = 165
        # 最大农民數量
        self.MAX_WORKERS = 50

    async def on_step(self, iteration: int):
        self.iteration = iteration
        await self.scout()
        await self.distribute_workers()
        await self.build_workers()
        await self.build_pylons()
        await self.build_assimilators()
        await self.expand()
        await self.offensive_force_buildings()
        await self.build_offensive_force()
        await self.intel()
        await self.attack()

    ## 偵察
    async def scout(self):
        if len(self.units(UnitTypeId.OBSERVER)) > 0:
            scout = self.units(UnitTypeId.OBSERVER)[0]
            if scout.is_idle:
                enemy_location = self.enemy_start_locations[0]
                move_to = self.random_location_variance(enemy_location)
                print(move_to)
                await self.do(scout.move(move_to))

        else:
            for rf in self.units(UnitTypeId.ROBOTICSFACILITY).ready.noqueue:
                if self.can_afford(UnitTypeId.OBSERVER) and self.supply_left > 0:
                    await self.do(rf.train(UnitTypeId.OBSERVER))

    async def intel(self):
        game_data = np.zeros((self.game_info.map_size[1], self.game_info.map_size[0], 3), np.uint8)

        # UnitTypeId作為key,半徑和顏色是value
        draw_dict = {
            UnitTypeId.NEXUS: [15, (0, 255, 0)],
            UnitTypeId.PYLON: [3, (20, 235, 0)],
            UnitTypeId.PROBE: [1, (55, 200, 0)],
            UnitTypeId.ASSIMILATOR: [2, (55, 200, 0)],
            UnitTypeId.GATEWAY: [3, (200, 100, 0)],
            UnitTypeId.CYBERNETICSCORE: [3, (150, 150, 0)],
            UnitTypeId.STARGATE: [5, (255, 0, 0)],
            UnitTypeId.ROBOTICSFACILITY: [5, (215, 155, 0)],

            UnitTypeId.VOIDRAY: [3, (255, 100, 0)],
            # OBSERVER: [3, (255, 255, 255)],
        }

        for unit_type in draw_dict:
            for unit in self.units(unit_type).ready:
                pos = unit.position
                cv2.circle(game_data, (int(pos[0]), int(pos[1])), draw_dict[unit_type][0], draw_dict[unit_type][1], -1)

        # 主基地名稱
        main_base_names = ["nexus", "supplydepot", "hatchery"]
        # 記錄敵方基地位置
        for enemy_building in self.known_enemy_structures:
            pos = enemy_building.position
            # 不是主基地建築,畫小一些
            if enemy_building.name.lower() not in main_base_names:
                cv2.circle(game_data, (int(pos[0]), int(pos[1])), 5, (200, 50, 212), -1)
        for enemy_building in self.known_enemy_structures:
            pos = enemy_building.position
            if enemy_building.name.lower() in main_base_names:
                cv2.circle(game_data, (int(pos[0]), int(pos[1])), 15, (0, 0, 255), -1)

        for enemy_unit in self.known_enemy_units:

            if not enemy_unit.is_structure:
                worker_names = ["probe", "scv", "drone"]
                # if that unit is a PROBE, SCV, or DRONE... it's a worker
                pos = enemy_unit.position
                if enemy_unit.name.lower() in worker_names:
                    cv2.circle(game_data, (int(pos[0]), int(pos[1])), 1, (55, 0, 155), -1)
                else:
                    cv2.circle(game_data, (int(pos[0]), int(pos[1])), 3, (50, 0, 215), -1)

        for obs in self.units(UnitTypeId.OBSERVER).ready:
            pos = obs.position
            cv2.circle(game_data, (int(pos[0]), int(pos[1])), 1, (255, 255, 255), -1)

        # flip horizontally to make our final fix in visual representation:
        flipped = cv2.flip(game_data, 0)
        resized = cv2.resize(flipped, dsize=None, fx=2, fy=2)

        cv2.imshow('Intel', resized)
        cv2.waitKey(1)

    def random_location_variance(self, enemy_start_location):
        x = enemy_start_location[0]
        y = enemy_start_location[1]

        x += ((random.randrange(-20, 20)) / 100) * enemy_start_location[0]
        y += ((random.randrange(-20, 20)) / 100) * enemy_start_location[1]

        if x < 0:
            x = 0
        if y < 0:
            y = 0
        if x > self.game_info.map_size[0]:
            x = self.game_info.map_size[0]
        if y > self.game_info.map_size[1]:
            y = self.game_info.map_size[1]

        go_to = position.Point2(position.Pointlike((x, y)))
        return go_to

    # 建造农民
    async def build_workers(self):
        # 星靈樞鈕*16(一個基地配備16個农民)大於農民數量並且現有农民數量小於MAX_WORKERS
        if len(self.units(UnitTypeId.NEXUS)) * 16 > len(self.units(UnitTypeId.PROBE)) and len(
                self.units(UnitTypeId.PROBE)) < self.MAX_WORKERS:
            # 星靈樞紐(NEXUS)無隊列建造,可以提高晶體礦的利用率,不至於佔用資源
            for nexus in self.units(UnitTypeId.NEXUS).ready.noqueue:
                # 是否有50晶體礦建造农民
                if self.can_afford(UnitTypeId.PROBE):
                    await self.do(nexus.train(UnitTypeId.PROBE))

    ## 建造水晶
    async def build_pylons(self):
        ## 供應人口和現有人口之差小於5且建築不是正在建造
        if self.supply_left < 5 and not self.already_pending(UnitTypeId.PYLON):
            nexuses = self.units(UnitTypeId.NEXUS).ready
            if nexuses.exists:
                if self.can_afford(UnitTypeId.PYLON):
                    await self.build(UnitTypeId.PYLON, near=nexuses.first)

    ## 建造吸收廠
    async def build_assimilators(self):
        for nexus in self.units(UnitTypeId.NEXUS).ready:
            # 在瓦斯泉上建造吸收廠
            vaspenes = self.state.vespene_geyser.closer_than(15.0, nexus)
            for vaspene in vaspenes:
                if not self.can_afford(UnitTypeId.ASSIMILATOR):
                    break
                worker = self.select_build_worker(vaspene.position)
                if worker is None:
                    break
                if not self.units(UnitTypeId.ASSIMILATOR).closer_than(1.0, vaspene).exists:
                    await self.do(worker.build(UnitTypeId.ASSIMILATOR, vaspene))

    ## 開礦
    async def expand(self):
        # (self.iteration / self.ITERATIONS_PER_MINUTE)是一個緩慢遞增的值,動態開礦
        if self.units(UnitTypeId.NEXUS).amount < self.iteration / self.ITERATIONS_PER_MINUTE and self.can_afford(
                UnitTypeId.NEXUS):
            await self.expand_now()

    ## 建造進攻性建築
    async def offensive_force_buildings(self):
        print(self.iteration / self.ITERATIONS_PER_MINUTE)
        if self.units(UnitTypeId.PYLON).ready.exists:
            pylon = self.units(UnitTypeId.PYLON).ready.random
            # 根據神族建築科技圖,折躍門建造過後才可以建造控制核心
            if self.units(UnitTypeId.GATEWAY).ready.exists and not self.units(UnitTypeId.CYBERNETICSCORE):
                if self.can_afford(UnitTypeId.CYBERNETICSCORE) and not self.already_pending(UnitTypeId.CYBERNETICSCORE):
                    await self.build(UnitTypeId.CYBERNETICSCORE, near=pylon)
            # 否則建造折躍門
            # (self.iteration / self.ITERATIONS_PER_MINUTE)/2 是一個緩慢遞增的值
            # elif len(self.units(UnitTypeId.GATEWAY)) < ((self.iteration / self.ITERATIONS_PER_MINUTE) / 2):
            elif len(self.units(UnitTypeId.GATEWAY)) < 1:
                if self.can_afford(UnitTypeId.GATEWAY) and not self.already_pending(UnitTypeId.GATEWAY):
                    await self.build(UnitTypeId.GATEWAY, near=pylon)
            # 控制核心存在的情況下建造机械台
            if self.units(UnitTypeId.CYBERNETICSCORE).ready.exists:
                if len(self.units(UnitTypeId.ROBOTICSFACILITY)) < 1:
                    if self.can_afford(UnitTypeId.ROBOTICSFACILITY) and not self.already_pending(
                            UnitTypeId.ROBOTICSFACILITY):
                        await self.build(UnitTypeId.ROBOTICSFACILITY, near=pylon)

            # 控制核心存在的情況下建造星門
            if self.units(UnitTypeId.CYBERNETICSCORE).ready.exists:
                if len(self.units(UnitTypeId.STARGATE)) < ((self.iteration / self.ITERATIONS_PER_MINUTE) / 2):
                    if self.can_afford(UnitTypeId.STARGATE) and not self.already_pending(UnitTypeId.STARGATE):
                        await self.build(UnitTypeId.STARGATE, near=pylon)

    ## 造兵
    async def build_offensive_force(self):
        # 無隊列化建造
        # for gw in self.units(UnitTypeId.GATEWAY).ready.noqueue:
        #     if not self.units(UnitTypeId.STALKER).amount > self.units(UnitTypeId.VOIDRAY).amount:
        #
        #         if self.can_afford(UnitTypeId.STALKER) and self.supply_left > 0:
        #             await self.do(gw.train(UnitTypeId.STALKER))

        for sg in self.units(UnitTypeId.STARGATE).ready.noqueue:
            if self.can_afford(UnitTypeId.VOIDRAY) and self.supply_left > 0:
                await self.do(sg.train(UnitTypeId.VOIDRAY))

    ## 尋找目標
    def find_target(self, state):
        if len(self.known_enemy_units) > 0:
            # 隨機選取敵方單位
            return random.choice(self.known_enemy_units)
        elif len(self.known_enemy_units) > 0:
            # 隨機選取敵方建築
            return random.choice(self.known_enemy_structures)
        else:
            # 返回敵方出生點位
            return self.enemy_start_locations[0]

    ## 進攻
    async def attack(self):
        # {UNIT: [n to fight, n to defend]}
        aggressive_units = {UnitTypeId.VOIDRAY: [8, 3]}

        for UNIT in aggressive_units:
            # 攻擊模式
            if self.units(UNIT).amount > aggressive_units[UNIT][0] and self.units(UNIT).amount > aggressive_units[UNIT][
                1]:
                for s in self.units(UNIT).idle:
                    await self.do(s.attack(self.find_target(self.state)))
            # 防衛模式
            elif self.units(UNIT).amount > aggressive_units[UNIT][1]:
                if len(self.known_enemy_units) > 0:
                    for s in self.units(UNIT).idle:
                        await self.do(s.attack(random.choice(self.known_enemy_units)))


## 啟動遊戲
run_game(maps.get("AcidPlantLE"), [
    Bot(Race.Protoss, SentdeBot()), Computer(Race.Terran, Difficulty.Hard)
], realtime=False)

運行結果如下,紅色和粉紅色是敵方單位。

創建訓練數據

統計資源、人口和軍隊人口比,在intel方法添加如下代碼

        # 追蹤資源、人口和軍隊人口比
        line_max = 50
        mineral_ratio = self.minerals / 1500
        if mineral_ratio > 1.0:
            mineral_ratio = 1.0

        vespene_ratio = self.vespene / 1500
        if vespene_ratio > 1.0:
            vespene_ratio = 1.0

        population_ratio = self.supply_left / self.supply_cap
        if population_ratio > 1.0:
            population_ratio = 1.0

        plausible_supply = self.supply_cap / 200.0

        military_weight = len(self.units(UnitTypeId.VOIDRAY)) / (self.supply_cap - self.supply_left)
        if military_weight > 1.0:
            military_weight = 1.0

        # 农民/人口      worker/supply ratio
        cv2.line(game_data, (0, 19), (int(line_max * military_weight), 19), (250, 250, 200), 3)
        # 人口/200    plausible supply (supply/200.0)
        cv2.line(game_data, (0, 15), (int(line_max * plausible_supply), 15), (220, 200, 200), 3)
        # (人口-現有人口)/人口  population ratio (supply_left/supply)
        cv2.line(game_data, (0, 11), (int(line_max * population_ratio), 11), (150, 150, 150), 3)
        # 氣體/1500   gas/1500
        cv2.line(game_data, (0, 7), (int(line_max * vespene_ratio), 7), (210, 200, 0), 3)
        # 晶體礦/1500  minerals minerals/1500
        cv2.line(game_data, (0, 3), (int(line_max * mineral_ratio), 3), (0, 255, 25), 3)

運行結果如下,左下角自上而下依次是“农民/人口”,“人口/200”,“(人口-現有人口)/人口”,“氣體/1500”,“晶體礦/1500”

採集進攻行為數據,在attack方法中加入如下代碼

        if len(self.units(UnitTypeId.VOIDRAY).idle) > 0:
            choice = random.randrange(0, 4)
            target = False
            if self.iteration > self.do_something_after:
                if choice == 0:
                    # 什麼都不做
                    wait = random.randrange(20, 165)
                    self.do_something_after = self.iteration + wait

                elif choice == 1:
                    # 攻擊離星靈樞紐最近的單位
                    if len(self.known_enemy_units) > 0:
                        target = self.known_enemy_units.closest_to(random.choice(self.units(UnitTypeId.NEXUS)))

                elif choice == 2:
                    # 攻擊敵方建築
                    if len(self.known_enemy_structures) > 0:
                        target = random.choice(self.known_enemy_structures)

                elif choice == 3:
                    # 攻擊敵方出生位置
                    target = self.enemy_start_locations[0]

                if target:
                    for vr in self.units(UnitTypeId.VOIDRAY).idle:
                        await self.do(vr.attack(target))
                y = np.zeros(4)
                y[choice] = 1
                print(y)
                self.train_data.append([y, self.flipped])

輸出如下結果

···
[1. 0. 0. 0.]
[0. 0. 1. 0.]
[0. 0. 0. 1.]
[0. 0. 1. 0.]
[1. 0. 0. 0.]
···

為了使用self.flipped = cv2.flip(game_data, 0),修改

        flipped = cv2.flip(game_data, 0)
        resized = cv2.resize(flipped, dsize=None, fx=2, fy=2)

        self.flipped = cv2.flip(game_data, 0)
        resized = cv2.resize(self.flipped, dsize=None, fx=2, fy=2)

init 方法添加do_something_after和train_data

    def __init__(self):
        self.ITERATIONS_PER_MINUTE = 165
        self.MAX_WORKERS = 50
        self.do_something_after = 0
        self.train_data = []

採集攻擊數據的時候不需要畫圖,我們在類前加HEADLESS = False,intel方法代碼修改如下

        self.flipped = cv2.flip(game_data, 0)

        if not HEADLESS:
            resized = cv2.resize(self.flipped, dsize=None, fx=2, fy=2)
            cv2.imshow('Intel', resized)
            cv2.waitKey(1)

加入on_end方法,只存儲勝利的數據,在和代碼同級目錄新建train_data文件夾

    def on_end(self, game_result):
        print('--- on_end called ---')
        print(game_result)

        if game_result == Result.Victory:
            np.save("train_data/{}.npy".format(str(int(time.time()))), np.array(self.train_data))

完整代碼如下

import os
import time

import sc2
from sc2 import run_game, maps, Race, Difficulty, position, Result
from sc2.player import Bot, Computer
from sc2.constants import *
import random
import numpy as np
import cv2

HEADLESS = True
# os.environ["SC2PATH"] = 'F:\StarCraft II'

class SentdeBot(sc2.BotAI):
    def __init__(self):
        # 經過計算,每分鐘大約165迭代次數
        self.ITERATIONS_PER_MINUTE = 165
        # 最大农民數量
        self.MAX_WORKERS = 50
        self.do_something_after = 0
        self.train_data = []

    def on_end(self, game_result):
        print('--- on_end called ---')
        print(game_result)

        if game_result == Result.Victory:
            np.save("train_data/{}.npy".format(str(int(time.time()))), np.array(self.train_data))

    async def on_step(self, iteration: int):
        self.iteration = iteration
        await self.scout()
        await self.distribute_workers()
        await self.build_workers()
        await self.build_pylons()
        await self.build_assimilators()
        await self.expand()
        await self.offensive_force_buildings()
        await self.build_offensive_force()
        await self.intel()
        await self.attack()

    ## 偵察
    async def scout(self):
        if len(self.units(UnitTypeId.OBSERVER)) > 0:
            scout = self.units(UnitTypeId.OBSERVER)[0]
            if scout.is_idle:
                enemy_location = self.enemy_start_locations[0]
                move_to = self.random_location_variance(enemy_location)
                print(move_to)
                await self.do(scout.move(move_to))

        else:
            for rf in self.units(UnitTypeId.ROBOTICSFACILITY).ready.noqueue:
                if self.can_afford(UnitTypeId.OBSERVER) and self.supply_left > 0:
                    await self.do(rf.train(UnitTypeId.OBSERVER))

    async def intel(self):
        game_data = np.zeros((self.game_info.map_size[1], self.game_info.map_size[0], 3), np.uint8)

        # UnitTypeId作為key,半徑和顏色是value
        draw_dict = {
            UnitTypeId.NEXUS: [15, (0, 255, 0)],
            UnitTypeId.PYLON: [3, (20, 235, 0)],
            UnitTypeId.PROBE: [1, (55, 200, 0)],
            UnitTypeId.ASSIMILATOR: [2, (55, 200, 0)],
            UnitTypeId.GATEWAY: [3, (200, 100, 0)],
            UnitTypeId.CYBERNETICSCORE: [3, (150, 150, 0)],
            UnitTypeId.STARGATE: [5, (255, 0, 0)],
            UnitTypeId.ROBOTICSFACILITY: [5, (215, 155, 0)],

            UnitTypeId.VOIDRAY: [3, (255, 100, 0)],
            # OBSERVER: [3, (255, 255, 255)],
        }

        for unit_type in draw_dict:
            for unit in self.units(unit_type).ready:
                pos = unit.position
                cv2.circle(game_data, (int(pos[0]), int(pos[1])), draw_dict[unit_type][0], draw_dict[unit_type][1], -1)

        # 主基地名稱
        main_base_names = ["nexus", "supplydepot", "hatchery"]
        # 記錄敵方基地位置
        for enemy_building in self.known_enemy_structures:
            pos = enemy_building.position
            # 不是主基地建築,畫小一些
            if enemy_building.name.lower() not in main_base_names:
                cv2.circle(game_data, (int(pos[0]), int(pos[1])), 5, (200, 50, 212), -1)
        for enemy_building in self.known_enemy_structures:
            pos = enemy_building.position
            if enemy_building.name.lower() in main_base_names:
                cv2.circle(game_data, (int(pos[0]), int(pos[1])), 15, (0, 0, 255), -1)

        for enemy_unit in self.known_enemy_units:

            if not enemy_unit.is_structure:
                worker_names = ["probe", "scv", "drone"]
                # if that unit is a PROBE, SCV, or DRONE... it's a worker
                pos = enemy_unit.position
                if enemy_unit.name.lower() in worker_names:
                    cv2.circle(game_data, (int(pos[0]), int(pos[1])), 1, (55, 0, 155), -1)
                else:
                    cv2.circle(game_data, (int(pos[0]), int(pos[1])), 3, (50, 0, 215), -1)

        for obs in self.units(UnitTypeId.OBSERVER).ready:
            pos = obs.position
            cv2.circle(game_data, (int(pos[0]), int(pos[1])), 1, (255, 255, 255), -1)


        # 追蹤資源、人口和軍隊人口比
        line_max = 50
        mineral_ratio = self.minerals / 1500
        if mineral_ratio > 1.0:
            mineral_ratio = 1.0

        vespene_ratio = self.vespene / 1500
        if vespene_ratio > 1.0:
            vespene_ratio = 1.0

        population_ratio = self.supply_left / self.supply_cap
        if population_ratio > 1.0:
            population_ratio = 1.0

        plausible_supply = self.supply_cap / 200.0

        military_weight = len(self.units(UnitTypeId.VOIDRAY)) / (self.supply_cap - self.supply_left)
        if military_weight > 1.0:
            military_weight = 1.0

        # 农民/人口      worker/supply ratio
        cv2.line(game_data, (0, 19), (int(line_max * military_weight), 19), (250, 250, 200), 3)
        # 人口/200    plausible supply (supply/200.0)
        cv2.line(game_data, (0, 15), (int(line_max * plausible_supply), 15), (220, 200, 200), 3)
        # (人口-現有人口)/人口  population ratio (supply_left/supply)
        cv2.line(game_data, (0, 11), (int(line_max * population_ratio), 11), (150, 150, 150), 3)
        # 氣體/1500   gas/1500
        cv2.line(game_data, (0, 7), (int(line_max * vespene_ratio), 7), (210, 200, 0), 3)
        # 晶體礦/1500  minerals minerals/1500
        cv2.line(game_data, (0, 3), (int(line_max * mineral_ratio), 3), (0, 255, 25), 3)


        # flip horizontally to make our final fix in visual representation:
        self.flipped = cv2.flip(game_data, 0)

        if HEADLESS:
            resized = cv2.resize(self.flipped, dsize=None, fx=2, fy=2)

            cv2.imshow('Intel', resized)
            cv2.waitKey(1)

    def random_location_variance(self, enemy_start_location):
        x = enemy_start_location[0]
        y = enemy_start_location[1]

        x += ((random.randrange(-20, 20)) / 100) * enemy_start_location[0]
        y += ((random.randrange(-20, 20)) / 100) * enemy_start_location[1]

        if x < 0:
            x = 0
        if y < 0:
            y = 0
        if x > self.game_info.map_size[0]:
            x = self.game_info.map_size[0]
        if y > self.game_info.map_size[1]:
            y = self.game_info.map_size[1]

        go_to = position.Point2(position.Pointlike((x, y)))
        return go_to

    # 建造农民
    async def build_workers(self):
        # 星靈樞鈕*16(一個基地配備16個农民)大於農民數量並且現有农民數量小於MAX_WORKERS
        if len(self.units(UnitTypeId.NEXUS)) * 16 > len(self.units(UnitTypeId.PROBE)) and len(
                self.units(UnitTypeId.PROBE)) < self.MAX_WORKERS:
            # 星靈樞紐(NEXUS)無隊列建造,可以提高晶體礦的利用率,不至於佔用資源
            for nexus in self.units(UnitTypeId.NEXUS).ready.noqueue:
                # 是否有50晶體礦建造农民
                if self.can_afford(UnitTypeId.PROBE):
                    await self.do(nexus.train(UnitTypeId.PROBE))

    ## 建造水晶
    async def build_pylons(self):
        ## 供應人口和現有人口之差小於5且建築不是正在建造
        if self.supply_left < 5 and not self.already_pending(UnitTypeId.PYLON):
            nexuses = self.units(UnitTypeId.NEXUS).ready
            if nexuses.exists:
                if self.can_afford(UnitTypeId.PYLON):
                    await self.build(UnitTypeId.PYLON, near=nexuses.first)

    ## 建造吸收廠
    async def build_assimilators(self):
        for nexus in self.units(UnitTypeId.NEXUS).ready:
            # 在瓦斯泉上建造吸收廠
            vaspenes = self.state.vespene_geyser.closer_than(15.0, nexus)
            for vaspene in vaspenes:
                if not self.can_afford(UnitTypeId.ASSIMILATOR):
                    break
                worker = self.select_build_worker(vaspene.position)
                if worker is None:
                    break
                if not self.units(UnitTypeId.ASSIMILATOR).closer_than(1.0, vaspene).exists:
                    await self.do(worker.build(UnitTypeId.ASSIMILATOR, vaspene))

    ## 開礦
    async def expand(self):
        # (self.iteration / self.ITERATIONS_PER_MINUTE)是一個緩慢遞增的值,動態開礦
        if self.units(UnitTypeId.NEXUS).amount < self.iteration / self.ITERATIONS_PER_MINUTE and self.can_afford(
                UnitTypeId.NEXUS):
            await self.expand_now()

    ## 建造進攻性建築
    async def offensive_force_buildings(self):
        # print(self.iteration / self.ITERATIONS_PER_MINUTE)
        if self.units(UnitTypeId.PYLON).ready.exists:
            pylon = self.units(UnitTypeId.PYLON).ready.random
            # 根據神族建築科技圖,折躍門建造過後才可以建造控制核心
            if self.units(UnitTypeId.GATEWAY).ready.exists and not self.units(UnitTypeId.CYBERNETICSCORE):
                if self.can_afford(UnitTypeId.CYBERNETICSCORE) and not self.already_pending(UnitTypeId.CYBERNETICSCORE):
                    await self.build(UnitTypeId.CYBERNETICSCORE, near=pylon)
            # 否則建造折躍門
            # (self.iteration / self.ITERATIONS_PER_MINUTE)/2 是一個緩慢遞增的值
            # elif len(self.units(UnitTypeId.GATEWAY)) < ((self.iteration / self.ITERATIONS_PER_MINUTE) / 2):
            elif len(self.units(UnitTypeId.GATEWAY)) < 1:
                if self.can_afford(UnitTypeId.GATEWAY) and not self.already_pending(UnitTypeId.GATEWAY):
                    await self.build(UnitTypeId.GATEWAY, near=pylon)
            # 控制核心存在的情況下建造机械台
            if self.units(UnitTypeId.CYBERNETICSCORE).ready.exists:
                if len(self.units(UnitTypeId.ROBOTICSFACILITY)) < 1:
                    if self.can_afford(UnitTypeId.ROBOTICSFACILITY) and not self.already_pending(
                            UnitTypeId.ROBOTICSFACILITY):
                        await self.build(UnitTypeId.ROBOTICSFACILITY, near=pylon)

            # 控制核心存在的情況下建造星門
            if self.units(UnitTypeId.CYBERNETICSCORE).ready.exists:
                if len(self.units(UnitTypeId.STARGATE)) < ((self.iteration / self.ITERATIONS_PER_MINUTE) / 2):
                    if self.can_afford(UnitTypeId.STARGATE) and not self.already_pending(UnitTypeId.STARGATE):
                        await self.build(UnitTypeId.STARGATE, near=pylon)

    ## 造兵
    async def build_offensive_force(self):
        # 無隊列化建造
        # for gw in self.units(UnitTypeId.GATEWAY).ready.noqueue:
        #     if not self.units(UnitTypeId.STALKER).amount > self.units(UnitTypeId.VOIDRAY).amount:
        #
        #         if self.can_afford(UnitTypeId.STALKER) and self.supply_left > 0:
        #             await self.do(gw.train(UnitTypeId.STALKER))

        for sg in self.units(UnitTypeId.STARGATE).ready.noqueue:
            if self.can_afford(UnitTypeId.VOIDRAY) and self.supply_left > 0:
                await self.do(sg.train(UnitTypeId.VOIDRAY))

    ## 尋找目標
    def find_target(self, state):
        if len(self.known_enemy_units) > 0:
            # 隨機選取敵方單位
            return random.choice(self.known_enemy_units)
        elif len(self.known_enemy_units) > 0:
            # 隨機選取敵方建築
            return random.choice(self.known_enemy_structures)
        else:
            # 返回敵方出生點位
            return self.enemy_start_locations[0]

    ## 進攻
    async def attack(self):
        if len(self.units(UnitTypeId.VOIDRAY).idle) > 0:
            choice = random.randrange(0, 4)
            target = False
            if self.iteration > self.do_something_after:
                if choice == 0:
                    # 什麼都不做
                    wait = random.randrange(20, 165)
                    self.do_something_after = self.iteration + wait

                elif choice == 1:
                    # 攻擊離星靈樞紐最近的單位
                    if len(self.known_enemy_units) > 0:
                        target = self.known_enemy_units.closest_to(random.choice(self.units(UnitTypeId.NEXUS)))

                elif choice == 2:
                    # 攻擊敵方建築
                    if len(self.known_enemy_structures) > 0:
                        target = random.choice(self.known_enemy_structures)

                elif choice == 3:
                    # 攻擊敵方出生位置
                    target = self.enemy_start_locations[0]

                if target:
                    for vr in self.units(UnitTypeId.VOIDRAY).idle:
                        await self.do(vr.attack(target))
                y = np.zeros(4)
                y[choice] = 1
                print(y)
                self.train_data.append([y, self.flipped])


## 啟動遊戲
run_game(maps.get("AcidPlantLE"), [
    Bot(Race.Protoss, SentdeBot()), Computer(Race.Terran, Difficulty.Medium)
], realtime=False)

可以看到train_data文件夾下存儲了勝利數據

本站聲明:網站內容來源於博客園,如有侵權,請聯繫我們,我們將及時處理【其他文章推薦】

台北網頁設計公司這麼多,該如何挑選?? 網頁設計報價省錢懶人包"嚨底家"

網頁設計公司推薦更多不同的設計風格,搶佔消費者視覺第一線

※想知道購買電動車哪裡補助最多?台中電動車補助資訊懶人包彙整

分類
發燒車訊

linux與Windows進程控制

進程管理控制

這裏實現的是一個自定義timer用於統計子進程運行的時間。使用方式主要是

timer [-t seconds] command arguments

例如要統計ls的運行時間可以直接輸入timer ls,其後的arguments是指所要運行的程序的參數。如:timer ls -al。如果要指定程序運行多少時間,如5秒鐘,可以輸入timer -t 5 ls -al。需要注意的是,該程序對輸入沒有做異常檢測,所以要確保程序輸入正確。

Linux

程序思路

  1. 獲取時間

    時間獲取函數使用gettimeofday,精度可以達到微秒

    struct timeval{
         long tv_sec;*//秒*
         long tv_usec;*//微秒*
    }
  2. 子進程創建

    1. fork()函數

      #include <sys/types.h>
      #include <unistd.h>
      pid_t fork(void);

      fork調用失敗則返回-1,調用成功則:

      fork函數會有兩種返回值,一是為0,一是為正整數。若為0,則說明當前進程為子進程;若為正整數,則該進程為父進程且該值為子進程pid。關於進程控制的詳細說明請參考:

    2. exec函數

      用fork創建子進程后執行的是和父進程相同的程序(但有可能執行不同的代碼分支),子進程往往要調用一種exec函數以執行另一個程序。當進程調用一種exec函數時,該進程的用戶空間代碼和數據完全被新程序替換,從新程序的啟動例程開始執行。調用exec並不創建新進程,所以調用exec前後該進程的id並未改變。
      其實有六種以exec開頭的函數,統稱exec函數:

      #include <unistd.h>
      int execl(const char *path, const char *arg, ...);
      int execlp(const char *file, const char *arg, ...);
      int execle(const char *path, const char *arg, ..., char *const envp[]);
      int execv(const char *path, char *const argv[]);
      int execvp(const char *file, char *const argv[]);
      int execve(const char *path, char *const argv[], char *const envp[]);

      這些函數如果調用成功則加載新的程序從啟動代碼開始執行,不再返回,如果調用出錯則返回-1,所以exec函數只有出錯的返回值而沒有成功的返回值。

    3. waitwaitpid

      一個進程在終止時會關閉所有文件描述符,釋放在用戶空間分配的內存,但它的PCB還保留着,內核在其中保存了一些信息:如果是正常終止則保存着退出狀態,如果是異常終止則保存着導致該進程終止的信號是哪個。這個進程的父進程可以調用wait或waitpid獲取這些信息,然後徹底清除掉這個進程。我們知道一個進程的退出狀態可以在Shell中用特殊變量$?查看,因為Shell是它的父進程,當它終止時Shell調用wait或waitpid得到它的退出狀態同時徹底清除掉這個進程。
      如果一個進程已經終止,但是它的父進程尚未調用wait或waitpid對它進行清理,這時的進程狀態稱為殭屍(Zombie)進程。任何進程在剛終止時都是殭屍進程,正常情況下,殭屍進程都立刻被父進程清理了。
      殭屍進程是不能用kill命令清除掉的,因為kill命令只是用來終止進程的,而殭屍進程已經終止了。

    #include <sys/types.h>
    #include <sys/wait.h>
    pid_t wait(int *status);
    pid_t waitpid(pid_t pid, int *status, int options);

    若調用成功則返回清理掉的子進程id,若調用出錯則返回-1。父進程調用wait或waitpid時可能會:

    • 阻塞(如果它的所有子進程都還在運行

    • 帶子進程的終止信息立即返回(如果一個子進程已終止,正等待父進程讀取其終止信息)
    • 出錯立即返回(如果它沒有任何子進程)

    這兩個函數的區別是:

    • 如果父進程的所有子進程都還在運行,調用wait將使父進程阻塞,而調用waitpid時如果在options參數中指定WNOHANG可以使父進程不阻塞而立即返回0
    • wait等待第一個終止的子進程,而waitpid可以通過pid參數指定等待哪一個子進程

源代碼

timer源代碼

#include <math.h>
#include <stdio.h>
#include <stdlib.h>
#include <sys/time.h>
#include <unistd.h>
#include <wait.h>
#include <ctime>
#include <iostream>
#include <cstring>
//程序假定輸入完全正確,沒有做異常處理
//mytime [-t number] 程序
using namespace std;
//調用系統時間
struct timeval time_start;
struct timeval time_end;

void printTime();

void newProcess(const char *child_process, char *argv[], double duration);

int main(int argc, char const *argv[])
{
    double duration = 0;
    char **arg;
    int step = 2;
    if (argc > 3 && (strcmp((char *)"-t", argv[1]) == 0)) //如果指定了運行時間
    {
        step = 4;
        duration = atof(argv[2]); //沒有做異常處理
    }

    arg = new char *[argc - step + 1];
    for (int i = 0; i < argc - step; i++)
    {
        arg[i] = new char[100];
        strcpy(arg[i], argv[i + step]);
    }
    arg[argc - step] = NULL;

    newProcess(argv[step - 1], arg, duration);
    return 0;
}

void printTime()
{
    //用以記錄進程運行的時間
    int time_use = 0;  // us
    int time_left = 0; // us
    int time_hour = 0, time_min = 0, time_sec = 0, time_ms = 0, time_us = 0;
    gettimeofday(&time_end, NULL);

    time_use = (time_end.tv_sec - time_start.tv_sec) * 1000000 + (time_end.tv_usec - time_start.tv_usec);
    time_hour = time_use / (60 * 60 * (int)pow(10, 6));
    time_left = time_use % (60 * 60 * (int)pow(10, 6));
    time_min = time_left / (60 * (int)pow(10, 6));
    time_left %= (60 * (int)pow(10, 6));
    time_sec = time_left / ((int)pow(10, 6));
    time_left %= ((int)pow(10, 6));
    time_ms = time_left / 1000;
    time_left %= 1000;
    time_us = time_left;
    printf("此程序運行的時間為:%d 小時, %d 分鐘, %d 秒, %d 毫秒, %d 微秒\n", time_hour, time_min, time_sec, time_ms, time_us);
}

void newProcess(const char* child_process, char **argv, double duration)
{
    pid_t pid = fork();
    if (pid < 0) //出錯
    {
        printf("創建子進程失敗!");
        exit(1);
    }
    if (pid == 0) //子進程
    {
        execvp(child_process, argv);
    }
    else
    {
        if (abs(duration - 0) < 1e-6)
        {
            gettimeofday(&time_start, NULL);
            wait(NULL); //等待子進程結束
            printTime();
        }
        else
        {
            gettimeofday(&time_start, NULL);
            // printf("sleep: %lf\n", duration);
            waitpid(pid, NULL, WNOHANG);
            usleep(duration * 1000000); // sec to usec
            int kill_ret_val = kill(pid, SIGKILL);
            if (kill_ret_val == -1) // return -1, fail
            {
                printf("kill failed.\n");
                perror("kill");
            }
            else if (kill_ret_val == 0) // return 0, success
            {
                printf("process %d has been killed\n", pid);
            }
            printTime();
        }
    }
}

測試源代碼

#include <iostream>
#include <ctime>
#include <unistd.h>
using namespace std;
int main(int argc, char const *argv[])
{
    for(int n = 0; n < argc; n++)
    {
        printf("arg[%d]:%s\n",n, argv[n]);
    }
    sleep(5);
    return 0;
}

測試

  1. 自行編寫程序測試

  2. 系統程序測試

  3. 將timer加入環境變量

    這裏僅進行了臨時變量修改。

Windows

在Windows下進行父子進程的創建和管理在api調用上相較Linux有一定難度,但實際上在使用管理上比Linux容易的多。

CreateProcess

#include <Windows.h>
BOOL CreateProcessA(
  LPCSTR                lpApplicationName,
  LPSTR                 lpCommandLine,
  LPSECURITY_ATTRIBUTES lpProcessAttributes,
  LPSECURITY_ATTRIBUTES lpThreadAttributes,
  BOOL                  bInheritHandles,
  DWORD                 dwCreationFlags,
  LPVOID                lpEnvironment,
  LPCSTR                lpCurrentDirectory,
  LPSTARTUPINFOA        lpStartupInfo,
  LPPROCESS_INFORMATION lpProcessInformation
);

源代碼實現

timer程序

// 進程管理.cpp : 此文件包含 "main" 函數。程序執行將在此處開始並結束。
//

#include <iostream>
#include <wchar.h>
#include <Windows.h>
#include <tchar.h>
using namespace std;


void printTime(SYSTEMTIME* start, SYSTEMTIME* end);
void newProcess(TCHAR* cWinDir, double duration);

int _tmain(int argc, TCHAR *argv[])
{
    TCHAR* cWinDir = new TCHAR[MAX_PATH];
    memset(cWinDir, sizeof(TCHAR) * MAX_PATH, 0);

    printf("argc:   %d\n", argc);

    int step = 1;
    double duration = 0;
    if (argc > 1)
    {
        if (argv[1][0] == TCHAR('-') && argv[1][1] == TCHAR('t') && argv[1][2] == TCHAR('\0'))
        {
            step = 3;
            duration = atof((char*)argv[2]);
        }
    }
    //printf("printf content start: %ls\n", argv[1]);
    int j = 0;
    for (int i = 0, h = 0; i < argc - step; i++)
    {
        wcscpy_s(cWinDir + j, MAX_PATH - j, argv[i + step]);
        for (h = 0; argv[i + step][h] != TCHAR('\0'); h++);
        j += h;
        cWinDir[j++] = ' ';
        //printf("%d : %d\n", i, j);
        //printf("printf content start: %ls\n", cWinDir);
    }
    cWinDir[j - 2] = TCHAR('\0');
    //printf("printf content start: %ls\n", cWinDir);

    newProcess(cWinDir,duration);

    return 0;
}


void printTime(SYSTEMTIME* start, SYSTEMTIME* end)
{
    int hours = end->wHour - start->wHour;
    int minutes = end->wMinute - start->wMinute;
    int seconds = end->wSecond - start->wSecond;
    int ms = end->wMilliseconds - start->wMilliseconds;
    if (ms < 0)
    {
        ms += 1000;
        seconds -= 1;
    }
    if (seconds < 0)
    {
        seconds += 60;
        minutes -= 1;
    }
    if (minutes < 0)
    {
        minutes += 60;
        hours -= 1;
    }
    //由於僅考慮在一天之內,不考慮小時會變成負數的情況
    printf("runtime: %02dhours %02dminutes %02dseconds %02dmilliseconds\n", hours, minutes, seconds, ms);
}

void newProcess(TCHAR* cWinDir, double duration)
{
    PROCESS_INFORMATION pi;
    STARTUPINFO si;
    ZeroMemory(&si, sizeof(si));
    si.cb = sizeof(si);
    ZeroMemory(&pi, sizeof(pi));
    

    SYSTEMTIME start_time, end_time;
    memset(&start_time, sizeof(SYSTEMTIME), 0);
    memset(&end_time, sizeof(SYSTEMTIME), 0);
    GetSystemTime(&start_time);

        //建議大家不要單獨傳入lpApplicationName,而是將程序名放入cWinDir中
        //這樣會自動搜索PATH
    if (CreateProcess(
        NULL,       //lpApplicationName.若為空,則lpCommandLine必須指定可執行程序
                    //若路徑中存在空格,必須使用引號框定
        cWinDir,    //lpCommandLine
                    //若lpApplicationName為空,lpCommandLine長度不超過MAX_PATH
        NULL,       //指向一個SECURITY_ATTRIBUTES結構體,這個結構體決定是否返回的句柄可以被子進程繼承,進程安全性
        NULL,       //  如果lpProcessAttributes參數為空(NULL),那麼句柄不能被繼承。<同上>,線程安全性
        false,      //  指示新進程是否從調用進程處繼承了句柄。句柄可繼承性
        0,          //  指定附加的、用來控制優先類和進程的創建的標識符(優先級)
                    //  CREATE_NEW_CONSOLE  新控制台打開子進程
                    //  CREATE_SUSPENDED    子進程創建后掛起,直到調用ResumeThread函數
        NULL,       //  指向一個新進程的環境塊。如果此參數為空,新進程使用調用進程的環境。指向環境字符串
        NULL,       //  指定子進程的工作路徑
        &si,        //  決定新進程的主窗體如何显示的STARTUPINFO結構體
        &pi         //  接收新進程的識別信息的PROCESS_INFORMATION結構體。進程線程以及句柄
    ))
    {
    }
    else
    {
        printf("CreateProcess failed (%d).\n", GetLastError());
        return;
    }


    //wait untill the child process exits
    if (abs(duration - 0) < 1e-6)
        WaitForSingleObject(pi.hProcess, INFINITE);//這裏指定運行時間,單位毫秒
    else
        WaitForSingleObject(pi.hProcess, duration * 1000);

    GetSystemTime(&end_time);

    printTime(&start_time, &end_time);

    CloseHandle(pi.hProcess);
    CloseHandle(pi.hThread);
}

測試程序

#include <iostream>
#include <Windows.h>
using namespace std;
int main(int argc, char* argv[])
{
    for (int n = 0; n < argc; n++)
    {
        printf("arg[%d]:%s\n", n, argv[n]);
    }
    Sleep(5*1000);
    return 0;
}

測試

  1. 自行編寫程序測試

  2. 系統程序測試

  3. 添加至環境變量

參考資料

Windows

Linux

本站聲明:網站內容來源於博客園,如有侵權,請聯繫我們,我們將及時處理【其他文章推薦】

網頁設計公司推薦更多不同的設計風格,搶佔消費者視覺第一線

※廣告預算用在刀口上,網站設計公司幫您達到更多曝光效益

※自行創業 缺乏曝光? 下一步"網站設計"幫您第一時間規劃公司的門面形象

分類
發燒車訊

【python測試開發棧】帶你徹底搞明白python3編碼原理

在之前的文章中,我們介紹過編碼格式的發展史:[文章傳送門-todo]。今天我們通過幾個例子,來徹底搞清楚python3中的編碼格式原理,這樣你之後寫python腳本時碰到編碼問題,才能有章可循。

我們先搞清楚幾個概念:

  • 系統默認編碼:指python解釋器默認的編碼格式,在python文件頭部沒有聲明其他編碼格式時,python3默認的編碼格式是utf-8。
  • 本地默認編碼:操作系統默認的編碼,常見的Windows的默認編碼是gbk,Linux的默認編碼是UTF-8。
  • python文件頭部聲明編碼格式:修改的是文件的默認編碼格式,只是會影響python解釋器讀取python文件時的編碼格式,並不會改變系統默認編碼和本地默認編碼。

通過python自帶的庫,可以查看系統默認編碼和本地默認編碼

Python 3.7.4 (tags/v3.7.4:e09359112e, Jul  8 2019, 20:34:20) [MSC v.1916 64 bit (AMD64)] on win32
Type "help", "copyright", "credits" or "license" for more information.
>>> import sys
>>> sys.getdefaultencoding()
'utf-8'
>>> import locale
>>> locale.getdefaultlocale()
('zh_CN', 'cp936')
>>>

注意,因為我在windows系統的電腦上 進行測試,所以系統默認編碼返回“cp936”, 這是代碼頁(是字符編碼集的別名),而936對應的就是gbk。如果你在linux或者mac上執行上面的代碼,應該會返回utf-8編碼。

其實總結來看,容易出現亂碼的場景,基本都與讀寫程序有關,比如:讀取/寫入某個文件,或者從網絡流中讀取數據等,因為這個過程中涉及到了編碼解碼的過程,只要編碼和解碼的編碼格式對應不上,就容易出現亂碼。下面我們舉兩個具體的例子,來驗證下python的編碼原理,幫助你理解這個過程。注意:下面的例子都是在pycharm中寫的。

01默認的編碼格式

我們新建一個encode_demo.py的文件,其文件默認的編碼格式是UTF-8(可以從pycharm右下角看到編碼格式),代碼如下:

"""
    @author: asus
    @time: 2019/11/21
    @function: 驗證編碼格式
"""
import sys, locale


def write_str_default_encode():
    s = "我是一個str"
    print(s)
    print(type(s))
    print(sys.getdefaultencoding())
    print(locale.getdefaultlocale())

    with open("utf_file", "w", encoding="utf-8") as f:
        f.write(s)
    with open("gbk_file", "w", encoding="gbk") as f:
        f.write(s)
    with open("jis_file", "w", encoding="shift-jis") as f:
        f.write(s)


if __name__ == '__main__':
    write_str_default_encode()

我們先來猜測下結果,因為我們沒有聲明編碼格式,所以python解釋器默認用UTF-8去解碼文件,因為文件默認編碼格式就是UTF-8,所以字符串s可以正常打印。同時以UTF-8編碼格式寫文件不會出現亂碼,而以gbk和shift-jis(日文編碼)寫文件會出現亂碼(這裏說明一點,我是用pycharm直接打開生成的文件查看的,編輯器默認編碼是UTF-8,如果在windows上用記事本打開則其默認編碼跟隨系統是GBK,gbk_file和utf_file均不會出現亂碼,只有jis_file是亂碼),我們運行看下結果:

# 運行結果
我是一個str
<class 'str'>
utf-8
('zh_CN', 'cp936')

# 寫文件utf_file、gbk_file、jis_file文件內容分別是:
我是一個str
����һ��str
�䐥�꘢str

和我們猜測的結果一致,下面我們做個改變,在文件頭部聲明個編碼格式,再來看看效果。

02 python頭文件聲明編碼格式

因為上面文件encode_demo.py的格式是UTF-8,那麼我們就將其變為gbk編碼。同樣的我們先來推測下結果,在pycharm中,在python文件頭部聲明編碼為gbk后(頭部加上 # coding=gbk ),文件的編碼格式變成gbk,同時python解釋器會用gbk去解碼encode_demo.py文件,所以運行結果應該和用UTF-8編碼時一樣。運行結果如下:

# 運行結果
我是一個str
<class 'str'>
utf-8
('zh_CN', 'cp936')

# 寫文件utf_file、gbk_file、jis_file文件內容分別是:
我是一個str
����һ��str
�䐥�꘢str

結果確實是一樣的,證明我們推論是正確的。接下來我們再做個嘗試,假如我們將(# coding=gbk)去掉(需要注意,在pycharm中將 # coding=gbk去掉,並不會改變文件的編碼格式,也就是說encode_demo.py還是gbk編碼),我們再運行一次看結果:

  File "D:/codespace/python/pythonObject/pythonSample/basic/encodeDemo/encode_demo.py", line 4
SyntaxError: Non-UTF-8 code starting with '\xd1' in file D:/codespace/python/pythonObject/pythonSample/basic/encodeDemo/encode_demo.py on line 5, but no encoding declared; see http://python.org/dev/peps/pep-0263/ for details

運行直接報錯了,我們加個斷點,看看具體的異常信息:

看錯誤提示是UnicodeDecodeError,python解釋器在對encode_demo.py文件解碼時,使用默認的UTF-8編碼,但是文件本身是gbk編碼,所以當碰到有中文沒辦法識別時,就拋出DecodeError。

03 敲黑板,划重點

python3中的str和bytes

python3的重要特性之一就是對字符串和二進制流做了嚴格的區分,我們聲明的字符串都是str類型,不過Str和bytes是可以相互轉換的:

def str_transfor_bytes():
    s = '我是一個測試Str'
    print(type(s))
    # str 轉bytes
    b = s.encode()
    print(b)
    print(type(b))
    # bytes轉str
    c = b.decode('utf-8')
    print(c)
    print(type(c))


if __name__ == '__main__':
    str_transfor_bytes()

需要注意一點:在調用encode()和decode()方法時,如果不傳參數,則會使用python解釋器默認的編碼格式UTF-8(如果不在python頭文件聲明編碼格式)。但是如果傳參的話,encode和decode使用的編碼格式要能對應上。

python3默認編碼是UTF-8?還是Unicode?

經常在很多文章里看到,python3的默認編碼格式是Unicode,但是我在本文中卻一直在說python3的默認編碼格式是UTF-8,那麼哪種說法是正確的呢?其實兩種說法都對,主要得搞清楚Unicode和UTF-8的區別(之前文章有提到):

  • Unicode是一個字符集,說白了就是把各種編碼的映射關係全都整合起來,不過它是不可變長的,全部都以兩個字節或四個字節來表示,佔用的內存空間比較大。
  • UTF-8是Unicode的一種實現方式,主要對 Unicode 碼的數據進行轉換,方便存儲和網絡傳輸 。它是可變長編碼,比如對於英文字母,它使用一個字節就可以表示。

在python3內存中使用的字符串全都是Unicode碼,當python解釋器解析python文件時,默認使用UTF-8編碼。

open()方法默認使用本地編碼

在上面的例子中,我們往磁盤寫入文件時,都指定了編碼格式。如果不指定編碼格式,那麼默認將使用操作系統本地默認的編碼格式,比如:Linux默認是UTF-8,windows默認是GBK。其實這也好理解,因為和磁盤交互,肯定要考慮操作系統的編碼格式。這有區別於encode()和decode()使用的是python解釋器的默認編碼格式,千萬別搞混淆了。

總結

不知道你看完上面的例子后,是否已經徹底理解了python3的編碼原理。不過所有的編碼問題,都逃不過“編碼”和“解碼”兩個過程,當你碰到編碼問題時,先確定源文件使用的編碼,再確定目標文件需要的編碼格式,只要能匹配,一般就可以解決編碼的問題。

本站聲明:網站內容來源於博客園,如有侵權,請聯繫我們,我們將及時處理【其他文章推薦】

台北網頁設計公司這麼多,該如何挑選?? 網頁設計報價省錢懶人包"嚨底家"

網頁設計公司推薦更多不同的設計風格,搶佔消費者視覺第一線

※想知道購買電動車哪裡補助最多?台中電動車補助資訊懶人包彙整

分類
發燒車訊

[ASP.NET Core 3框架揭秘] 文件系統[3]:物理文件系統

ASP.NET Core應用中使用得最多的還是具體的物理文件,比如配置文件、View文件以及作為Web資源的靜態文件。物理文件系統由定義在NuGet包“Microsoft.Extensions.FileProviders.Physical”中的PhysicalFileProvider來構建。我們知道System.IO命名空間下定義了一整套針操作物理目錄和文件的API,實際上PhysicalFileProvider最終也是通過調用這些API來完成相關的IO操作。

public class PhysicalFileProvider : IFileProvider, IDisposable
{   
    public PhysicalFileProvider(string root);   
     
    public IFileInfo GetFileInfo(string subpath);  
    public IDirectoryContents GetDirectoryContents(string subpath); 
    public IChangeToken Watch(string filter);

    public void Dispose();   
}

一、PhysicalFileInfo

一個PhysicalFileProvider對象總是映射到某個具體的物理目錄上,被映射的目錄所在的路徑通過構造函數的參數root來提供,該目錄將作為PhysicalFileProvider的根目錄。GetFileInfo方法返回的IFileInfo對象代表指定路徑對應的文件,這是一個類型為PhysicalFileInfo的對象。一個物理文件可以通過一個System.IO.FileInfo對象來表示,一個PhysicalFileInfo對象實際上就是對該對象的封裝,定義在PhysicalFileInfo的所有屬性都來源於這個FileInfo對象。對於創建讀取文件輸出流的CreateReadStream方法來說,它返回的是一個根據物理文件絕對路徑創建的FileStream對象。

public class PhysicalFileInfo : IFileInfo
{
    ...
    public PhysicalFileInfo(FileInfo info);    
}

對於PhysicalFileProvider的GetFileInfo方法來說,即使我們指定的路徑指向一個具體的物理文件,它並不總是會返回一個PhysicalFileInfo對象。PhysicalFileProvider會將一些場景視為“目標文件不存在”,並讓GetFileInfo方法返回一個NotFoundFileInfo對象。具體來說,PhysicalFileProvider的GetFileInfo方法在如下的場景中會返回一個NotFoundFileInfo對象:

  • 確實沒有一個物理文件與指定的路徑相匹配。
  • 如果指定的是一個絕對路徑(比如“c:\foobar”),即Path.IsPathRooted方法返回True。
  • 如果指定的路徑指向一個隱藏文件。

顧名思義,具有如下定義的NotFoundFileInfo類型表示一個“不存在”的文件。NotFoundFileInfo對象的Exists屬性總是返回False,而其他的屬性則變得沒有任何意義。當我們調用它的CreateReadStream試圖讀取一個根本不存在的文件內容時,會拋出一個FileNotFoundException類型的異常。

public class NotFoundFileInfo : IFileInfo
{
    public bool Exists => false;   
    public long Length => throw new NotImplementedException();   
    public string PhysicalPath => null;  
    public string Name { get; }   
    public DateTimeOffset LastModified => DateTimeOffset.MinValue;
    public bool IsDirectory => false; 

    public NotFoundFileInfo(string name) => this.Name = name;
    public Stream CreateReadStream() => throw new FileNotFoundException($"The file {Name} does not exist.");
}

二、PhysicalDirectoryInfo

PhysicalFileProvider利用一個PhysicalFileInfo對象來描述某個具體的物理文件,而一個物理目錄則通過一個PhysicalDirectoryInfo的對象來描述。既然PhysicalFileInfo是對一個FileInfo對象的封裝,那麼我們應該想得到PhysicalDirectoryInfo對象封裝的就是表示目錄的DirectoryInfo對象。如下面的代碼片段所示,我們需要在創建一個PhysicalDirectoryInfo對象時提供這個DirectoryInfo對象,PhysicalDirectoryInfo實現的所有屬性的返回值都來源於這個DirectoryInfo對象。由於CreateReadStream方法的目的總是讀取文件的內容,所以PhysicalDirectoryInfo類型的這個方法會拋出一個InvalidOperationException類型的異常。

public class PhysicalDirectoryInfo : IFileInfo
{   
    ...
    public PhysicalDirectoryInfo(DirectoryInfo info);
}

三、PhysicalDirectoryContents

當我們調用PhysicalFileProvider的GetDirectoryContents方法時,如果指定的路徑指向一個具體的目錄,那麼該方法會返回一個類型為PhysicalDirectoryContents的對象。PhysicalDirectoryContents是一個IFileInfo對象的集合,該集合中包括所有描述子目錄的PhysicalDirectoryInfo對象和描述文件的PhysicalFileInfo對象。PhysicalDirectoryContents的Exists屬性取決於指定的目錄是否存在。

public class PhysicalDirectoryContents : IDirectoryContents
{
    public bool Exists { get; }
    public PhysicalDirectoryContents(string directory);
    public IEnumerator<IFileInfo> GetEnumerator();
    IEnumerator IEnumerable.GetEnumerator();
}

四、NotFoundDirectoryContents

如果指定的路徑並不指向一個存在的目錄,或者指定的是一個絕對路徑,GetDirectoryContents方法都會返回一個Exsits為False的NotFoundDirectoryContents對象。如下所示的代碼片段展示了NotFoundDirectoryContents類型的定義,如果我們需要使用到這麼一個類型,可以直接利用靜態屬性Singleton得到對應的單例對象。

public class NotFoundDirectoryContents : IDirectoryContents
{    
    public static NotFoundDirectoryContents Singleton { get; }  = new NotFoundDirectoryContents();
    public bool Exists => false;
    public IEnumerator<IFileInfo> GetEnumerator()  => Enumerable.Empty<IFileInfo>().GetEnumerator();
    IEnumerator IEnumerable.GetEnumerator() => GetEnumerator();
}

五、PhysicalFilesWatcher

我們接着來談談PhysicalFileProvider的Watch方法。當我們調用該方法的時候,PhysicalFileProvider會通過解析我們提供的Globbing Pattern表達式來確定我們期望監控的文件或者目錄,並最終利用FileSystemWatcher對象來對這些文件實施監控。這些文件或者目錄的變化(創建、修改、重命名和刪除等)都會實時地反映到Watch方法返回的IChangeToken上。

PhysicalFileProvider的Watch方法中指定的Globbing Pattern表達式必須是針對當前根目錄的相對路徑,我們可以使用“/”或者“./”前綴,也可以不採用任何前綴。一旦我們使用了絕對路徑(比如“c:\test\*.txt”)或者“../”前綴(比如“../test/*.txt”),不論解析出來的文件是否存在於PhysicalFileProvider的根目錄下,這些文件都不會被監控。除此之外,如果我們沒有指定Globbing Pattern表達式,PhysicalFileProvider也不會有任何的文件會被監控。

PhysicalFileProvider針對物理文件系統變化的監控是通過如下這個PhysicalFilesWatcher對象實現的,其Watch方法內部會直接調用PhysicalFileProvider的CreateFileChangeToken方法,並返回得到的IChangeToken對象。這是一個公共類型,如果我們具有監控物理文件系統變化的需要,可以直接使用這個類型。

public class PhysicalFilesWatcher: IDisposable
{
    public PhysicalFilesWatcher(string root, FileSystemWatcher fileSystemWatcher, bool pollForChanges);
    public IChangeToken CreateFileChangeToken(string filter);
    public void Dispose();
}

從PhysicalFilesWatcher構造函數的定義我們不難看出,它最終是利用一個FileSystemWatcher對象(對應於fileSystemWatcher參數)來完成針對指定根目錄下(對應於root參數)所有子目錄和文件的監控。FileSystemWatcher的CreateFileChangeToken方法返回的IChangeToken對象會幫助我們感知到子目錄或者文件的添加、刪除、修改和重命名,但是它會忽略隱藏的目錄和文件。最後需要提醒的是,當我們不再需要對指定目錄實施監控的時候,記得調用PhysicalFileProvider的Dispose方法,該方法會負責將FileSystemWatcher對象關閉。

六、小結

我們藉助下圖所示的UML來對由PhysicalFileProvider構建物理文件系統的整體設計做一個簡單的總結。首先,該文件系統使用PhysicalDirectoryInfo和PhysicalFileInfo對類型來描述目錄和文件,它們分別是對DirectoryInfo和FileInfo(System.IO.FileInfo)對象的封裝。

PhysicalFileProvider的GetDirectoryContents方法返回一個PhysicalDirectoryContents 對象(如果指定的目錄存在),組成該對象的分別是根據其所有子目錄和文件創建的PhysicalDirectoryInfo和PhysicalFileInfo對象。當我們調用PhysicalFileProvider的GetFileInfo方法時,如果指定的文件存在,返回的是描述該文件的PhysicalFileInfo對象。至於PhysicalFileProvider的Watch方法,它最終利用了FileSystemWatcher來監控指定文件或者目錄的變化。

本站聲明:網站內容來源於博客園,如有侵權,請聯繫我們,我們將及時處理【其他文章推薦】

網頁設計公司推薦更多不同的設計風格,搶佔消費者視覺第一線

※廣告預算用在刀口上,網站設計公司幫您達到更多曝光效益

※自行創業 缺乏曝光? 下一步"網站設計"幫您第一時間規劃公司的門面形象

分類
發燒車訊

fastjason常用方法

什麼是fastjson?

Fastjson是一個Java語言編寫的高性能功能完善的JSON庫。它採用一種“假定有序快速匹配”的算法,把JSON Parse的性能提升到極致,是目前Java語言中最快的JSON庫。Fastjson接口簡單易用,已經被廣泛使用在緩存序列化、協議交互、Web輸出、Android客戶端等多種應用場景。

主要特點:

  • 快速FAST (比其它任何基於Java的解析器和生成器更快,包括jackson)
  • 強大(支持普通JDK類包括任意Java Bean Class、Collection、Map、Date或enum)
  • 零依賴(沒有依賴其它任何類庫除了JDK)

背景

最近關於fastjson的消息,引起了很多人的關注!

fastjson爆出重大漏洞,攻擊者可使整個業務癱瘓

漏洞描述

常用JSON組件FastJson存在遠程代碼執行漏洞,攻擊者可通過精心構建的json報文對目標服務器執行任意命令,從而獲得服務器權限。此次爆發的漏洞為以往漏洞中autoType的繞過。

影響範圍

FastJson < 1.2.48

很多開發者才猛然發現,fastjson已經深入到我們開發工作的方方面面。那麼除了趕快升級你的json外,我們來挖挖fastjson最常用的用法。

fastjson常用方式

1.maven依賴(記得升級到1.2.48以上版本哦)

        <!-- https://mvnrepository.com/artifact/com.alibaba/fastjson -->
        <dependency>
         <groupId>com.alibaba</groupId>
         <artifactId>fastjson</artifactId>
         <version>1.2.62</version>
        </dependency>    

2.FastJson對於json格式字符串的解析主要用到了一下三個類:

(1)JSON:fastJson的解析器,用於JSON格式字符串與JSON對象及javaBean之間的轉換。

(2)JSONObject:fastJson提供的json對象。

(3)JSONArray:fastJson提供json數組對象。

3.常用方式

3.1 string和java對象


實例1:對象轉json字符串

        Map<String,String> map=new HashMap<String,String>();
        map.put("code","0");
        map.put("message","ok");
        String json=JSON.toJSONString(map);
        System.out.println(json);

輸出結果為:

{"code":"0","message":"ok"}

實例2:字符串轉對象

        Map<String,String> map=new HashMap<String,String>();
        map.put("code","0");
        map.put("message","ok");
        String json=JSON.toJSONString(map);
        System.out.println(json);
        
        Map obj=(Map)JSON.parse(json);
        System.out.println("code="+obj.get("code")+",message="+obj.get("message"));

輸出結果

{"code":"0","message":"ok"}
code=0,message=ok

3.2 工具類JSONObject

    public static void main(String[] args) {
        Map<String,String> map=new HashMap<String,String>();
        map.put("code","0");
        map.put("message","ok");
        String json=JSON.toJSONString(map);
        System.out.println(json);
        
        Map obj=(Map)JSON.parse(json);
        System.out.println("code="+obj.get("code")+",message="+obj.get("message"));        
        
        String code=JSON.parseObject(json).getString("code");
        String message=JSON.parseObject(json).getString("message");
        System.out.println("code="+code+",message="+message);
    }

輸出結果

{"code":"0","message":"ok"}
code=0,message=ok
code=0,message=ok

3.3 數組對象

List<user> list=new ArrayList<user>(JSONArray.parseArray(jsonString,user.class)); 

Fastjson 與各種JSON庫的性能比較:


json庫 序列化性能 反序列化性能 jar大小
fastjson 1201 1216 fastjson-1.1.26.jar(356k)
fastjson-1.1.25-android.jar(226k)
jackson 1408 1915 jackson-annotations-2.1.1.jar(34k)
jackson-core-2.1.1.jar(206k)
jackson-databind-2.1.1.jar(922k)
總共1162k
gson 7421 5065 gson-2.2.2.jar(189k)
json-lib 27555 87292 json-lib-2.4-jdk15.jar(159k)


本站聲明:網站內容來源於博客園,如有侵權,請聯繫我們,我們將及時處理【其他文章推薦】

台北網頁設計公司這麼多,該如何挑選?? 網頁設計報價省錢懶人包"嚨底家"

網頁設計公司推薦更多不同的設計風格,搶佔消費者視覺第一線

※想知道購買電動車哪裡補助最多?台中電動車補助資訊懶人包彙整

分類
發燒車訊

CSS:CSS彈性盒子布局 Flexible Box

一、簡介

flexbox:全稱Flexible Box, 彈性盒子布局。可以簡單實現各種伸縮性的設計,它是由伸縮容器和伸縮項目組成。任何一個元素都可以指定為flexbox布局。這種新的布局方案在2009年是由W3C組織提出來的,在此之前,Web開發一般使用基於盒子模型的傳統頁面布局,依賴定位屬性、流動屬性和显示屬性來解決,參看鏈接:。彈性盒子布局的出現,極大的方便了開發者,在如今的ReactNative開發中,也已經被引入使用。

伸縮流布局結構圖如下:

彈性盒子布局具備的特徵:

1、伸縮容器的子元素稱為伸縮項目,伸縮項目使用伸縮布局來排版。伸縮布局和傳統布局不一樣,它按照伸縮流方向布局。

2、伸縮容器由兩條軸構成,分別為主軸(main axis)和交叉軸(cross axis)。主軸既可以用水平軸,也可以是豎直軸,根據開發者需要來決定。

3、主軸的起點叫main start,終點叫main end,主軸的空間用main size表示。

4、交叉軸的起點叫cross start,終點叫cross end,交叉軸的空間用cross size表示。

5、默認情況下,伸縮項目總是沿着主軸方向排版,從開始位置到終點位置。至於換行显示,則通過設置伸縮屬性來實現。

6、伸縮容器的屬性有:display、flex-direction、flex-wrap、flex-flow、justify-content、align-items、align-content

7、伸縮項目的屬性有: order、flex-grow、flex-shrink、flex-basis、flex、align-self


二、伸縮容器的屬性,全局設置排版

HTML:[注意:下面的演示截圖項目個數會根據需要選擇性註釋“flex-item”,有時用不到5個]

<!DOCTYPE html>
<html>
<head>
    <title>Flexbox</title>
    <!--  採用外聯方式導入css文件 -->
    <link rel="stylesheet" type="text/css" href="./css_test.css">
</head>
<body>
    <span class="flex-container"> 
        <span class="flex-item" id="item1" style="color:white;font-size:20px">1</span>
        <span class="flex-item" id="item2" style="color:white;font-size:20px">2</span>
        <span class="flex-item" id="item3" style="color:white;font-size:20px">3</span>
        <span class="flex-item" id="item4" style="color:white;font-size:20px">4</span>
        <span class="flex-item" id="item5" style="color:white;font-size:20px">5</span>
    </span>
</body>
</html> 

1、display:決定元素是否為伸縮容器

  • flex:產生塊級伸縮容器
    .flex-container {
         display: flex;
     }
  • inline-flex:產生行內塊級伸縮容器
  •  .flex-container {
         display: inline-flex;
     }

2、flex-direction:指定伸縮容器主軸的方向

  • row:水平方向,從左到右
     .flex-container {
         display: flex;
         flex-direction: row;
         width: 160px;
         height: 160px;
         background-color: red;
     }
    
     .flex-item {
         width: 50px; 
         height: 50px;
         background-color: green;
         margin: 1px;
     }

  • row-reverse:水平方向,從右到左
     .flex-container {
         display: flex;
         flex-direction: row-reverse;
         width: 160px;
         height: 160px;
         background-color: red;
     }
    
     .flex-item {
         width: 50px; 
         height: 50px;
         background-color: green;
         margin: 1px;
     }

  • column:豎直方向,從上到下
     .flex-container {
         display: flex;
         flex-direction: column;
         width: 160px;
         height: 160px;
         background-color: red;
     }
    
     .flex-item {
         width: 50px;
         height: 50px; 
         background-color: green;
         margin: 1px;
     }

  • column-reverse:豎直方向,從下到上
     .flex-container {
         display: flex;
         flex-direction: column-reverse;
         width: 160px;
         height: 160px;
         background-color: red;
     }
    
     .flex-item {
         width: 50px;
         height: 50px; 
         background-color: green;
         margin: 1px;
     }

3、flex-wrap:指定伸縮容器主軸方向空間不足時,決定是否換行以及換行方式

  • nowarp:不換行
    .flex-container {
         display: flex;
         flex-direction: row;
         flex-wrap: nowrap;
         width: 160px;
         height: 160px;
         background-color: red;
     }
    
     .flex-item {
         width: 50px; //下圖單行狀態寬度被重新計算
         height: 50px;
         background-color: green;
         margin: 1px;
     }

  • warp:換行,若主軸為水平方向,換行方向是從上到下
     .flex-container {
         display: flex;
         flex-direction: row;
         flex-wrap: wrap;
         width: 160px;
         height: 160px;
         background-color: red;
     }
    
     .flex-item {
         width: 50px;
         height: 50px;
         background-color: green;
         margin: 1px;
     }

  • wrap-reverse:換行,若主軸為水平方向,換行方向是從下到上
     .flex-container {
         display: flex;
         flex-direction: row;
         flex-wrap: wrap-reverse;
         width: 160px;
         height: 160px;
         background-color: red;
     }
    
     .flex-item {
         width: 50px;
         height: 50px;
         background-color: green;
         margin: 1px;
     }

4、flex-flow:flex-direction和flex-wrap的縮寫,同時指定伸縮容器主軸方向和換行設置

  • row nowrap:默認主軸是水平方向,從左到右,且不換行
     .flex-container {
         display: flex;
         flex-flow: row nowrap;
         width: 160px;
         height: 160px;
         background-color: red;
     }
    
     .flex-item {
         width: 50px; //下圖單行狀態寬度被重新計算
         height: 50px;
         background-color: green;
         margin: 1px;
     }

5、justify-content:決定伸縮項目沿着主軸線的對齊方式

  • flex-start:與主軸線起始位置靠齊
     .flex-container {
         display: flex;
         flex-flow: row wrap;
         justify-content: flex-start;
         width: 160px;
         height: 160px;
         background-color: red;
     }
    
     .flex-item {
         width: 50px;
         height: 50px;
         background-color: green;
         margin: 1px;
     }

  • flex-end:與主軸線結束位置靠齊
     .flex-container {
         display: flex;
         flex-flow: row wrap;
         justify-content: flex-end;
         width: 160px;
         height: 160px;
         background-color: red;
     }
    
     .flex-item {
         width: 50px;
         height: 50px;
         background-color: green;
         margin: 1px;
     }

  • center:與主軸線中間位置靠齊
     .flex-container {
         display: flex;
         flex-flow: row wrap;
         justify-content: center;
         width: 160px;
         height: 160px;
         background-color: red;
     }
    
     .flex-item {
         width: 50px;
         height: 50px;
         background-color: green;
         margin: 1px;
     }

  • space-between:平均分配到主軸線里,第一個項目靠齊起始位置,最後一個項目靠齊終點位置
     .flex-container {
         display: flex;
         flex-flow: row wrap;
         justify-content: space-between;
         width: 160px;
         height: 160px;
         background-color: red;
     }
    
     .flex-item {
         width: 50px;
         height: 50px;
         background-color: green;
         margin: 1px;
     }

  • sapce-around:平均分配到主軸線里,兩端保留一半的空間
    .flex-container {
         display: flex;
         flex-flow: row wrap;
         justify-content: space-around;
         width: 160px;
         height: 160px;
         background-color: red;
     }
    
     .flex-item {
         width: 50px;
         height: 50px;
         background-color: green;
         margin: 1px;
     }

6、align-items:決定伸縮項目不能換行時沿着交叉軸線的對齊方式

  • flex-start:與交叉軸線起始位置靠齊
     .flex-container {
         display: flex;
         flex-flow: row nowrap;
         align-items: flex-start;
         width: 160px;
         height: 160px;
         background-color: red;
     }
    
     .flex-item {
         width: 50px; //下圖單行狀態寬度被重新計算
         height: 50px;
         background-color: green;
         margin: 1px;
     }

  • flex-end:與交叉軸線結束位置靠齊
     .flex-container {
         display: flex;
         flex-flow: row nowrap;
         align-items: flex-end;
         width: 160px;
         height: 160px;
         background-color: red;
     }
    
     .flex-item {
         width: 50px; //下圖單行狀態寬度被重新計算
         height: 50px;
         background-color: green;
         margin: 1px;
     }

  • center:與交叉軸線中間位置靠齊
     .flex-container {
         display: flex;
         flex-flow: row nowrap;
         align-items: center;
         width: 160px;
         height: 160px;
         background-color: red;
     }
    
     .flex-item {
         width: 50px;
         height: 50px;
         background-color: green;
         margin: 1px;
     }

  • baseline:根據基線對齊
     .flex-container {
         display: flex;
         flex-flow: row nowrap;
         align-items: baseline;
         width: 160px;
         height: 160px;
         background-color: red;
     }
    
     .flex-item {
         width: 50px;
         height: 50px;
         background-color: green;
         margin: 1px;
     }
    
     #item1 {
         padding-top: 25px;
     }
    
     #item2 {
         padding-top: 20px;
     }
      
     #item3 {
         padding-top: 15px;
     }
    
     #item4 {
         padding-top: 10px;
     }
      
     #item5 {
         padding-top: 5px;
     }

  • stretch:沿着交叉軸線拉伸填充整個伸縮容器
     .flex-container {
         display: flex;
         flex-flow: row nowrap;
         align-items: stretch;
         width: 160px;
         height: 160px;
         background-color: red;
     }
    
     .flex-item {
         width: 50px;//此時可以設置寬度,但不能設置高度,否則無法拉伸
         background-color: green;
         margin: 1px;
     }

7、align-content:決定伸縮項目可以換行時沿着交叉軸線的對齊方式,flex-warp:warp一定要開啟

  • flex-start:與交叉軸線起始位置靠齊
     .flex-container {
         display: flex;
         flex-flow: row wrap;
         align-content:flex-start;
         width: 160px;
         height: 160px;
         background-color: red;
     }
    
     .flex-item {
         width: 50px;
         height: 50px;
         background-color: green;
         margin: 1px;
     }

  • flex-end:與交叉軸線結束位置靠齊
     .flex-container {
         display: flex;
         flex-flow: row wrap;
         align-content:flex-end;
         width: 160px;
         height: 160px;
         background-color: red;
     }
    
     .flex-item {
         width: 50px;
         height: 50px;
         background-color: green;
         margin: 1px;
     }

  • center:與主軸線中間位置靠齊
     .flex-container {
         display: flex;
         flex-flow: row wrap;
         align-content:center;
         width: 160px;
         height: 160px;
         background-color: red;
     }
    
     .flex-item {
         width: 50px;
         height: 50px;
         background-color: green;
         margin: 1px;
     }

  • space-between:平均分配到主軸線里,第一行項目靠齊起始位置,最後一行項目靠齊終點位置
     .flex-container {
         display: flex;
         flex-flow: row wrap;
         align-content:space-between;
         width: 160px;
         height: 160px;
         background-color: red;
     }
    
     .flex-item {
         width: 50px;
         height: 50px;
         background-color: green;
         margin: 1px;
     }

  • sapce-around:所有行平均分配到主軸線里,兩端保留一半的空間
     .flex-container {
         display: flex;
         flex-flow: row wrap;
         align-content:space-around;
         width: 160px;
         height: 160px;
         background-color: red;
     }
    
     .flex-item {
         width: 50px;
         height: 50px;
         background-color: green;
         margin: 1px;
     }

  • stretch:沿着交叉軸
     .flex-container {
         display: flex;
         flex-flow: row wrap;
         align-content:stretch;
         width: 160px;
         height: 160px;
         background-color: red;
     }
    
     .flex-item {
         width: 50px; //不要設置高度,不然無法拉伸
         background-color: green;
         margin: 1px;
     }


三、伸縮項目的屬性,單個設置排版

1、order:定義伸縮項目的排列順序。數值越小,排列越靠前,默認值為0。

  • 表達式 order: integer;
     .flex-container {
         display: flex;
         flex-flow: row wrap;
         width: 160px;
         height: 160px;
         background-color: red;
     }
    
     .flex-item {
         width: 50px;
         height: 50px;
         background-color: green;
         margin: 1px;
     }
    
     #item4 {
         order: -1;
     }
    
     #item5 {
         order: -2;
     }

2、flex-grow:定義伸縮項目的放大比例,默認值為0,表示即使存在剩餘空間,也不放大。

  • 表達式 flex-grow: number;
     .flex-container {
         display: flex;
         flex-flow: row wrap;
         width: 160px;
         height: 160px;
         background-color: red;
     }
    
     .flex-item {
         width: 50px;
         height: 50px;
         background-color: green;
         margin: 1px;
     }
    
     #item2 {
         flex-grow: 1; //空間不足,item2不會放大
     }
    
     #item4 {
         flex-grow: 1; //item4放大填滿剩餘空間
     }

3、flex-shrink:定義伸縮項目的收縮比例,默認值為1。

  • 表達式 flex-shrink: numer;
    .flex-container {
         display: flex;
         flex-flow: row nowrap;
         width: 160px;
         height: 160px;
         background-color: red;
     }
    
     .flex-item {
         width: 50px;
         height: 50px;
         background-color: green;
         margin: 1px;
     }
    
     #item4 {
         flex-shrink:3; //單行,空間有限,item4縮小為原來的1/3
     }
    
     #item5 {
         flex-shrink:4;  //單行,空間有限,item5縮小為原來的1/5
    }

4、flex-basis:定義伸縮項目的基準值,剩餘空間按照比例進行伸縮,默認auto。

  •  auto
     .flex-container {
         display: flex;
         flex-flow: row wrap;
         width: 160px;
         height: 160px;
         background-color: red;
     }
    
     .flex-item {
         width: 50px;
         height: 50px;
         background-color: green;
         margin: 1px;
     }
    
     #item5 {
         flex-basis:auto;
     }


  • flex-basis: length 
     .flex-container {
         display: flex;
         flex-flow: row wrap;
         width: 160px;
         height: 160px;
         background-color: red;
     }
    
     .flex-item {
         width: 50px;
         height: 50px;
         background-color: green;
         margin: 1px;
     }
    
     #item5 {
         flex-basis:200px;
     }

5、flex:是flex-grow、flex-shrink、flex-basis的縮寫,默認值 0 1 auto。

  • none: 不設置
     .flex-container {
         display: flex;
         flex-flow: row wrap;
         width: 160px;
         height: 160px;
         background-color: red;
     }
    
     .flex-item {
         width: 50px;
         height: 50px;
         background-color: green;
         margin: 1px;
     }
    
     #item2 {
         flex: none; /* 等同於 flex: 0 0 auto */
     }

  • flex-grow flex-shrink flex-basis: 設置放大或縮小或基準線
     .flex-container {
         display: flex;
         flex-flow: row wrap;
         width: 160px;
         height: 160px;
         background-color: red;
     }
    
     .flex-item {
         width: 50px;
         height: 50px;
         background-color: green;
         margin: 1px;
     }
    
     #item2 {
         flex: 1; /* 等同於 flex: 1 1 auto 或者 等同於 flex: auto*/
     }

6、align-self:用來設置伸縮項目在交叉軸的對齊方式。

  • auto:自動對齊
     .flex-container {
         display: flex;
         flex-flow: row wrap;
         width: 160px;
         height: 160px;
         background-color: red;
     }
    
     .flex-item {
         width: 50px;
         height: 50px;
         background-color: green;
         margin: 1px;
     }
    
     #item3 {
         align-self: auto;
     }

  • flex-start: 向交叉軸的開始位置對齊
     .flex-container {
         display: flex;
         flex-flow: row wrap;
         width: 160px;
         height: 160px;
         background-color: red;
     }
    
     .flex-item {
         width: 50px;
         height: 50px;
         background-color: green;
         margin: 1px;
     }
    
     #item3 {
         align-self: flex-start;
     }

  • flex-end: 向交叉軸的結束位置對齊
     .flex-container {
         display: flex;
         flex-flow: row wrap;
         width: 160px;
         height: 160px;
         background-color: red;
     }
    
     .flex-item {
         width: 50px;
         height: 50px;
         background-color: green;
         margin: 1px;
     }
    
     #item3 {
         align-self: flex-end;
     }

  • center: 向交叉軸的中間位置對齊
     .flex-container {
         display: flex;
         flex-flow: row wrap;
         width: 160px;
         height: 160px;
         background-color: red;
     }
    
     .flex-item {
         width: 50px;
         height: 50px;
         background-color: green;
         margin: 1px;
     }
    
     #item3 {
         align-self: center;
     }

  • baseline:向交叉軸的基準線對齊
     .flex-container {
         display: flex;
         flex-flow: row wrap;
         width: 160px;
         height: 160px;
         background-color: red;
     }
    
     .flex-item {
         width: 50px;
         height: 50px;
         background-color: green;
         margin: 1px;
     }
    
     #item1 {
         align-self: baseline;
         margin-top: 50px;
     }
    
     #item2 {
         align-self: baseline;
     }

  • stretch: 在交叉軸拉伸填滿伸縮容器
     .flex-container {
         display: flex;
         flex-flow: row wrap;
         width: 160px;
         height: 160px;
         background-color: red;
     }
    
     .flex-item {
         width: 50px;
         background-color: green;
         margin: 1px;
     }
    
     #item1 {
         align-self: stretch;
     }
    
     #item2 {
         align-self: stretch;
     }
    
     #item3 {
         align-self: stretch;
     }


本站聲明:網站內容來源於博客園,如有侵權,請聯繫我們,我們將及時處理【其他文章推薦】

網頁設計公司推薦更多不同的設計風格,搶佔消費者視覺第一線

※廣告預算用在刀口上,網站設計公司幫您達到更多曝光效益

※自行創業 缺乏曝光? 下一步"網站設計"幫您第一時間規劃公司的門面形象

分類
發燒車訊

德國頒佈最新電動汽車補貼計畫 共投入12億歐元

據報導,自7月1日起,德國頒佈最新的電動車補貼計畫,截止目前已經有近2000位申請者,其中寶馬車主占多數。  
  為了促進電動車等環保車型的普及,德國為每位購買電動車的消費者提供4000歐元的補貼,插電式混合動力車的補貼為3000歐元。在計畫實施後,有1791位插電式混合動力車的車主申請了補貼,其中有581位購買了寶馬的車型。同時還有444位申請者購買了雷諾車型,大眾汽車買主為154位。   據統計,目前德國人汽車擁有量為4500萬輛,而其中僅有5萬輛是純電動或者是混合動力車輛。為改善這一情況,德國此次計畫共投入12億歐元,由政府和汽車製造商平攤,希望能夠在2019年6月底,即計畫截止期前售出40萬輛電動車。   文章來源:環球網

本站聲明:網站內容來源於EnergyTrend https://www.energytrend.com.tw/ev/,如有侵權,請聯繫我們,我們將及時處理

【其他文章推薦】

台北網頁設計公司這麼多,該如何挑選?? 網頁設計報價省錢懶人包"嚨底家"

網頁設計公司推薦更多不同的設計風格,搶佔消費者視覺第一線

※想知道購買電動車哪裡補助最多?台中電動車補助資訊懶人包彙整

分類
發燒車訊

蘋果的第一個汽車專利由BAE公司授權 像坦克

儘管蘋果公司一直三緘其口,但是對於傳聞中的蘋果電動汽車項目,已經快成為了公開的秘密。現在,蘋果的首個關於汽車技術的專利也被人曝光,不過看起來與我們期望的距離似乎有點遙遠。  
  近日,美國專利商標局通過了一批蘋果公司的新專利,其中一項專利顯示了一種採用履帶以及軌槽設計的交通工具草圖。這項專利其實是兩個貨箱之間的接駁原理,駕駛員可以在極端寒冷空氣條件下,直接,通過加熱裝置,控制第一個車廂的轉向構件及包括一個連接機制的第二個車廂。   據悉,這項專利由瑞典軍用坦克製造商BAE公司授權給蘋果,因此至少目前來看肯定不會被使用在普通的消費和商業領域。   文章來源:騰訊數碼

本站聲明:網站內容來源於EnergyTrend https://www.energytrend.com.tw/ev/,如有侵權,請聯繫我們,我們將及時處理

【其他文章推薦】

網頁設計公司推薦更多不同的設計風格,搶佔消費者視覺第一線

※廣告預算用在刀口上,網站設計公司幫您達到更多曝光效益

※自行創業 缺乏曝光? 下一步"網站設計"幫您第一時間規劃公司的門面形象

分類
發燒車訊

大規模搜索廣告的端到端一致性實時保障

一、背景

電商平台的搜索廣告數據處理鏈路通常較長,一般會經歷如下過程:

  • 廣告主在後台進行廣告投放;
  • 投放廣告品及關鍵詞數據寫入數據庫;
  • 數據庫中的數據通過全量構建(導入數據倉庫再進行離線批處理)或增量構建(藉助消息隊列和流計算引擎)的方式產出用於構建在線索引的“內容文件”;
  • BuildService基於“內容文件”,構建出在搜索服務檢索時使用的索引。

下圖是ICBU的廣告系統的買賣家數據處理鏈路:

右半部分(BP->DB)和offline部分即為廣告投放數據的更新過程。

複雜的數據處理鏈路結合海量(通常是億級以上)的商品數據,對線上全量商品的投放狀態正確性測試提出巨大挑戰。從數據庫、到離線大規模數據聯表處理、到在線索引構建,鏈路中的任一節點出現異常或數據延遲,都有可能會對廣告主以及平台造成“資損”影響,例如:

  • 廣告主在後台操作取消A商品的廣告投放,但是因為數據鏈路處理延遲,搜索引擎中A的狀態仍處於“推廣中”,導致A能繼續在買家搜索廣告時得到曝光,相應地當“點擊”行為發生時,造成錯誤扣款。
  • 廣告主設定某個產品只限定對某個地域/國家的客戶投放廣告,但是因為搜索引擎的過濾邏輯處理不恰當,導致客戶的廣告品在所有地區都進行廣告投放,同樣會造成錯誤點擊扣款。

傳統的測試手段,或聚焦於廣告主後台應用的模塊功能測試,或聚焦於搜索引擎的模塊功能測試,對於全鏈路功能的測試缺乏有效和全面的測試手段。而線上的業務監控,則側重於對業務效果指標的監控,如CTR(click through rate,點擊率)、CPC(cost per click,點擊成本)、RPM(revenue per impression,千次瀏覽收益)等。對涉及廣告主切身利益和平台總營收的廣告錯誤投放問題,缺乏有效的發現機制。

我們期望對在線搜索廣告引擎所有實際曝光的商品,通過反查數據庫中曝光時刻前它的最後狀態,來校驗它在數據庫中的投放狀態與搜索引擎中的狀態的一致性,做到線上廣告錯誤投放問題的實時發現。同時,通過不同的觸發檢測方式,做到數據變更的各個環節的有效覆蓋。

二、階段成果

我們藉助日誌流同步服務(TTLog)、海量數據NoSQL存儲系統(Lindorm)、實時業務校驗平台(BCP)、消息隊列(MetaQ)、在線數據實時同步服務(精衛)以及海量日誌實時分析系統(Xflush)實現了ICBU搜索廣告錯誤投放問題的線上實時發現,且覆蓋線上的全部用戶真實曝光流量。同時,通過在數據變更節點增加主動校驗的方式,可以做到在特定場景下(該廣告品尚未被用戶檢索)的線上問題先於用戶發現。

此外,藉助TTLog+實時計算引擎Blink+阿里雲日誌服務SLS+Xflush的技術體系,實現了線上引擎/算法效果的實時透出。

下面是ICBU廣告實時質量大盤:

從八月底開始投入線上使用,目前這套實時系統已經發現了多起線上問題,且幾乎都是直接影響資損和廣告主的利益。

三、技術實現

圖一:

1. 引擎曝光日誌數據處理

對於電商搜索廣告系統,當一個真實的用戶請求觸達(如圖一中1.1)時,會產生一次實時的廣告曝光,相對應地,搜索引擎的日誌里會寫入一條曝光記錄(如圖一中2)。我們通過日誌流同步服務TTLog對搜索引擎各個服務器節點上的日誌數據進行統一的搜集(如圖一中3),然後藉助數據對賬服務平台BCP對接TTLog中的“流式”數據(如圖一中4),對數據進行清洗、過濾、採樣,然後將待校驗的數據推送到消息隊列服務MetaQ(如圖一中5)。

2. DB數據處理

圖二:

如圖二所示,通常,業務數據庫MySQL針對每個領域對象,只會存儲它當前時刻最新的數據。為了獲取廣告品在引擎中真實曝光的時刻前的最後數據,我們通過精衛監聽數據庫中的每次數據變更,將變更數據“快照”寫入Lindorm(底層是HBase存儲,支持海量數據的隨機讀寫)。

3. 數據一致性校驗

在廣告測試服務igps(我們自己的應用)中,我們通過監聽MetaQ的消息變更,拉取MetaQ中待校驗的數據(如圖一中6),解析獲得曝光時每個廣告品在搜索引擎中的狀態,同時獲得其曝光的時刻點。然後基於曝光時刻點,通過查詢Lindorm,獲得廣告品於曝光時刻點前最後在MySQL中的數據狀態(如圖一中7)。然後igps對該次廣告曝光,校驗引擎中的數據狀態和MySQL中的數據狀態的一致性。

如果數據校驗不一致,則打印出錯誤日誌。最後,藉助海量日誌實時分析系統Xflush(如圖一中8),我們可以做到對錯誤數據的實時聚合統計、可視化展示以及監控報警。

4. 數據變更節點的主動校驗

因為線上的實時用戶搜索流量具有一定的隨機性,流量場景的覆蓋程度具有很大的不確定性,作為補充,我們在數據變更節點還增加了主動校驗。

整個數據鏈路,數據變更有兩個重要節點:

  • MySQL中的數據變更;
  • 引擎索引的切換。

對於MySQL中的數據變更:我們通過精衛監聽變更,針對單條數據的變更信息,構建出特定的引擎查詢請求串,發起查詢請求(如圖一中1.3)。

對於引擎索引的切換(主要是全量切換):我們通過離線對歷史(如過去7天)的線上廣告流量進行聚合分析/改寫,得到測試用例請求集合。再監聽線上引擎索引的切換操作。當引擎索引進行全量切換時,我們主動發起對引擎服務的批量請求(如圖一中1.2)。

上述兩種主動發起的請求,最後都會復用前面搭建的數據一致性校驗系統進行廣告投放狀態的校驗。

上圖是對廣告投放狀態的實時校驗錯誤監控圖,從圖中我們清晰看到當前時刻,搜索廣告鏈路的數據質量。無論是中美業務DB同步延遲、DB到引擎數據增量處理鏈路的延遲、或者是發布變更導致的邏輯出錯,都會導致錯誤數據曲線的異常上漲。校驗的規則覆蓋了推廣計劃(campaign)、推廣組(adgroup)、客戶狀態(customer)、詞的狀態(keyword)、品的狀態(feed)。校驗的節點覆蓋了曝光和點擊兩個不同的環節。

5. 引擎及算法的實時質量

圖三:

搜索引擎日誌pvlog中蘊含了非常多有價值的信息,利用好這些信息不僅可以做到線上問題的實時發現,還能幫助算法同學感知線上的實時效果提供抓手。如圖三所示,通過實時計算引擎Blink我們對TTLog中的pv信息進行解析和切分,然後將拆分的結果輸出到阿里雲日誌服務SLS中,再對接Xflush進行實時的聚合和可視化展示。

如上圖所示,上半年我們曾出現過一次線上的資損故障,是搜索應用端構造的搜索廣告引擎SP請求串中缺失了一個參數,導致部分頭部客戶的廣告沒有在指定地域投放,故障從發生到超過10+客戶上報才發現,歷經了10幾個小時。我們通過對SP請求串的實時key值和重要value值進行實時監控,可以快速發現key值或value值缺失的場景。

此外,不同召回類型、扣費類型、以及扣費價格的分佈,不僅可以監控線上異常狀態的出現,還可以給算法同學做實驗、調參、以及排查線上問題時提供參考。

四、幾個核心問題

1. why lindorm?

最初的實現,我們是通過精衛監聽業務DB的變更寫入另一個新的DB(MySQL),但是性能是一個非常大的瓶頸。我們的數據庫分了5+個物理庫,1000+張分表,單表的平均數據量達到1000+w行,總數據達到千億行。

后通過存儲的優化和按邏輯進行分表的方式,實現了查詢性能從平均1s到70ms的提升。

2. why BCP + MetaQ + igps?

最初我們是想直接使用BCP對數據進行校驗:通過igps封裝lindorm的查詢接口,然後提供hsf接口供在BCP里直接使用。

但是還是因為性能問題:TTLog的一條message平均包含60+條pv,每個pv可能有5個或更多廣告,每個廣告要查6張表,單條message在BCP校驗需要調用約60x5x6=1800次hsf請求。當我們在BCP中對TTLog的數據進行10%的採樣時,後端服務igps的性能已經出現瓶頸,hsf線程池被打滿,同時7台服務器的cpu平均使用率達到70%以上。

藉助MetaQ的引入,可以剔除hsf調用的網絡開銷,同時將消息的生產和消費解耦,當流量高峰到達時,igps可以保持自己的消費速率不變,更多的消息可以暫存在隊列里。通過這一優化,我們不僅扛住了10%的採樣,當線上採樣率開到100%時,我們的igps的服務器的平均cpu使用率仍只維持在20%上下,而且metaq中沒有出現消息堆積。

不過這樣一來,bcp的作用從原來的“採樣、過濾、校驗、報警”,只剩下“採樣、過濾”。無法發揮其通過在線編碼可以快速適應業務變化的作用。

3. why not all blink?

其實“BCP + MetaQ + igps”的流程可以被“Blink + SLS”取代,那為什麼不都統一使用Blink呢。

一方面,目前點擊的校驗由於其流量相對較小的因素,我們目前是直接在BCP里編寫的校驗代碼,不需要走發布流程,比較快捷。而且BCP擁有如“延遲校驗”、“限流控制”等個性化的功能。另一方面,從我們目前使用Blink的體驗來看,實時的處理引擎尚有一些不穩定的因素,尤其是會有不穩定的網絡抖動(可能是數據源和Blink workder跨機房導致)。

4. SP請求的key值如何拆分?

在做SP請求串的實時key值監控的時候,遇到了一個小難題:SP的請求串中參數key是動態的,並不是每個key都會在每個串中出現,而且不同的請求串key出現的順序是不一樣的。如何切分使其滿足Xflush的“列值分組”格式要求。

實現方式是,對每個sp請求串,使用Blink的udtf(自定義表值函數)進行解析,得到每個串的所有key和其對應的value。然後輸出時,按照“validKey={key},validValue={value}”的格式對每個sp請求串拆分成多行輸出。然後通過Xflush可以按照validKey進行分組,並對行數進行統計。

五、總結及後續規劃

本文介紹了通過大數據的處理技術做到電商搜索廣告場景下數據端到端一致性問題的實時發現,並且通過“實時發現”結合“數據變更節點的主動校驗”,實現數據全流程的一致性校驗。

後續的優化方向主要有兩方面:

  • 結合業務的使用場景,透出更豐富維度的實時數據。
  • 將該套技術體系“左移”到線下/預發測試階段,實現“功能、性能、效果”的一鍵式自動化測試,同時覆蓋從搜索應用到引擎的全鏈路。

本站聲明:網站內容來源於博客園,如有侵權,請聯繫我們,我們將及時處理【其他文章推薦】

台北網頁設計公司這麼多,該如何挑選?? 網頁設計報價省錢懶人包"嚨底家"

網頁設計公司推薦更多不同的設計風格,搶佔消費者視覺第一線

※想知道購買電動車哪裡補助最多?台中電動車補助資訊懶人包彙整