.NET 人臉識別庫 ViewFaceCore
這是基於 SeetaFace6 人臉識別開發的 .NET 平台下的人臉識別庫
這是一個使用超簡單的人臉識別庫
這是一個基於 .NET Standard 2.0 開發的庫
這個庫已經發布到 NuGet ,你可以一鍵集成到你的項目
此項目可以免費商業使用
⭐、開源
開源協議:Apache-2.0
GitHub地址: ViewFaceCore
十分感謝您的小星星
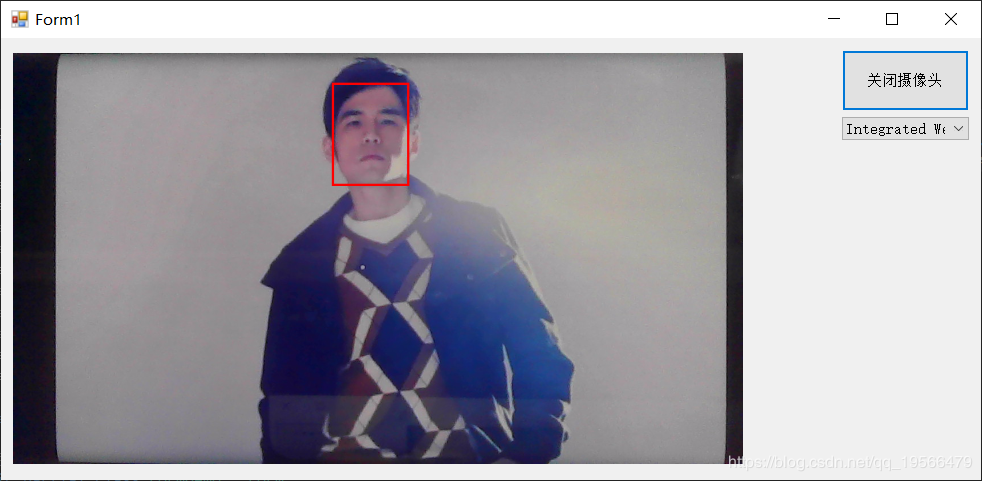
一、示例
示例項目地址:WinForm 攝像頭人臉檢測
示例項目效果:
二、使用
一分鐘在你的項目里集成人臉識別
1. 創建你的 .NET 應用
.NET Standard >= 2.0
.NET Core >= 2.0
.NET Framework >= 4.6.1^2
2. 使用 Nuget 安裝 ViewFaceCore
- Author : View
- Version >= 0.1.1
此 Nuget 包會自動添加依賴的 C++ 庫,以及最精簡的識別模型。
如果需要其它場景的識別模型,請下載 SeetaFace6 模型文件。
3. 在項目中編寫你的代碼
簡單的調用示例
 1 static void Main()
 2         {
 3             ViewFace viewFace = new ViewFace((str) => { Debug.WriteLine(str); }); // 初始化人臉識別類,並設置 日誌回調函數
 4             viewFace.DetectorSetting = new DetectorSetting() { FaceSize = 20, MaxWidth = 2000, MaxHeight = 2000, Threshold = 0.5 };
 5
 6             // 系統默認使用的輕量級識別模型。如果對精度有要求,請切換到 Normal 模式;並下載需要模型文件 放入生成目錄的 model 文件夾中
 7             viewFace.FaceType = FaceType.Normal;
 8             // 系統默認使用5個人臉關鍵點。//不建議改動,除非是使用口罩模型。
 9             viewFace.MarkType = MarkType.Light;
10
11             #region 識別老照片
12             float[] oldEigenValues;
13             Bitmap oldImg = (Bitmap)Image.FromFile(@"C:\Users\yangw\OneDrive\圖片\Camera Roll\IMG_20181103_142707.jpg"/*老圖片路徑*/); // 從文件中加載照片 // 或者視頻幀等
14             var oldFaces = viewFace.FaceDetector(oldImg); // 檢測圖片中包含的人臉信息。(置信度、位置、大小)
15             if (oldFaces.Length > 0) //識別到人臉
16             {
17                 { // 打印人臉信息
18                     Console.WriteLine($"識別到的人臉數量:{oldFaces.Length} 。人臉信息:\n");
19                     Console.WriteLine($"序號\t人臉置信度\t位置X\t位置Y\t寬度\t高度");
20                     for (int i = 0; i < oldFaces.Length; i++)
21                     {
22                         Console.WriteLine($"{i + 1}\t{oldFaces[i].Score}\t{oldFaces[i].Location.X}\t{oldFaces[i].Location.Y}\t{oldFaces[i].Location.Width}\t{oldFaces[i].Location.Height}");
23                     }
24                     Console.WriteLine();
25                 }
26                 var oldPoints = viewFace.FaceMark(oldImg, oldFaces[0]); // 獲取 第一個人臉 的識別關鍵點。(人臉識別的關鍵點數據)
27                 oldEigenValues = viewFace.Extract(oldImg, oldPoints); // 獲取 指定的關鍵點 的特徵值。
28             }
29             else { oldEigenValues = new float[0]; /*未識別到人臉*/ }
30             #endregion
31
32             #region 識別新照片
33             float[] newEigenValues;
34             Bitmap newImg = (Bitmap)Image.FromFile(@"C:\Users\yangw\OneDrive\圖片\Camera Roll\IMG_20181129_224339.jpg"/*新圖片路徑*/); // 從文件中加載照片 // 或者視頻幀等
35             var newFaces = viewFace.FaceDetector(newImg); // 檢測圖片中包含的人臉信息。(置信度、位置、大小)
36             if (newFaces.Length > 0) //識別到人臉
37             {
38                 { // 打印人臉信息
39                     Console.WriteLine($"識別到的人臉數量:{newFaces.Length} 。人臉信息:\n");
40                     Console.WriteLine($"序號\t人臉置信度\t位置X\t位置Y\t寬度\t高度");
41                     for (int i = 0; i < newFaces.Length; i++)
42                     {
43                         Console.WriteLine($"{i + 1}\t{newFaces[i].Score}\t{newFaces[i].Location.X}\t{newFaces[i].Location.Y}\t{newFaces[i].Location.Width}\t{newFaces[i].Location.Height}");
44                     }
45                     Console.WriteLine();
46                 }
47                 var newPoints = viewFace.FaceMark(newImg, newFaces[0]); // 獲取 第一個人臉 的識別關鍵點。(人臉識別的關鍵點數據)
48                 newEigenValues = viewFace.Extract(newImg, newPoints); // 獲取 指定的關鍵點 的特徵值。
49             }
50             else { newEigenValues = new float[0]; /*未識別到人臉*/ }
51             #endregion
52
53             try
54             {
55                 float similarity = viewFace.Similarity(oldEigenValues, newEigenValues); // 對比兩張照片上的數據,確認是否是同一個人。
56                 Console.WriteLine($"閾值 = {Face.Threshold[viewFace.FaceType]}\t相似度 = {similarity}");
57                 Console.WriteLine($"是否是同一個人:{viewFace.IsSelf(similarity)}");
58             }
59             catch (Exception e)
60             { Console.WriteLine(e); }
61
62             Console.ReadKey();
63         }
ViewFaceCore 使用示例
三、說明
命名空間:ViewFaceCore.Sharp : 人臉識別類所在的命名空間
| 屬性名稱 |
類型 |
說明 |
默認值 |
| ModelPath |
string |
獲取或設置模型路徑 [ 如非必要,請勿修改 ] |
./model/ |
| FaceType |
FaceType |
獲取或設置人臉類型 |
FaceType.Light |
| MarkType |
MarkType |
獲取或設置人臉關鍵點類型 |
MarkType.Light |
| DetectorSetting |
DetectorSetting |
獲取或設置人臉檢測器設置 |
new DetectorSetting() |
 1 using System.Drawing;
 2 using ViewFaceCore.Sharp;
 3 using ViewFaceCore.Sharp.Model;
 4
 5 // 識別 bitmap 中的人臉,並返回人臉的信息。
 6 FaceInfo[] FaceDetector(Bitmap);
 7
 8 // 識別 bitmap 中指定的人臉信息 info 的關鍵點坐標。
 9 FaceMarkPoint[] FaceMark(Bitmap, FaceInfo);
10
11 // 提取人臉特徵值。
12 float[] Extract(Bitmap, FaceMarkPoint[]);
13
14 // 計算特徵值相似度。
15 float Similarity(float[], float[]);
16
17 // 判斷相似度是否為同一個人。
18 bool IsSelf(float);
四、實現
此項目受到了 SeetaFaceEngine.NET 項目的啟發
這個項目本質上來說還是調用了 SeetaFace 的 C++ 類庫來實現的人臉識別功能。針對本人遇到過的相關的類庫的使用都不太方便,而且使用的 SeetaFace 的版本較老,故萌生了自己重新開發的想法。
本項目在開發完成之後為了方便調用,採用了 Nuget 包的形式,將所有需要的依賴以及最小識別模型一起打包。在使用時非常簡單,只需要 nuget 安裝,編寫代碼,運行即可,不需要多餘的操作。
首先查看 SeetaFace ,已經更新到了v3(v6即v3)(上面前輩的項目是基於v1開發的),最新版本暫時沒有開源,但是可以免費商用。然後是根據以前的經驗和 SeetaFace6 文檔的指導,以及前輩的項目,做了以下操作。
1.對SeetaFace6 的接口進行了 C++ 形式的封裝。
目前主要實現了 人臉檢測,關鍵點提取,特徵值提取,特徵值對比幾個人臉識別中的基礎接口。有了這幾個接口,可以完整的實現一套人臉識別和驗證的流程。
  1 #include "seeta/FaceDetector.h"
  2 #include "seeta/FaceLandmarker.h"
  3 #include "seeta/FaceRecognizer.h"
  4
  5 #include <time.h>
  6
  7 #define View_Api extern "C" __declspec(dllexport)
  8
  9 using namespace std;
 10
 11 typedef void(_stdcall* LogCallBack)(const char* logText);
 12
 13 string modelPath = "./model/"; // 模型所在路徑
 14 LogCallBack logger = NULL; // 日誌回調函數
 15
 16 // 打印日誌
 17 void WriteLog(string str) { if (logger != NULL) { logger(str.c_str()); } }
 18
 19 void WriteMessage(string fanctionName, string message) { WriteLog(fanctionName + "\t Message:" + message); }
 20 void WriteModelName(string fanctionName, string modelName) { WriteLog(fanctionName + "\t Model.Name:" + modelName); }
 21 void WriteRunTime(string fanctionName, int start) { WriteLog(fanctionName + "\t Run.Time:" + to_string(clock() - start) + " ms"); }
 22 void WriteError(string fanctionName, const std::exception& e) { WriteLog(fanctionName + "\t Error:" + e.what()); }
 23
 24 // 註冊日誌回調函數
 25 View_Api void V_SetLogFunction(LogCallBack writeLog)
 26 {
 27     logger = writeLog;
 28     WriteMessage(__FUNCDNAME__, "Successed.");
 29 }
 30
 31 // 設置人臉模型目錄
 32 View_Api void V_SetModelPath(const char* path)
 33 {
 34     modelPath = path;
 35     WriteMessage(__FUNCDNAME__, "Model.Path:" + modelPath);
 36 }
 37 // 獲取人臉模型目錄
 38 View_Api bool V_GetModelPath(char** path)
 39 {
 40     try
 41     {
 42 #pragma warning(disable:4996)
 43         strcpy(*path, modelPath.c_str());
 44
 45         return true;
 46     }
 47     catch (const std::exception& e)
 48     {
 49         WriteError(__FUNCDNAME__, e);
 50         return false;
 51     }
 52 }
 53
 54 seeta::FaceDetector* v_faceDetector = NULL;
 55
 56 // 人臉檢測結果
 57 static SeetaFaceInfoArray detectorInfos;
 58 // 人臉數量檢測器
 59 View_Api int V_DetectorSize(unsigned char* imgData, int width, int height, int channels, double faceSize = 20, double threshold = 0.9, double maxWidth = 2000, double maxHeight = 2000, int type = 0)
 60 {
 61     try {
 62         clock_t start = clock();
 63
 64         SeetaImageData img = { width, height, channels, imgData };
 65         if (v_faceDetector == NULL) {
 66             seeta::ModelSetting setting;
 67             setting.set_device(SEETA_DEVICE_CPU);
 68             string modelName = "face_detector.csta";
 69             switch (type)
 70             {
 71             case 1: modelName = "mask_detector.csta"; break;
 72             }
 73             setting.append(modelPath + modelName);
 74             WriteModelName(__FUNCDNAME__, modelName);
 75             v_faceDetector = new seeta::FaceDetector(setting);
 76         }
 77
 78         if (faceSize != 20) { v_faceDetector->set(seeta::FaceDetector::Property::PROPERTY_MIN_FACE_SIZE, faceSize); }
 79         if (threshold != 0.9) { v_faceDetector->set(seeta::FaceDetector::Property::PROPERTY_THRESHOLD, threshold); }
 80         if (maxWidth != 2000) { v_faceDetector->set(seeta::FaceDetector::Property::PROPERTY_MAX_IMAGE_WIDTH, maxWidth); }
 81         if (maxHeight != 2000) { v_faceDetector->set(seeta::FaceDetector::Property::PROPERTY_MAX_IMAGE_HEIGHT, maxHeight); }
 82
 83         auto infos = v_faceDetector->detect(img);
 84         detectorInfos = infos;
 85
 86         WriteRunTime("V_Detector", start); // 此方法已經是人臉檢測的全過程,故計時器显示為 人臉識別方法
 87         return infos.size;
 88     }
 89     catch (const std::exception& e)
 90     {
 91         WriteError(__FUNCDNAME__, e);
 92         return -1;
 93     }
 94 }
 95 // 人臉檢測器
 96 View_Api bool V_Detector(float* score, int* x, int* y, int* width, int* height)
 97 {
 98     try
 99     {
100         //clock_t start = clock();
101
102         for (int i = 0; i < detectorInfos.size; i++, detectorInfos.data++)
103         {
104             *score = detectorInfos.data->score;
105             *x = detectorInfos.data->pos.x;
106             *y = detectorInfos.data->pos.y;
107             *width = detectorInfos.data->pos.width;
108             *height = detectorInfos.data->pos.height;
109             score++, x++, y++, width++, height++;
110         }
111         detectorInfos.data = NULL;
112         detectorInfos.size = NULL;
113
114         //WriteRunTime(__FUNCDNAME__, start); // 此方法只是將 人臉數量檢測器 獲取到的數據賦值傳遞,並不耗時。故不显示此方法的調用時間
115         return true;
116     }
117     catch (const std::exception& e)
118     {
119         WriteError(__FUNCDNAME__, e);
120         return false;
121     }
122 }
123
124
125 seeta::FaceLandmarker* v_faceLandmarker = NULL;
126 // 人臉關鍵點數量
127 View_Api int V_FaceMarkSize(int type = 0)
128 {
129     try
130     {
131         clock_t start = clock();
132
133         if (v_faceLandmarker == NULL) {
134             seeta::ModelSetting setting;
135             setting.set_device(SEETA_DEVICE_CPU);
136             string modelName = "face_landmarker_pts68.csta";
137             switch (type)
138             {
139             case 1: modelName = "face_landmarker_mask_pts5.csta"; break;
140             case 2: modelName = "face_landmarker_pts5.csta"; break;
141             }
142             setting.append(modelPath + modelName);
143             WriteModelName(__FUNCDNAME__, modelName);
144             v_faceLandmarker = new seeta::FaceLandmarker(setting);
145         }
146         int size = v_faceLandmarker->number();
147
148         WriteRunTime(__FUNCDNAME__, start);
149         return size;
150     }
151     catch (const std::exception& e)
152     {
153         WriteError(__FUNCDNAME__, e);
154         return -1;
155     }
156 }
157 // 人臉關鍵點
158 View_Api bool V_FaceMark(unsigned char* imgData, int width, int height, int channels, int x, int y, int fWidth, int fHeight, double* pointX, double* pointY, int type = 0)
159 {
160     try
161     {
162         clock_t start = clock();
163
164         SeetaImageData img = { width, height, channels, imgData };
165         SeetaRect face = { x, y, fWidth, fHeight };
166         if (v_faceLandmarker == NULL) {
167             seeta::ModelSetting setting;
168             setting.set_device(SEETA_DEVICE_CPU);
169             string modelName = "face_landmarker_pts68.csta";
170             switch (type)
171             {
172             case 1: modelName = "face_landmarker_mask_pts5.csta"; break;
173             case 2: modelName = "face_landmarker_pts5.csta"; break;
174             }
175             setting.append(modelPath + modelName);
176             WriteModelName(__FUNCDNAME__, modelName);
177             v_faceLandmarker = new seeta::FaceLandmarker(setting);
178         }
179         std::vector<SeetaPointF> _points = v_faceLandmarker->mark(img, face);
180
181         if (!_points.empty()) {
182             for (auto iter = _points.begin(); iter != _points.end(); iter++)
183             {
184                 *pointX = (*iter).x;
185                 *pointY = (*iter).y;
186                 pointX++;
187                 pointY++;
188             }
189
190             WriteRunTime(__FUNCDNAME__, start);
191             return true;
192         }
193         else { return false; }
194     }
195     catch (const std::exception& e)
196     {
197         WriteError(__FUNCDNAME__, e);
198         return false;
199     }
200 }
201
202 seeta::FaceRecognizer* v_faceRecognizer = NULL;
203 // 獲取人臉特徵值長度
204 View_Api int V_ExtractSize(int type = 0)
205 {
206     try
207     {
208         clock_t start = clock();
209
210         if (v_faceRecognizer == NULL) {
211             seeta::ModelSetting setting;
212             setting.set_id(0);
213             setting.set_device(SEETA_DEVICE_CPU);
214             string modelName = "face_recognizer.csta";
215             switch (type)
216             {
217             case 1: modelName = "face_recognizer_mask.csta"; break;
218             case 2: modelName = "face_recognizer_light.csta"; break;
219             }
220             setting.append(modelPath + modelName);
221             WriteModelName(__FUNCDNAME__, modelName);
222             v_faceRecognizer = new seeta::FaceRecognizer(setting);
223         }
224         int length = v_faceRecognizer->GetExtractFeatureSize();
225
226         WriteRunTime(__FUNCDNAME__, start);
227         return length;
228     }
229     catch (const std::exception& e)
230     {
231         WriteError(__FUNCDNAME__, e);
232         return -1;
233     }
234 }
235 // 提取人臉特徵值
236 View_Api bool V_Extract(unsigned char* imgData, int width, int height, int channels, SeetaPointF* points, float* features, int type = 0)
237 {
238     try
239     {
240         clock_t start = clock();
241
242         SeetaImageData img = { width, height, channels, imgData };
243         if (v_faceRecognizer == NULL) {
244             seeta::ModelSetting setting;
245             setting.set_id(0);
246             setting.set_device(SEETA_DEVICE_CPU);
247             string modelName = "face_recognizer.csta";
248             switch (type)
249             {
250             case 1: modelName = "face_recognizer_mask.csta"; break;
251             case 2: modelName = "face_recognizer_light.csta"; break;
252             }
253             setting.append(modelPath + modelName);
254             WriteModelName(__FUNCDNAME__, modelName);
255             v_faceRecognizer = new seeta::FaceRecognizer(setting);
256         }
257         int length = v_faceRecognizer->GetExtractFeatureSize();
258         std::shared_ptr<float> _features(new float[v_faceRecognizer->GetExtractFeatureSize()], std::default_delete<float[]>());
259         v_faceRecognizer->Extract(img, points, _features.get());
260
261         for (int i = 0; i < length; i++)
262         {
263             *features = _features.get()[i];
264             features++;
265         }
266
267         WriteRunTime(__FUNCDNAME__, start);
268         return true;
269
270     }
271     catch (const std::exception& e)
272     {
273         WriteError(__FUNCDNAME__, e);
274         return false;
275     }
276 }
277 // 人臉特徵值相似度計算
278 View_Api float V_CalculateSimilarity(float* leftFeatures, float* rightFeatures, int type = 0)
279 {
280     try
281     {
282         clock_t start = clock();
283
284         if (v_faceRecognizer == NULL) {
285             seeta::ModelSetting setting;
286             setting.set_id(0);
287             setting.set_device(SEETA_DEVICE_CPU);
288             string modelName = "face_recognizer.csta";
289             switch (type)
290             {
291             case 1: modelName = "face_recognizer_mask.csta"; break;
292             case 2: modelName = "face_recognizer_light.csta"; break;
293             }
294             setting.append(modelPath + modelName);
295             WriteModelName(__FUNCDNAME__, modelName);
296             v_faceRecognizer = new seeta::FaceRecognizer(setting);
297         }
298
299         auto similarity = v_faceRecognizer->CalculateSimilarity(leftFeatures, rightFeatures);
300         WriteMessage(__FUNCDNAME__, "Similarity = " + to_string(similarity));
301         WriteRunTime(__FUNCDNAME__, start);
302         return similarity;
303     }
304     catch (const std::exception& e)
305     {
306         WriteError(__FUNCDNAME__, e);
307         return -1;
308     }
309 }
310
311 // 釋放資源
312 View_Api void V_Dispose()
313 {
314     if (v_faceDetector != NULL) delete v_faceDetector;
315     if (v_faceLandmarker != NULL) delete v_faceLandmarker;
316     if (v_faceRecognizer != NULL) delete v_faceRecognizer;
317 }
C++ 封裝層
2.採用 C# 對上訴接口進行了導入。
因為C++的項目測CPU架構區分x86和x64,所以C# 層也需要區分架構封裝
using System.Runtime.InteropServices;
using System.Text;
using ViewFaceCore.Sharp.Model;

namespace ViewFaceCore.Plus
{
    /// <summary>
    /// 日誌回調函數
    /// </summary>
    /// <param name="logText"></param>
    public delegate void LogCallBack(string logText);

    class ViewFacePlus64
    {
        const string LibraryPath = @"FaceLibraries\x64\ViewFace.dll";
        /// <summary>
        /// 設置日誌回調函數(用於日誌打印)
        /// </summary>
        /// <param name="writeLog"></param>
        [DllImport(LibraryPath, EntryPoint = "V_SetLogFunction", CallingConvention = CallingConvention.Cdecl)]
        public static extern void SetLogFunction(LogCallBack writeLog);

        /// <summary>
        /// 設置人臉模型的目錄
        /// </summary>
        /// <param name="path"></param>
        [DllImport(LibraryPath, EntryPoint = "V_SetModelPath", CallingConvention = CallingConvention.Cdecl)]
        private extern static void SetModelPath(byte[] path);
        /// <summary>
        /// 設置人臉模型的目錄
        /// </summary>
        /// <param name="path"></param>
        public static void SetModelPath(string path) => SetModelPath(Encoding.UTF8.GetBytes(path));

        /// <summary>
        /// 釋放使用的資源
        /// </summary>
        [DllImport(LibraryPath, EntryPoint = "V_Dispose", CallingConvention = CallingConvention.Cdecl)]
        public extern static void ViewDispose();

        /// <summary>
        /// 獲取人臉模型的目錄
        /// </summary>
        /// <param name="path"></param>
        [DllImport(LibraryPath, EntryPoint = "V_GetModelPath", CallingConvention = CallingConvention.Cdecl)]
        private extern static bool GetModelPathEx(ref string path);
        /// <summary>
        /// 獲取人臉模型的目錄
        /// </summary>
        public static string GetModelPath() { string path = string.Empty; GetModelPathEx(ref path); return path; }

        /// <summary>
        /// 人臉檢測器檢測到的人臉數量
        /// </summary>
        /// <param name="imgData"></param>
        /// <param name="width"></param>
        /// <param name="height"></param>
        /// <param name="channels"></param>
        /// <param name="faceSize">最小人臉是人臉檢測器常用的一個概念,默認值為20,單位像素。
        /// <para>最小人臉和檢測器性能息息相關。主要方面是速度,使用建議上,我們建議在應用範圍內,這個值設定的越大越好。SeetaFace採用的是BindingBox Regresion的方式訓練的檢測器。如果最小人臉參數設置為80的話,從檢測能力上,可以將原圖縮小的原來的1/4,這樣從計算複雜度上,能夠比最小人臉設置為20時,提速到16倍。</para>
        /// </param>
        /// <param name="threshold">檢測器閾值默認值是0.9,合理範圍為[0, 1]。這個值一般不進行調整,除了用來處理一些極端情況。這個值設置的越小,漏檢的概率越小,同時誤檢的概率會提高</param>
        /// <param name="maxWidth">可檢測的圖像最大寬度。默認值2000。</param>
        /// <param name="maxHeight">可檢測的圖像最大高度。默認值2000。</param>
        /// <param name="type"></param>
        /// <returns></returns>
        [DllImport(LibraryPath, EntryPoint = "V_DetectorSize", CallingConvention = CallingConvention.Cdecl)]
        public extern static int DetectorSize(byte[] imgData, int width, int height, int channels, double faceSize = 20, double threshold = 0.9, double maxWidth = 2000, double maxHeight = 2000, int type = 0);
        /// <summary>
        /// 人臉檢測器
        /// <para>調用此方法前必須先調用 <see cref="DetectorSize(byte[], int, int, int, double, double, double, double, int)"/></para>
        /// </summary>
        /// <param name="score">人臉置信度集合</param>
        /// <param name="x">人臉位置集合</param>
        /// <param name="y">人臉位置集合</param>
        /// <param name="width">人臉大小集合</param>
        /// <param name="height">人臉大小集合</param>
        /// <returns></returns>
        [DllImport(LibraryPath, EntryPoint = "V_Detector", CallingConvention = CallingConvention.Cdecl)]
        public extern static bool Detector(float[] score, int[] x, int[] y, int[] width, int[] height);

        /// <summary>
        /// 人臉關鍵點數量
        /// </summary>
        /// <returns></returns>
        [DllImport(LibraryPath, EntryPoint = "V_FaceMarkSize", CallingConvention = CallingConvention.Cdecl)]
        public extern static int FaceMarkSize(int type = 0);
        /// <summary>
        /// 人臉關鍵點
        /// </summary>
        /// <param name="imgData"></param>
        /// <param name="width"></param>
        /// <param name="height"></param>
        /// <param name="channels"></param>
        /// <param name="x"></param>
        /// <param name="y"></param>
        /// <param name="fWidth"></param>
        /// <param name="fHeight"></param>
        /// <param name="pointX"></param>
        /// <param name="pointY"></param>
        /// <param name="type"></param>
        /// <returns></returns>
        [DllImport(LibraryPath, EntryPoint = "V_FaceMark", CallingConvention = CallingConvention.Cdecl)]
        public extern static bool FaceMark(byte[] imgData, int width, int height, int channels, int x, int y, int fWidth, int fHeight, double[] pointX, double[] pointY, int type = 0);

        /// <summary>
        /// 提取特徵值
        /// </summary>
        /// <param name="imgData"></param>
        /// <param name="width"></param>
        /// <param name="height"></param>
        /// <param name="channels"></param>
        /// <param name="points"></param>
        /// <param name="features"></param>
        /// <param name="type"></param>
        /// <returns></returns>
        [DllImport(LibraryPath, EntryPoint = "V_Extract", CallingConvention = CallingConvention.Cdecl)]
        public extern static bool Extract(byte[] imgData, int width, int height, int channels, FaceMarkPoint[] points, float[] features, int type = 0);
        /// <summary>
        /// 特徵值大小
        /// </summary>
        /// <returns></returns>
        [DllImport(LibraryPath, EntryPoint = "V_ExtractSize", CallingConvention = CallingConvention.Cdecl)]
        public extern static int ExtractSize(int type = 0);

        /// <summary>
        /// 計算相似度
        /// </summary>
        /// <param name="leftFeatures"></param>
        /// <param name="rightFeatures"></param>
        /// <param name="type"></param>
        /// <returns></returns>
        [DllImport(LibraryPath, EntryPoint = "V_CalculateSimilarity", CallingConvention = CallingConvention.Cdecl)]
        public extern static float Similarity(float[] leftFeatures, float[] rightFeatures, int type = 0);
    }
    class ViewFacePlus32
    {
        const string LibraryPath = @"FaceLibraries\x86\ViewFace.dll";
        /// <summary>
        /// 設置日誌回調函數(用於日誌打印)
        /// </summary>
        /// <param name="writeLog"></param>
        [DllImport(LibraryPath, EntryPoint = "V_SetLogFunction", CallingConvention = CallingConvention.Cdecl)]
        public static extern void SetLogFunction(LogCallBack writeLog);

        /// <summary>
        /// 設置人臉模型的目錄
        /// </summary>
        /// <param name="path"></param>
        [DllImport(LibraryPath, EntryPoint = "V_SetModelPath", CallingConvention = CallingConvention.Cdecl)]
        private extern static void SetModelPath(byte[] path);
        /// <summary>
        /// 設置人臉模型的目錄
        /// </summary>
        /// <param name="path"></param>
        public static void SetModelPath(string path) => SetModelPath(Encoding.UTF8.GetBytes(path));

        /// <summary>
        /// 釋放使用的資源
        /// </summary>
        [DllImport(LibraryPath, EntryPoint = "V_Dispose", CallingConvention = CallingConvention.Cdecl)]
        public extern static void ViewDispose();

        /// <summary>
        /// 獲取人臉模型的目錄
        /// </summary>
        /// <param name="path"></param>
        [DllImport(LibraryPath, EntryPoint = "V_GetModelPath", CallingConvention = CallingConvention.Cdecl)]
        private extern static bool GetModelPathEx(ref string path);
        /// <summary>
        /// 獲取人臉模型的目錄
        /// </summary>
        public static string GetModelPath() { string path = string.Empty; GetModelPathEx(ref path); return path; }

        /// <summary>
        /// 人臉檢測器檢測到的人臉數量
        /// </summary>
        /// <param name="imgData"></param>
        /// <param name="width"></param>
        /// <param name="height"></param>
        /// <param name="channels"></param>
        /// <param name="faceSize">最小人臉是人臉檢測器常用的一個概念,默認值為20,單位像素。
        /// <para>最小人臉和檢測器性能息息相關。主要方面是速度,使用建議上,我們建議在應用範圍內,這個值設定的越大越好。SeetaFace採用的是BindingBox Regresion的方式訓練的檢測器。如果最小人臉參數設置為80的話,從檢測能力上,可以將原圖縮小的原來的1/4,這樣從計算複雜度上,能夠比最小人臉設置為20時,提速到16倍。</para>
        /// </param>
        /// <param name="threshold">檢測器閾值默認值是0.9,合理範圍為[0, 1]。這個值一般不進行調整,除了用來處理一些極端情況。這個值設置的越小,漏檢的概率越小,同時誤檢的概率會提高</param>
        /// <param name="maxWidth">可檢測的圖像最大寬度。默認值2000。</param>
        /// <param name="maxHeight">可檢測的圖像最大高度。默認值2000。</param>
        /// <param name="type"></param>
        /// <returns></returns>
        [DllImport(LibraryPath, EntryPoint = "V_DetectorSize", CallingConvention = CallingConvention.Cdecl)]
        public extern static int DetectorSize(byte[] imgData, int width, int height, int channels, double faceSize = 20, double threshold = 0.9, double maxWidth = 2000, double maxHeight = 2000, int type = 0);
        /// <summary>
        /// 人臉檢測器
        /// <para>調用此方法前必須先調用 <see cref="DetectorSize(byte[], int, int, int, double, double, double, double, int)"/></para>
        /// </summary>
        /// <param name="score">人臉置信度集合</param>
        /// <param name="x">人臉位置集合</param>
        /// <param name="y">人臉位置集合</param>
        /// <param name="width">人臉大小集合</param>
        /// <param name="height">人臉大小集合</param>
        /// <returns></returns>
        [DllImport(LibraryPath, EntryPoint = "V_Detector", CallingConvention = CallingConvention.Cdecl)]
        public extern static bool Detector(float[] score, int[] x, int[] y, int[] width, int[] height);

        /// <summary>
        /// 人臉關鍵點數量
        /// </summary>
        /// <returns></returns>
        [DllImport(LibraryPath, EntryPoint = "V_FaceMarkSize", CallingConvention = CallingConvention.Cdecl)]
        public extern static int FaceMarkSize(int type = 0);
        /// <summary>
        /// 人臉關鍵點
        /// </summary>
        /// <param name="imgData"></param>
        /// <param name="width"></param>
        /// <param name="height"></param>
        /// <param name="channels"></param>
        /// <param name="x"></param>
        /// <param name="y"></param>
        /// <param name="fWidth"></param>
        /// <param name="fHeight"></param>
        /// <param name="pointX"></param>
        /// <param name="pointY"></param>
        /// <param name="type"></param>
        /// <returns></returns>
        [DllImport(LibraryPath, EntryPoint = "V_FaceMark", CallingConvention = CallingConvention.Cdecl)]
        public extern static bool FaceMark(byte[] imgData, int width, int height, int channels, int x, int y, int fWidth, int fHeight, double[] pointX, double[] pointY, int type = 0);

        /// <summary>
        /// 提取特徵值
        /// </summary>
        /// <param name="imgData"></param>
        /// <param name="width"></param>
        /// <param name="height"></param>
        /// <param name="channels"></param>
        /// <param name="points"></param>
        /// <param name="features"></param>
        /// <param name="type"></param>
        /// <returns></returns>
        [DllImport(LibraryPath, EntryPoint = "V_Extract", CallingConvention = CallingConvention.Cdecl)]
        public extern static bool Extract(byte[] imgData, int width, int height, int channels, FaceMarkPoint[] points, float[] features, int type = 0);
        /// <summary>
        /// 特徵值大小
        /// </summary>
        /// <returns></returns>
        [DllImport(LibraryPath, EntryPoint = "V_ExtractSize", CallingConvention = CallingConvention.Cdecl)]
        public extern static int ExtractSize(int type = 0);

        /// <summary>
        /// 計算相似度
        /// </summary>
        /// <param name="leftFeatures"></param>
        /// <param name="rightFeatures"></param>
        /// <param name="type"></param>
        /// <returns></returns>
        [DllImport(LibraryPath, EntryPoint = "V_CalculateSimilarity", CallingConvention = CallingConvention.Cdecl)]
        public extern static float Similarity(float[] leftFeatures, float[] rightFeatures, int type = 0);
    }
}
C# 導入層
3.採用 C# 的面向對象的封裝
因為C#的項目默認都是 AnyCPU,所以為了簡化調用,在這一層封裝的時候增加了架構判斷,當在你的項目中引用的時候,不用做任何修改。
且因為C++的C#導入方法在和原生的C#寫法略有差異,且數據的轉換和傳遞比較麻煩,所以類庫中對外隱藏了 C# 導入層。並使用大家都更熟悉的C#的面向對象的方式進行進一步的封裝和簡化。
  1     /// <summary>
  2     /// 人臉識別類
  3     /// </summary>
  4     public class ViewFace
  5     {
  6         bool Platform64 { get; set; } = false;
  7         // <para>需要模型:<see langword=""/></para>
  8
  9         // ctor
 10         /// <summary>
 11         /// 使用默認的模型目錄初始化人臉識別類
 12         /// </summary>
 13         public ViewFace() : this("./model/") { }
 14         /// <summary>
 15         /// 使用指定的模型目錄初始化人臉識別類
 16         /// </summary>
 17         /// <param name="modelPath">模型目錄</param>
 18         public ViewFace(string modelPath)
 19         {
 20             Platform64 = IntPtr.Size == 8;
 21             if (Platform64)
 22             { ViewFacePlus64.SetModelPath(modelPath); }
 23             else
 24             { ViewFacePlus32.SetModelPath(modelPath); }
 25         }
 26         /// <summary>
 27         /// 使用指定的日誌回調函數初始化人臉識別類
 28         /// </summary>
 29         /// <param name="action">日誌回調函數</param>
 30         public ViewFace(LogCallBack action) : this("./model/", action) { }
 31         /// <summary>
 32         /// 使用指定的模型目錄、日誌回調函數初始化人臉識別類
 33         /// </summary>
 34         /// <param name="modelPath">模型目錄</param>
 35         /// <param name="action">日誌回調函數</param>
 36         public ViewFace(string modelPath, LogCallBack action) : this(modelPath)
 37         {
 38             if (Platform64)
 39             { ViewFacePlus64.SetLogFunction(action); }
 40             else
 41             { ViewFacePlus32.SetLogFunction(action); }
 42         }
 43
 44         // public property
 45         /// <summary>
 46         /// 獲取或設置模型路徑
 47         /// </summary>
 48         public string ModelPath
 49         {
 50             get
 51             {
 52                 if (Platform64)
 53                 { return ViewFacePlus64.GetModelPath(); }
 54                 else
 55                 { return ViewFacePlus32.GetModelPath(); }
 56             }
 57             set
 58             {
 59                 if (Platform64)
 60                 { ViewFacePlus64.SetModelPath(value); }
 61                 else
 62                 { ViewFacePlus32.SetModelPath(value); }
 63             }
 64         }
 65         /// <summary>
 66         /// 獲取或設置人臉類型
 67         /// <para>
 68         /// <listheader>此屬性可影響到以下方法:</listheader><br />
 69         /// • <c><see cref="FaceDetector(Bitmap)"/></c><br />
 70         /// • <c><see cref="Extract(Bitmap, FaceMarkPoint[])"/></c><br />
 71         /// • <c><see cref="Similarity(float[], float[])"/></c><br />
 72         /// </para>
 73         /// </summary>
 74         public FaceType FaceType { get; set; } = FaceType.Light;
 75         /// <summary>
 76         /// 獲取或設置人臉關鍵點類型
 77         /// <para>
 78         /// <listheader>此屬性可影響到以下方法:</listheader><br />
 79         /// • <c><see cref="FaceMark(Bitmap, FaceInfo)"/></c><br />
 80         /// </para>
 81         /// </summary>
 82         public MarkType MarkType { get; set; } = MarkType.Light;
 83         /// <summary>
 84         /// 獲取或設置人臉檢測器設置
 85         /// </summary>
 86         public DetectorSetting DetectorSetting { get; set; } = new DetectorSetting();
 87
 88
 89         // public method
 90         /// <summary>
 91         /// 識別 <paramref name="bitmap"/> 中的人臉,並返回人臉的信息。
 92         /// <para>
 93         /// 當 <c><see cref="FaceType"/> <see langword="="/> <see cref="FaceType.Normal"/> <see langword="||"/> <see cref="FaceType.Light"/></c> 時, 需要模型:<see langword="face_detector.csta"/><br/>
 94         /// 當 <c><see cref="FaceType"/> <see langword="="/> <see cref="FaceType.Mask"/></c> 時, 需要模型:<see langword="mask_detector.csta"/><br/>
 95         /// </para>
 96         /// </summary>
 97         /// <param name="bitmap">包含人臉的圖片</param>
 98         /// <returns></returns>
 99         public FaceInfo[] FaceDetector(Bitmap bitmap)
100         {
101             byte[] bgr = ImageSet.Get24BGRFromBitmap(bitmap, out int width, out int height, out int channels);
102             int size;
103             if (Platform64)
104             { size = ViewFacePlus64.DetectorSize(bgr, width, height, channels, DetectorSetting.FaceSize, DetectorSetting.Threshold, DetectorSetting.MaxWidth, DetectorSetting.MaxHeight, (int)FaceType); }
105             else
106             { size = ViewFacePlus32.DetectorSize(bgr, width, height, channels, DetectorSetting.FaceSize, DetectorSetting.Threshold, DetectorSetting.MaxWidth, DetectorSetting.MaxHeight, (int)FaceType); }
107             float[] _socre = new float[size];
108             int[] _x = new int[size];
109             int[] _y = new int[size];
110             int[] _width = new int[size];
111             int[] _height = new int[size];
112             if (Platform64)
113             { _ = ViewFacePlus64.Detector(_socre, _x, _y, _width, _height); }
114             else
115             { _ = ViewFacePlus32.Detector(_socre, _x, _y, _width, _height); }
116             List<FaceInfo> infos = new List<FaceInfo>();
117             for (int i = 0; i < size; i++)
118             {
119                 infos.Add(new FaceInfo() { Score = _socre[i], Location = new FaceRect() { X = _x[i], Y = _y[i], Width = _width[i], Height = _height[i] } });
120             }
121             return infos.ToArray();
122         }
123
124         /// <summary>
125         /// 識別 <paramref name="bitmap"/> 中指定的人臉信息 <paramref name="info"/> 的關鍵點坐標。
126         /// <para>
127         /// 當 <see cref="FaceType"/> <see langword="="/> <see cref="FaceType.Normal"/> 時, 需要模型:<see langword="face_landmarker_pts68.csta"/><br/>
128         /// 當 <see cref="FaceType"/> <see langword="="/> <see cref="FaceType.Mask"/> 時, 需要模型:<see langword="face_landmarker_mask_pts5.csta"/><br/>
129         /// 當 <see cref="FaceType"/> <see langword="="/> <see cref="FaceType.Light"/> 時, 需要模型:<see langword="face_landmarker_pts5.csta"/><br/>
130         /// </para>
131         /// </summary>
132         /// <param name="bitmap">包含人臉的圖片</param>
133         /// <param name="info">指定的人臉信息</param>
134         /// <returns></returns>
135         public FaceMarkPoint[] FaceMark(Bitmap bitmap, FaceInfo info)
136         {
137             byte[] bgr = ImageSet.Get24BGRFromBitmap(bitmap, out int width, out int height, out int channels);
138             int size;
139             if (Platform64)
140             { size = ViewFacePlus64.FaceMarkSize((int)MarkType); }
141             else
142             { size = ViewFacePlus32.FaceMarkSize((int)MarkType); }
143             double[] _pointX = new double[size];
144             double[] _pointY = new double[size];
145             bool val;
146             if (Platform64)
147             { val = ViewFacePlus64.FaceMark(bgr, width, height, channels, info.Location.X, info.Location.Y, info.Location.Width, info.Location.Height, _pointX, _pointY, (int)MarkType); }
148             else
149             { val = ViewFacePlus32.FaceMark(bgr, width, height, channels, info.Location.X, info.Location.Y, info.Location.Width, info.Location.Height, _pointX, _pointY, (int)MarkType); }
150             if (val)
151             {
152                 List<FaceMarkPoint> points = new List<FaceMarkPoint>();
153                 for (int i = 0; i < size; i++)
154                 { points.Add(new FaceMarkPoint() { X = _pointX[i], Y = _pointY[i] }); }
155                 return points.ToArray();
156             }
157             else
158             { throw new Exception("人臉關鍵點獲取失敗"); }
159         }
160
161         /// <summary>
162         /// 提取人臉特徵值。
163         /// <para>
164         /// 當 <see cref="FaceType"/> <see langword="="/> <see cref="FaceType.Normal"/> 時, 需要模型:<see langword="face_recognizer.csta"/><br/>
165         /// 當 <see cref="FaceType"/> <see langword="="/> <see cref="FaceType.Mask"/> 時, 需要模型:<see langword="face_recognizer_mask.csta"/><br/>
166         /// 當 <see cref="FaceType"/> <see langword="="/> <see cref="FaceType.Light"/> 時, 需要模型:<see langword="face_recognizer_light.csta"/><br/>
167         /// </para>
168         /// </summary>
169         /// <param name="bitmap"></param>
170         /// <param name="points"></param>
171         /// <returns></returns>
172         public float[] Extract(Bitmap bitmap, FaceMarkPoint[] points)
173         {
174             byte[] bgr = ImageSet.Get24BGRFromBitmap(bitmap, out int width, out int height, out int channels);
175             float[] features;
176             if (Platform64)
177             { features = new float[ViewFacePlus64.ExtractSize((int)FaceType)]; }
178             else
179             { features = new float[ViewFacePlus32.ExtractSize((int)FaceType)]; }
180
181             if (Platform64)
182             { ViewFacePlus64.Extract(bgr, width, height, channels, points, features, (int)FaceType); }
183             else
184             { ViewFacePlus32.Extract(bgr, width, height, channels, points, features, (int)FaceType); }
185             return features;
186         }
187
188         /// <summary>
189         /// 計算特徵值相似度。
190         /// <para>只能計算相同 <see cref="FaceType"/> 計算出的特徵值</para>
191         /// <para>
192         /// 當 <see cref="FaceType"/> <see langword="="/> <see cref="FaceType.Normal"/> 時, 需要模型:<see langword="face_recognizer.csta"/><br/>
193         /// 當 <see cref="FaceType"/> <see langword="="/> <see cref="FaceType.Mask"/> 時, 需要模型:<see langword="face_recognizer_mask.csta"/><br/>
194         /// 當 <see cref="FaceType"/> <see langword="="/> <see cref="FaceType.Light"/> 時, 需要模型:<see langword="face_recognizer_light.csta"/><br/>
195         /// </para>
196         /// </summary>
197         /// <exception cref="ArgumentException"/>
198         /// <exception cref="ArgumentNullException"/>
199         /// <param name="leftFeatures"></param>
200         /// <param name="rightFeatures"></param>
201         /// <returns></returns>
202         public float Similarity(float[] leftFeatures, float[] rightFeatures)
203         {
204             if (leftFeatures.Length == 0 || rightFeatures.Length == 0)
205                 throw new ArgumentNullException("參數不能為空", nameof(leftFeatures));
206             if (leftFeatures.Length != rightFeatures.Length)
207                 throw new ArgumentException("兩個參數長度不一致");
208
209
210             if (Platform64)
211             { return ViewFacePlus64.Similarity(leftFeatures, rightFeatures, (int)FaceType); }
212             else
213             { return ViewFacePlus32.Similarity(leftFeatures, rightFeatures, (int)FaceType); }
214         }
215
216         /// <summary>
217         /// 判斷相似度是否為同一個人。
218         /// </summary>
219         /// <param name="similarity">相似度</param>
220         /// <returns></returns>
221         public bool IsSelf(float similarity) => similarity > Face.Threshold[FaceType];
222
223         /// <summary>
224         /// 釋放資源
225         /// </summary>
226         ~ViewFace()
227         {
228             if (Platform64)
229             { ViewFacePlus64.ViewDispose(); }
230             else
231             { ViewFacePlus32.ViewDispose(); }
232         }
233     }
C# 面向對象層
五、也許…
- 此項目還未實現 SeetaFace6 中的許多特性,也許:
想起 GitHub 密碼,持續更新…
刪除代碼倉庫跑路…
在 GitHub 報告Bug…
向我 發送郵件
本站聲明:網站內容來源於博客園,如有侵權,請聯繫我們,我們將及時處理
【其他文章推薦】
※網頁設計一頭霧水該從何著手呢? 台北網頁設計公司幫您輕鬆架站!
※網頁設計公司推薦不同的風格,搶佔消費者視覺第一線
※想知道購買電動車哪裡補助最多?台中電動車補助資訊懶人包彙整
※南投搬家公司費用,距離,噸數怎麼算?達人教你簡易估價知識!
※教你寫出一流的銷售文案?
※超省錢租車方案

 特斯拉當家電動車 Model S 不再完美無缺,去年給予 Model S 最高評級的消費者評鑒雜誌《Consumer Reports》點出 Model S 仍許多有小缺陷待改進。 《Consumer Reports》指出,Model S 多在跑超過一萬哩後出現問題,例如里程數超過 1.2 萬哩後,中央控制螢幕在會有反白的狀況,使多項功能無法操作。此外,還有車頂會發出異常噪音,前置行李箱蓋會自動開啟等問題。 Model S 去年 5 月在《Consumer Reports》評鑑中拿下 99 分(滿分 100 分),創史上最高分,之後並在 11 月獲選為年度 10 大好車第一名。 對此,特斯拉執行長 Elon Musk 7 月 31 日曾坦承,較早一批出廠的 Model S 的確有些生產上的瑕疵,但目前出廠的新車多已作修正。 (圖片來源:)
 近來積極拓展車用電池事業的南韓化學巨擘 LG Chem Ltd. 宣佈,該公司已敲定價值數億美元的電動車電池供應合約,對象是德國汽車製造商福斯 (Volkswagen AG) 旗下的豪華車廠奧迪 (Audi AG)。 LG Chem 目前為通用汽車 (General Motors Co.)、雷諾 (Renault SA)、福特汽車 (Ford Motor Co.)、現代汽車 (Hyundai Motor Co.) 以及起亞汽車 (Kia Motors Corp.) 等 20 家業者的車用電池供應商。日前 LG Chem 才宣布將與通用汽車等汽車廠商攜手研發一款車用電池,其單次充電的里程數多達 200 英里,為市面上大多數電動車的兩倍以上。 20 日 LG Chem 又傳出好消息,該公司透過聲明表示,會為奧迪的次世代插電式混合動力電動車提供車用電池,總值多達數百億韓圜,而由於奧迪與母公司福斯一起共用了許多汽車平台,因此 LG Chem 認為未來應該能與福斯敲定更多類似的協議。 (圖片來源:)
 Saleen Automotive 在改車界享負盛名,無論任何車款經其改裝後,都會變得更快更有勁。最近他們看上了 Tesla 的 Model S 電動車,將其改裝為 Saleen FourSixteen,比起原版本擁有更高性能。 Saleen FourSixteen 採用與 Model S 相同的 416 匹引擎,不過其齒輪比率卻提高至 11.39:1,能大幅提高跑車的加速性能,因此由 0 加速至 100 公里只需 4 秒,比起 Model S 足足快了 1 秒。此外,Saleen FourSixteen 同時亦改善了冷卻系統及防傾桿,與及採用賽車用的車底盤及碳纖維剎車盤。 車廂內部也經過重新設計,將 Model S 原有的五座位改成全真皮的四座位,變成了一部真正的四座位超級電動跑車。該跑車目前已開放預訂,但售價並不便宜,約 15 萬 2 千美元。 (圖片來源:)